Let’s be real for a second. The holiday table is a glorious, decadent battlefield. There’s the glistening ham, the buttery mashed potatoes, the rolls, the pies… it’s a carb-and-protein paradise. And then there’s the Veggie Tray. Too often, it’s the sad, obligatory guest at the party—a lonely bowl of celery sticks and baby carrots plopped next to the ranch, looking like it lost the will to live somewhere between the grocery store and your cousin’s third helping of stuffing.
But what if I told you it doesn’t have to be that way? What if your veggie platter could be the star of the festive spread? The thing everyone oohs and ahhs over before they even glance at the turkey? The Instagram hero that actually gets eaten?
This year, we’re banishing the sad veggie platter to the past. We’re embracing color, creativity, and a serious dose of fun. I’m talking about turning crisp, fresh vegetables into edible Christmas ornaments, whimsical characters, and stunning centerpieces. It’s easier than you think, it’s a game-changer for feeding a crowd, and it’s the secret weapon for getting everyone (yes, even the kids) to eat their veggies without a single complaint. Ready to become a holiday veggie artist? Let’s get into it.
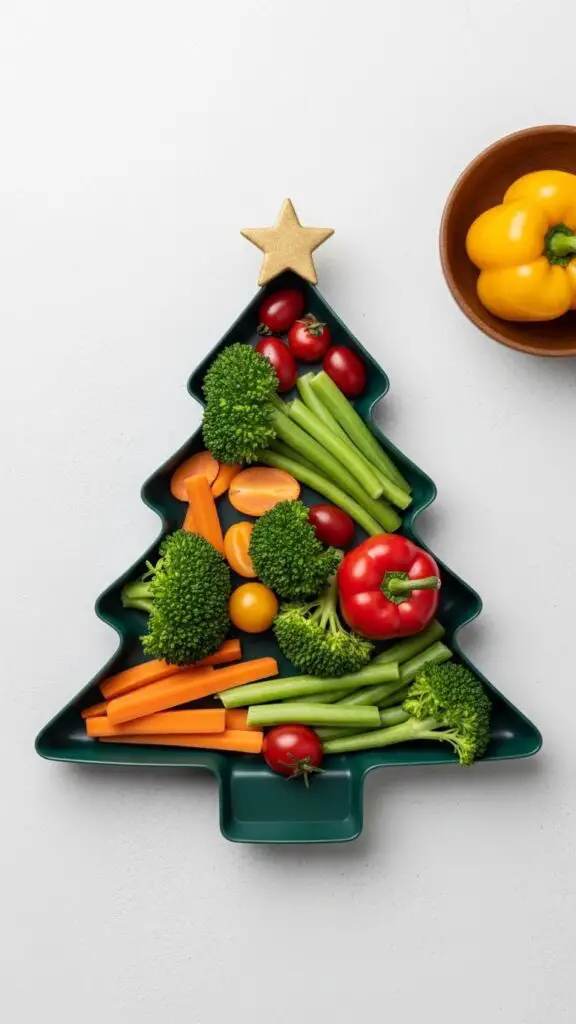
1. The Classic Christmas Tree Veggie Tray
Short Hook / Why It’s Awesome → It’s iconic, it’s recognizable, and it makes arranging veggies literally a no-brainer. This is your foolproof, always-impressive starting point.
Ingredients
- 1 large head of broccoli, cut into small florets (your lush tree “needles”)
- 1 yellow bell pepper, cut into strips (garland)
- 1 red bell pepper, cut into small star shapes (for the top!) and small squares (ornaments)
- Cherry tomatoes (ornaments)
- Yellow cherry tomatoes or small yellow pepper pieces (ornaments)
- A block of cheddar or white cheese, cut into small cubes (ornaments)
- A star-shaped cookie cutter (for the pepper star)
- A round cucumber or a bowl of dip for the “trunk”
Step-by-Step Instructions
- On a large rectangular platter or cutting board, arrange the broccoli florets into a large triangle shape, starting with a wide base and building up to a point at the top. Pack them tightly!
- Create a “trunk” at the bottom with a few rounds of cucumber or simply place your bowl of ranch or humus dip there.
- Drape the yellow pepper strips in a zig-zag or swooping pattern across the broccoli to look like garland.
- Get decorating! Tuck in the cherry tomatoes, cheese cubes, and red pepper squares randomly throughout the tree like ornaments.
- Crown your masterpiece with the red pepper star right at the tip-top.
Why You’ll Love It
It’s virtually impossible to mess up, and the “wow” factor is instant. I love using a creamy dill dip as the trunk—it complements the broccoli perfectly. Pro tip: Blanch your broccoli florets in boiling water for 30 seconds, then shock them in ice water. It brightens the color to a vibrant green and makes them slightly more tender.
2. The Cheeky Santa Claus Bell Pepper
Short Hook / Why It’s Awesome → Adorable, portion-controlled, and a fantastic way to use up leftover ingredients. These little guys have so much personality!

Ingredients
- 3 large red bell peppers (for Santa’s hat and body)
- 1 large white onion or daikon radish (for the fluffy hat trim and beard)
- Black olives (for eyes)
- 1 small carrot (for the nose)
- Cream cheese or hummus (as “glue”)
- Fresh chives or scallion greens (optional, for details)
Step-by-Step Instructions
- Carefully slice the tops off the red bell peppers to create the main “body.” You want a stable base, so trim the bottom if needed.
- Cut the remaining red pepper into wide strips for the hat. Slice the white onion into thin rings—you’ll use one for the hat’s fluffy brim.
- Fill the pepper body with your favorite veggie dip (a chive cream cheese is fantastic here).
- Assemble the face on the front of the pepper: use cream cheese to stick on olive slices for eyes and a small round carrot piece for the nose.
- For the beard, take a thin slice of onion and shape it into a fluffy semicircle beneath the eyes/nose.
- Place the red pepper strip above as the hat, and top it with a small ball of the onion for the pompom. Secure with toothpicks if needed.
Why You’ll Love It
These are individual servings, so there’s no double-dipping drama. They’re also a fantastic activity if you have helpers in the kitchen—let the kids design the faces! I once used a spicy pepper jack dip inside, and let’s just say Santa had a little extra kick that year. 🙂
3. The Rustic Holiday Wreath
Short Hook / Why It’s Awesome → Elegant, round, and perfect for placing right in the center of the table. It feels fancy but requires zero advanced artistic skills.

Ingredients
- 1 large bunch of fresh broccoli florets
- 1 large bunch of cauliflower florets
- 1 container of cherry or grape tomatoes
- 1 yellow bell pepper, cut into thin strips
- Fresh rosemary sprigs
- A round serving platter or a flat plate
- A small bowl for dip (like a creamy garlic or pesto yogurt)
Step-by-Step Instructions
- Place your small bowl of dip upside-down in the center of your round platter. This is your guide.
- Around the bowl, create a thick ring of alternating broccoli and cauliflower florets, all pointing outward. Pack them tightly together.
- Create a “bow” at the bottom or top of your wreath by arranging the yellow pepper strips accordingly.
- Tuck small sprigs of rosemary in between the florets for that authentic, fragrant wreath look.
- Fill in any gaps and add pops of red by strategically placing the cherry tomatoes around the ring.
Why You’ll Love It
The rosemary isn’t just for looks—it makes the whole platter smell incredible. This one always feels a bit more “grown-up” and rustic-chic. FYI, blanching the cauliflower and broccoli here is a game-changer for color and texture.
4. The Playful Rudolph the Red-Nosed Reindeer
Short Hook / Why It’s Awesome → Unleash your inner kid! This design is pure joy and is guaranteed to be the most photographed thing on your table (sorry, pie).

Ingredients
- 1 large oval platter (for the face shape)
- Sliced brown mushrooms (for the antlers and face)
- Purple cauliflower or radicchio (for the festive collar)
- 2 black olives (eyes)
- 1 large, perfect cherry tomato (that famous nose!)
- Leafy greens like kale or butter lettuce (for a background base)
- Pretzel sticks or bagel chips (for antler details, optional)
Step-by-Step Instructions
- Lay down a bed of leafy greens on your platter as a base.
- Using slices of brown mushroom (portobello work great), arrange two large, branching antler shapes at the top of the platter.
- Create Rudolph’s sweet face in the center using more mushroom slices to form a gentle oval or circle.
- Give him life! Add olive slices for eyes and that glorious, shiny cherry tomato for his nose.
- Frame his face with a “collar” of vibrant purple cauliflower florets or radicchio leaves. It adds a fantastic color contrast.
Why You’ll Love It
It’s whimsical, nostalgic, and a fantastic use for mushrooms, which don’t always get a veggie tray invite. IMO, serving this with a warm, gravy-like mushroom dip on the side ties the whole theme together deliciously.
5. The Minimalist Poinsettia Flower Platter
Short Hook / Why It’s Awesome → Stunning, sophisticated, and shockingly simple. This proves that sometimes, less truly is more.
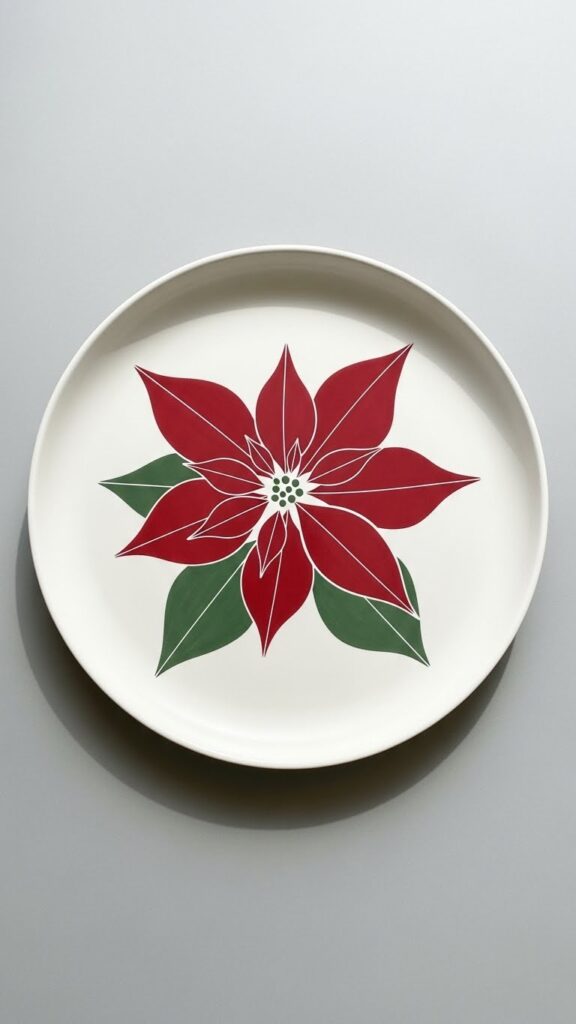
Ingredients
- 3-4 red bell peppers
- 1 bunch of fresh spinach or kale
- 1 small block of cream cheese or a round of brie
- Chives or the white parts of green onions
- A sharp knife
Step-by-Step Instructions
- Slice your red bell peppers lengthwise, removing all seeds and ribs. You want flat, red “petal” shapes.
- On a round plate, create a bed of dark green spinach or kale leaves—these are your poinsettia leaves.
- Place your round of brie or a smoothed mound of cream cheese in the center. This is the flower’s center.
- Arrange the red pepper slices around the center cheese in two overlapping layers to mimic poinsettia petals.
- For the final touch, cut thin strips of chive or green onion and place them in the center of the cheese to look like the tiny yellow flowers of a real poinsettia.
Why You’ll Love It
It’s almost too pretty to eat. Almost. The combination of the sweet pepper, creamy cheese, and crisp greens is a flawless flavor and texture trio. It’s elegant enough for a cocktail party but easy enough for a weeknight appetizer.
(We’ll continue with the next five ideas in the same engaging format.)
6. The “Frosty the Snowman” Family
Short Hook / Why It’s Awesome → Build-a-snowman, but delicious! A fantastic interactive platter, especially if you have little (or big!) kids helping.

Ingredients
- 1 large head of cauliflower, broken into large florets (snowman heads)
- 1 English cucumber, sliced (for hats and details)
- Black sesame seeds or whole peppercorns (for eyes and buttons)
- Small carrot sticks (for noses)
- Red bell pepper strips (for scarves)
- Broccoli florets or parsley (for trees/bushes, optional background)
Step-by-Step Instructions
- Arrange your cauliflower florets in little stacks of two or three to form snowman bodies on a platter.
- Create faces using sesame seeds for eyes and tiny carrot pieces for noses.
- Cut thin strips of cucumber to make top hats and drape red pepper strips around the “necks” as scarves.
- Use more sesame seeds or peppercorns to make a line of buttons down their fronts.
- Create a wintry scene around them with broccoli “trees” and maybe a light dusting of salt or grated cheese for “snow.”
Why You’ll Love It
It’s interactive and customizable. Let your guests build their own snowman bite! The cauliflower is a brilliant, mild canvas for stronger dips like a sharp blue cheese or a zesty salsa.
7. The Vibrant Christmas Lights Board
Short Hook / Why It’s Awesome → Colorful, chaotic in the best way, and a brilliant excuse to use every brightly-colored veggie you can find.

Ingredients
- Bell peppers (red, yellow, orange)
- Cherry tomatoes (red and yellow)
- Steamed golden beets, cubed
- Steamed purple potatoes, cubed
- Blanched green beans
- Black olives, sliced
- A long, rectangular board
- Scallions or chives (for the “wires”)
Step-by-Step Instructions
- Cut all your colorful veggies (peppers, beets, potatoes) into rough, bite-sized chunks. Think of them as little “bulbs.”
- Arrange them in a chaotic, happy line meandering down your board, mixing the colors intentionally.
- Take long strands of scallion or chive and lay them through the veggies, connecting them like a string of lights.
- Use the sliced black olives as the “socket” ends on each veggie bulb, placing a small piece at the top or bottom of each chunk.
- Fill in the board’s empty spaces with the green beans and any other extras to keep it looking abundant.
Why You’ll Love It
This is the ultimate “clean out the fridge” masterpiece. Any roasted or raw colorful veg works. The key is the color contrast. It’s a vibrant, energetic platter that feels modern and fun.
8. The Elegant Holiday Swan
Short Hook / Why It’s Awesome → The showstopper. This one requires a steady hand and 10 minutes of focus, but the gasps you’ll get are 100% worth it.

Ingredients
- 1 large, beautiful, curved white daikon radish or a large parsnip
- 1 black olive
- A sharp paring knife
- Leafy greens (for the “water”)
- Other crudités (like carrots, snap peas) to fill out the platter
Step-by-Step Instructions
- Cut a thick, angled piece from your daikon radish. This will be the swan’s body.
- Carefully, using your paring knife, slice a thin, long piece from another section of the radish to act as the gracefully curved neck. A YouTube tutorial is your best friend here for the carving details!
- Cut a small notch in the top of the body and insert the neck piece.
- For the head, carve a small point at the end of the neck. Press a single black olive slice into the side for an eye.
- Place your swan on a “lake” of leafy greens and surround it with other dipping veggies.
Why You’ll Love It
It’s pure artistry. Even if your first attempt is a bit… abstract… it’s still impressive. Serve it with a elegant lemony dill yogurt dip. Trust me, your mother-in-law will be talking about this one until next Christmas.
9. The Quick & Easy Christmas Stocking
Short Hook / Why It’s Awesome → Cute, thematic, and assembled in under 5 minutes. This is your last-minute, “oh-crap-I-need-an-appetizer” lifesaver.

Ingredients
- 1 large red bell pepper
- Your favorite pre-cut veggie sticks (carrots, celery, cucumbers)
- A white cheese (like mozzarella pearls or feta crumbles)
- A small bunch of chives or a scallion
- Toothpicks
Step-by-Step Instructions
- Carefully cut your red bell pepper into the shape of a Christmas stocking. (Think: a large “L” shape with a curved heel and toe).
- Fill the pepper “stocking” with a handful of your fresh veggie sticks.
- Use the white cheese to create a “cuff” at the top of the stocking.
- Tie a small piece of chive into a bow and attach it to the corner with a toothpick.
- Place it on a small plate with extra dip on the side.
Why You’ll Love It
It’s portion-friendly, adorable, and the pepper itself becomes the edible bowl. So smart, so simple. I like to fill mine with asparagus spears and call it a gourmet touch. 😉
10. The North Pole Signpost Snack Station
Short Hook / Why It’s Awesome → Interactive, practical, and clever. This one organizes your dips and dippers in the most thematic way possible.

Ingredients
- 4-5 small bowls or ramekins (for dips)
- Wooden skewers or pretzel rods
- Small paper tags & string
- A variety of dip options (e.g., “Santa’s Ranch,” “Elf’s Edamame,” “Reindeer Roasted Red Pepper”)
- An assortment of veggie sticks, breadsticks, and chips for dipping
- A large board or section of the table
Step-by-Step Instructions
- Prepare your dips and place each in a small bowl.
- Write fun, North Pole-themed names on your paper tags (“Mrs. Claus’s Artichoke,” “Workshop Hummus,” etc.).
- Tie the tags to the wooden skewers or pretzel rods.
- Arrange your bowls of dip on a board, and plant the corresponding signpost (skewer) in each one.
- Pile the different “dippers” (veggies, breads, crackers) around the bowls, encouraging guests to travel from the “North Pole” to “Reindeer Ranch.”
Why You’ll Love It
It solves the eternal party question: “What’s in this dip?!” It’s functional, fun, and takes the guesswork out of grazing. Plus, you can get really silly with the dip names, which is half the fun.
Wrap It Up With a Bow (of Dip)
So there you have it—ten ways to make your Christmas veggie tray the unexpected hero of your holiday feast. The best part? None of this requires a culinary degree or hours of painstaking work. It just requires a tiny shift from “obligation” to “opportunity.” An opportunity to play with your food, to splash a little more color on the table, and to create something that genuinely makes people smile before they even take a bite.
This year, skip the sad, last-minute veggie dump. Pick one or two of these ideas that speak to you—whether it’s the elegance of the Poinsettia or the pure joy of the Rudolph platter. Grab a vibrant array of the freshest produce you can find, put on some holiday tunes, and have fun with it. Because the most memorable holiday dishes aren’t always the most complicated ones. Often, they’re the ones made with a little bit of creativity and a whole lot of cheer.
Now, if you’ll excuse me, I have to go practice my radish swan carving. Wish me luck
Printable Recipe Card
Want just the essential recipe details without scrolling through the article? Get our printable recipe card with just the ingredients and instructions.