Honestly, is there anything better than a freezing cold popsicle on a scorching summer afternoon? It’s the ultimate cooldown. But then you look at the ingredients label of those store-bought ones…yikes. It’s basically colored sugar water. No thanks. We want the refreshment without the sugar crash, right?
That’s where making your own popsicles comes in. And I’m not talking about those sad, watery ice cubes we tried to make as kids. I mean gourmet-level, flavor-packed treats that happen to be super healthy. These seven recipes use nothing but the natural sweetness of whole fruits (and maybe a little coconut milk for creaminess). They are ridiculously easy, totally guilt-free, and I promise you won’t miss the added sugar. Grab your molds, let’s get freezing!
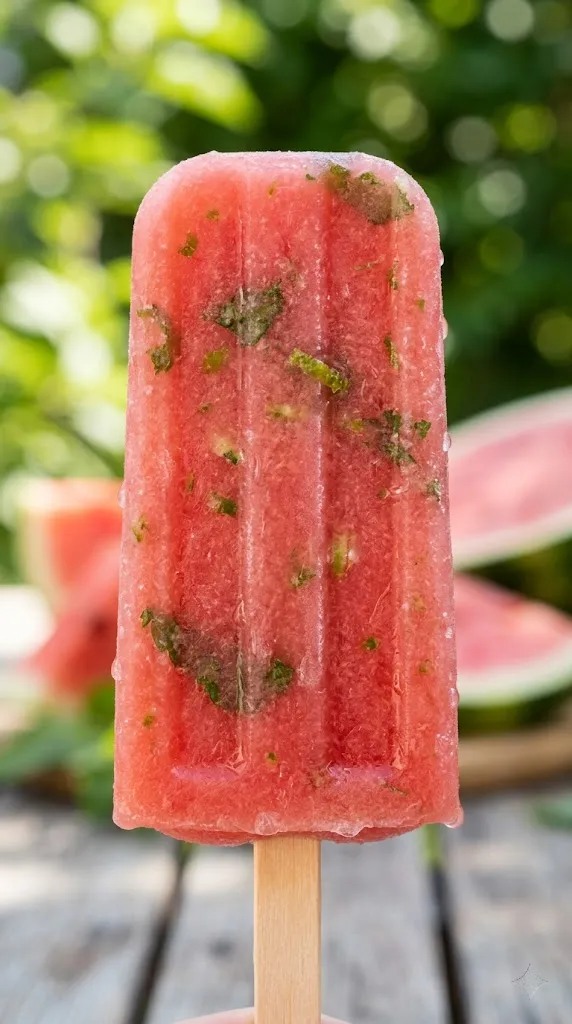
1. The Ultimate Summer Hydrator: Watermelon Lime Mint
This is hands down the most refreshing thing you will taste all summer. It’s light, subtly sweet, and incredibly cooling. Think of it as a fancy spa water, but frozen. The mint just pops against the watermelon. You absolutely need this one in your freezer.
Ingredients
- 4 cups fresh watermelon, cubed and seedless (Pro tip: use very ripe watermelon for best flavor!)
- Juice of 2 limes
- 1 tablespoon fresh mint leaves, finely chopped
Step-by-Step Instructions
- Throw all that gorgeous watermelon and the fresh lime juice into your blender.
- Blend on high until it is completely smooth and liquefied.
- Add the finely chopped mint leaves and pulse just once or twice. You want the tiny mint speckles visual, not mint-flavored smoothie.
- Pour the mixture into your popsicle molds, insert sticks, and freeze for at least 6 hours, or until solid.
Why You’ll Love It
This popsicle is pure hydration. It’s barely sweet, allowing the natural flavor of the watermelon to shine, while the lime and mint keep it bright and zesty. Seriously, try this after a workout or a long day in the sun; you’ll thank me.
2. Tropical Cream Dream: Mango Coconut Swirl
This popsicle tastes like a vacation. It combines super sweet, vibrant mango with creamy coconut milk for a treat that feels incredibly indulgent, but it’s just pure fruit and coconut goodness. You get that amazing texture contrast when you don’t fully mix them.
Ingredients
- 2 cups ripe mango, cubed (fresh is best, but frozen works)
- 1 cup full-fat coconut milk (the canned kind, well-shaken)
- Optional: A squeeze of lime juice in the mango puree.

Step-by-Step Instructions
- First, puree the mango cubes in your blender until perfectly smooth. (Add that lime squeeze if you want a little tang). Set this aside in a bowl.
- Next, pour the creamy coconut milk into a separate bowl.
- Here’s the swirl part: To create the beautiful swirl, alternate spoonfuls of the mango puree and the coconut milk into each popsicle mold. Don’t mix them! Just let the layers gently interact.
- Once filled, gently place a popsicle stick into each mold. Freeze for at least 6–8 hours.
Why You’ll Love It
It’s creamy, it’s tropical, and it has zero added sugar. The combination of dense mango and luscious coconut is phenomenal. Who needs ice cream when you can have this healthy tropical escape on a stick? This is my absolute favorite when I need a sweet treat that feels substantial.
3. The Classic Antioxidant: Very Berry Lemonade
This is the healthy, frozen version of everyone’s favorite summer drink. It’s tart, tangy, and absolutely packed with antioxidant-rich berries. We use a base of fresh-squeezed lemonade, but we define how sweet it is by using only the natural fruit.
Ingredients
- 1 cup fresh blueberries
- 1 cup fresh raspberries
- 1/2 cup fresh strawberries, hulled and sliced
- 1 cup fresh-squeezed lemon juice (from about 4–6 lemons)
- 1 cup water (to dilute the lemon juice)
- Optional: 1 tablespoon of date paste or a stevia drop if your lemons are extremely tart (but try it plain first!)

Step-by-Step Instructions
- In a blender, combine the lemon juice, water, and the blueberries. Puree this mixture until smooth. (This gives the entire popsicle that gorgeous purple hue).
- Place a few whole raspberries and sliced strawberries directly into each popsicle mold. This looks beautiful and provides bursts of texture.
- Pour the berry-lemonade mixture from the blender over the whole fruits in the molds.
- Insert the popsicle sticks and freeze for 6–8 hours.
Why You’ll Love It
This popsicle is incredibly balanced. You get the familiar tang of lemonade, sweetened naturally by the blueberries blended into the base, plus the fun of whole frozen berries. It’s the ultimate ‘adult lemonade’ (but totally kid-friendly!). The visual with the whole berries trapped inside is stunning—Pinterest, eat your heart out.
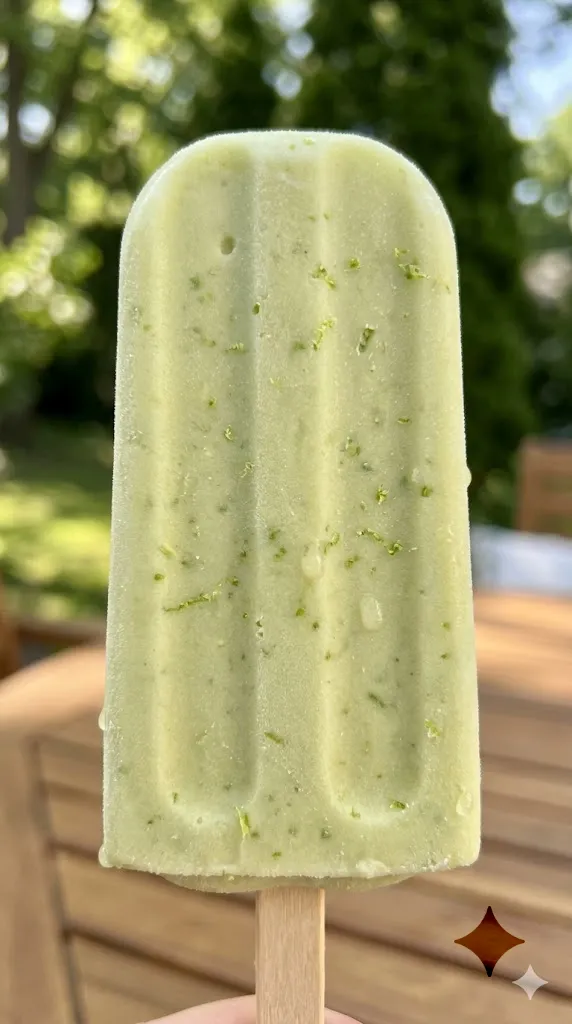
4. Creamy & Dreamy: Avocado Lime ‘Pie’
Okay, stay with me on this one. Yes, avocado. This is my secret weapon for the absolute creamiest dairy-free popsicle texture, IMO. It doesn’t taste like guacamole; it tastes like a frozen key lime pie. It’s dense, velvety, and shockingly delicious.
Ingredients
- 1 large, very ripe avocado
- Juice of 3 limes (about 1/3 cup)
- 1 teaspoon lime zest
- 3/4 cup unsweetened almond milk (or coconut milk for extra richness)
- Optional: 1-2 tablespoons date paste or a packet of stevia (Avocado isn’t naturally sweet, so you might need a touch of help here, but keep it natural).
Step-by-Step Instructions
- Cut the avocado in half, remove the pit, and scoop the flesh into your blender.
- Add the lime juice, lime zest, almond milk, and your natural sweetener of choice (if using).
- Blend on high until the mixture is perfectly smooth, velvety, and a beautiful pale green. It should be thick, like pudding.
- Pour the mixture into your popsicle molds. Give them a good tap on the counter to remove air bubbles. Insert sticks and freeze for at least 8 hours (this one takes longer to set due to the fat).
Why You’ll Love It
The texture of this popsicle is unreal. It’s so creamy it feels like you’re eating gelato. The avocado provides healthy fats, and the lime makes it bright and refreshing. This is the recipe that surprises everyone—my skeptical husband now requests these. Try it; you’ll be obsessed.
5. Pure Peach Bliss: Spiced Peach Ginger
This popsicle is like a frozen slice of late-summer peach pie. We use extremely ripe, juicy peaches and enhance their flavor with warmth from ginger and cinnamon. It’s comforting, sophisticated, and packed with that iconic summer fruit flavor.
Ingredients
- 3 cups very ripe peaches, pitted and roughly chopped (keep the skins on for color and fiber!)
- 1-inch piece of fresh ginger root, peeled and grated (adjust to your taste)
- 1/2 teaspoon ground cinnamon
- 1/2 cup water or unsweetened almond milk

Step-by-Step Instructions
- Place the chopped peaches (with skins!), the grated fresh ginger, and the cinnamon into your blender.
- Add the water or almond milk (start with 1/2 cup) and blend until perfectly smooth. You want a thick puree.
- Taste the mixture. If your peaches aren’t super sweet, you could add 1 tablespoon of date paste, but I find that ripe summer peaches are plenty sweet on their own.
- Pour the spiced peach mixture into your popsicle molds, insert sticks, and freeze for 6–8 hours.
Why You’ll Love It
The peach flavor is front and center, but the ginger gives it this subtle, warm, zesty kick that is so unexpected and sophisticated. It’s not just sweet; it has complexity. And using the whole peach (skin included) makes it healthier and gives it that gorgeous deep orange color. It’s pure summer bliss on a stick.
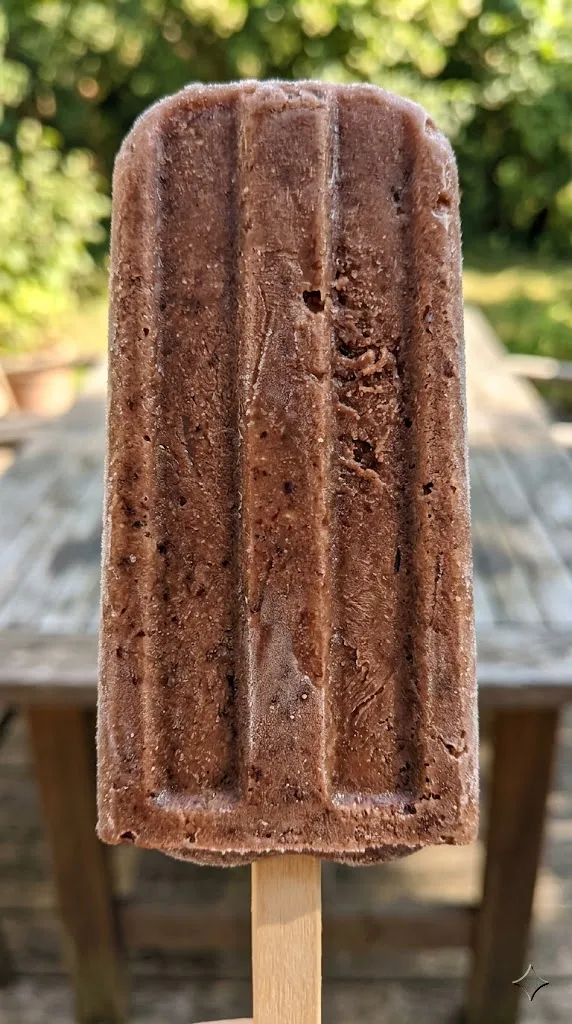
6. Healthy Fudge on a Stick: Hidden Veggie Fudgsicle
Okay, you knew this one was coming, right? We have to do chocolate! But this isn’t your average fudge bar; this one is packed with secret veggies. Yes, vegetables. This popsicle is creamy, rich, and incredibly chocolatey, but also happens to contain natural sweetness from beets. Don’t knock it ’til you try it!
Ingredients
- 1 cup roasted beets, cooked and peeled (buy pre-roasted beets to save time, seriously)
- 3/4 cup unsweetened cocoa powder (the good kind, it makes a difference!)
- 1 cup full-fat coconut milk (from the can, well-shaken)
- 1 teaspoon vanilla extract
- Optional: 2–3 tablespoons date paste or a stevia drop (Cocoa powder is bitter, so you will need a natural sweetener here to make it palatable).
Step-by-Step Instructions
- First, ensure your roasted beets are completely cool.
- Add the cooled beets, the cocoa powder, the coconut milk, the vanilla extract, and your natural sweetener of choice (if using) to your blender.
- Blend on high until the mixture is completely smooth, velvety, and a beautiful, deep, fudge-like brown. Make sure there are no beet chunks!
- Pour the rich chocolate mixture into your popsicle molds. Give them a few good taps to remove any air bubbles. Insert sticks and freeze for 8–10 hours (this one is dense and takes a while to solidify).
Why You’ll Love It
This is how you do chocolate for breakfast. It’s creamy and rich (thanks, coconut milk!) with a deep, complex cocoa flavor, while the roasted beets provide that secret earthy sweetness and unparalleled density. It’s shockingly nutritious and tastes like decadent fudge. It’s my go-to for kids because they literally never know about the veggies. I call that a parenting win!
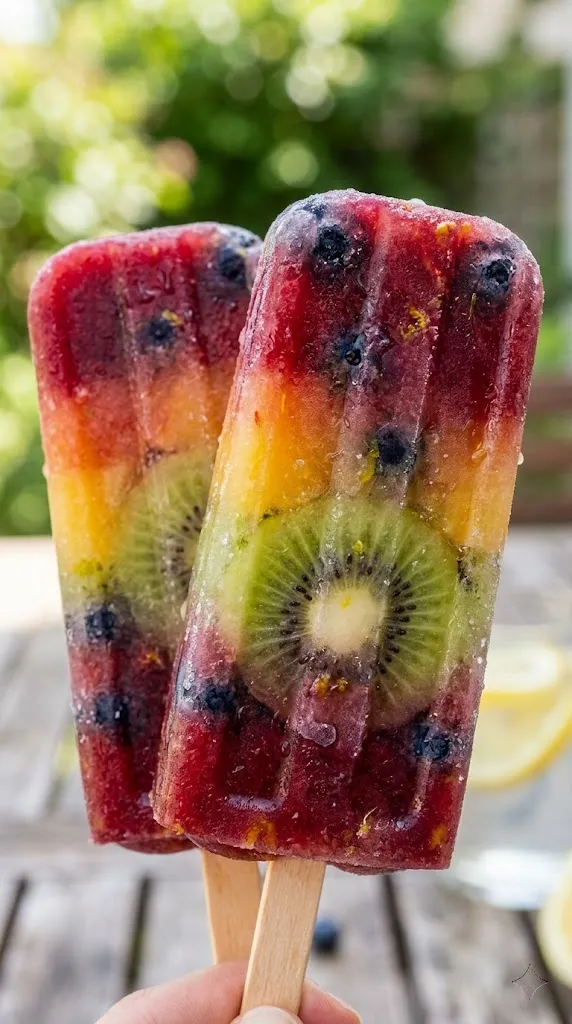
7. The Layered Masterpiece: Rainbow Fruit Ice
This is the quintessential ‘Pinterest’ popsicle. It looks incredibly complicated with all those vibrant, clean layers, but I’m here to tell you that it’s actually incredibly easy. This popsicle is just pure fruit juice and puree, layered and frozen, creating a stunning visual that’s almost too pretty to eat. Almost.
Ingredients
- 1 cup fresh strawberries, pureed (RED layer)
- 1 cup fresh mango, pureed (ORANGE layer)
- 1 cup fresh pineapple, pureed (YELLOW layer)
- 1 cup fresh kiwi, pureed (GREEN layer)
- 1 cup fresh blueberries, pureed (PURPLE layer)
- A splash of water or coconut milk to thin out thicker purees (like mango) if needed.
Step-by-Step Instructions
- Puree each type of fruit separately in your blender until perfectly smooth. This is key to getting clean, distinct layers. Rinse the blender between each color.
- Now, the layering: Pour the kiwi (GREEN) puree into the bottom of each popsicle mold (about 1/5 of the way up). Place the molds in the freezer for 30 minutes to let this first layer semi-freeze.
- Remove from the freezer and pour the next layer (the pineapple YELLOW). Carefully place it directly on top of the green layer. Crucially, do not mix them! Repeat the 30-minute freeze.
- Repeat this process, layering each remaining fruit (mango -> strawberry -> blueberry), freezing for 30 minutes in between each and every color.
- After the very last color is added (the blueberry purple), insert the popsicle sticks and freeze for a final 6–8 hours.
Why You’ll Love It
This is the ultimate healthy summer treat. It looks absolutely gorgeous and is made from 100% whole fruit. Every bite provides a different flavor, making it a true taste of the rainbow. It takes a little patience to freeze between layers, but the final result is SO worth the effort. Get ready for all the compliments.
Related Recipes:
- 9 Fruity Summer Popsicle Recipes with Fresh Berries
- 7 Easy Summer Popsicle Recipes for Kids
- 10 Healthy Summer Soup Recipes (Hot or Cold)
Summer Just Got a Whole Lot Cleaner (and Tastier!)
See? Who said summer treats had to be packed with refined sugar to be good? These seven recipes prove that nature provides all the sweetness we need. We’ve got hydrating watermelon, creamy tropical coconut, a sophisticated spiced peach, and yes, even hidden veggies.
Making your own popsicles is a total game-changer. They’re healthier, cheaper, and you can customize them endlessly. Plus, there’s just something so satisfying about pulling a homemade treat out of the freezer on a scorching hot day. They are simple, they use just a handful of fresh ingredients, and I can promise you—from one foodie to another—they are absolutely delicious.
So, ditch the sugar crash and embrace the freeze. You deserve a cooldown that actually makes you feel good. Now, if you’ll excuse me, I have a watermelon-lime popsicle calling my name. Happy summer, and happy freezing!
Printable Recipe Card
Want just the essential recipe details without scrolling through the article? Get our printable recipe card with just the ingredients and instructions.