Hey, you! Yeah, the one scrolling through recipes while pretending not to eye that bag of chips. What if I told you there’s a dessert that screams fall vibes, packs a serious crunch, and won’t have you chained to the stove for hours? Enter this apple crisp with granola topping—it’s like your grandma’s classic got a trendy upgrade. Let’s dive in before your stomach starts rumbling louder than mine.
Why This Recipe is Awesome
Okay, real talk: apple crisp is already a winner because it’s basically pie without the fuss of crust-rolling drama. But throwing granola into the topping? Genius move for that extra crunch that makes every bite feel like a party in your mouth. It’s idiot-proof—trust me, I’ve burned water before and still nailed this. Plus, it’s got that warm, cinnamon-y hug that hits right when the weather turns chilly. Who needs therapy when you’ve got a bubbling dish of apples that smells like heaven? And bonus: it’s customizable AF, so you can tweak it without the whole thing falling apart. In a world of complicated bakes, this one’s your chill bestie.
Ingredients You’ll Need
Gather ’round, folks—here’s what you’ll toss together. I kept portions for about 6-8 servings, because sharing is caring (or not, no judgment if you hoard it). Pro tip: use fresh apples for max juiciness; those sad, wrinkly ones in your fridge? Nah, give ’em a pass.
- Apples: 6 medium-sized ones, like Granny Smith or Honeycrisp for that tart-sweet balance. Peel ’em if you’re fancy, but I’m too lazy—skins add fiber, right?
- Granola: 1 ½ cups of your favorite store-bought or homemade. Go for one with nuts and oats for ultimate crunch; avoid the super sugary kinds unless you’re aiming for candy status.
- Butter: ½ cup, unsalted and softened. Or salted if you like living on the edge—adds a sneaky savory twist.
- Brown sugar: ¾ cup for the filling and topping combo. It’s what makes everything gooey and caramel-like; white sugar? Boring substitute.
- Flour: ½ cup all-purpose. Keeps things from turning into apple soup—essential, but don’t overthink it.
- Cinnamon: 1 tablespoon ground. The star spice that makes your kitchen smell like a cozy cabin; nutmeg fans, add a pinch if you’re feeling wild.
- Lemon juice: From 1 lemon, about 2 tablespoons. Cuts the sweetness so it’s not cloying—think of it as the recipe’s reality check.
- Oats: ½ cup quick or rolled, to bulk up the topping if your granola’s skimpy on them.
- Salt: Just a pinch. Because even desserts need a little attitude.
That’s it—nothing exotic that’ll send you on a wild goose chase at the store. Bold reminder: measure with your heart, but not too much, or it’ll be a mess.
Step-by-Step Instructions
Alright, preheat your oven to 375°F (190°C) while you prep—don’t skip this, or you’ll regret it. Grab an 8×8-inch baking dish and grease it lightly with butter or spray. Let’s get crunchy!
- Slice those apples. Core and cut them into thin wedges or chunks—about ¼-inch thick so they cook evenly. Toss them in a big bowl with ¼ cup brown sugar, the flour, cinnamon, lemon juice, and that pinch of salt. Mix it up until the apples are coated like they’re ready for a photoshoot. Spread this fruity goodness evenly in your baking dish.
- Whip up the topping. In another bowl, melt half the butter (¼ cup) and mix it with the granola, oats, remaining ½ cup brown sugar, and the rest of the butter cut into cubes. Use your hands or a fork to combine until it’s clumpy and crumbly—think streusel on steroids. If it looks too dry, add a splash of melted butter; too wet? Toss in more oats.
- Assemble and bake. Sprinkle the granola mixture generously over the apples—don’t skimp, we want crunch city here. Pop it in the oven for 35-40 minutes. You’re aiming for bubbly edges and a golden-brown top that smells irresistible. Check at 30 minutes to avoid over-browning; every oven’s got its quirks.
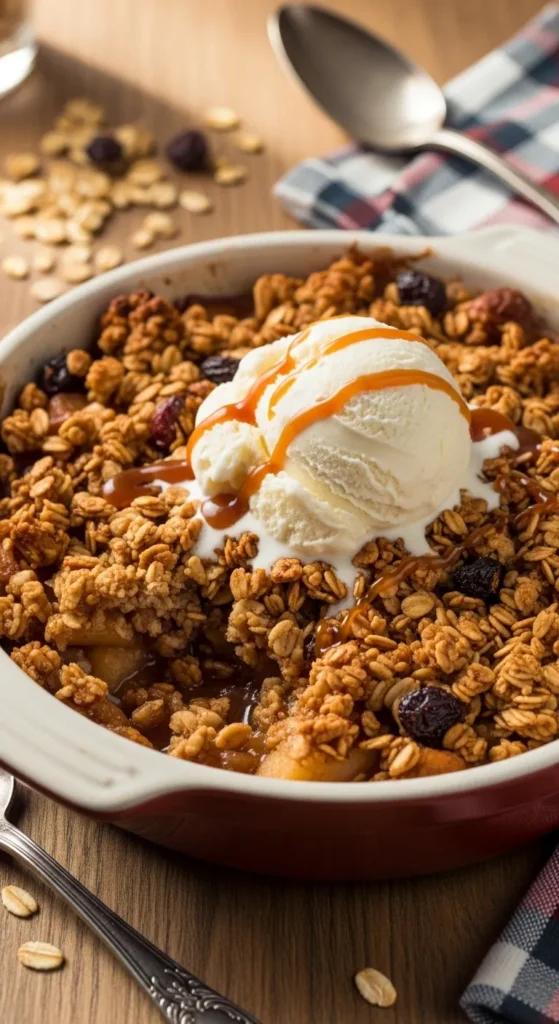
- Cool and serve. Let it sit for 10-15 minutes post-bake so it doesn’t burn your tongue (been there). Scoop into bowls, top with vanilla ice cream or whipped cream if you’re feeling extra, and dig in. Pro tip: warm it up later in the microwave for that fresh-baked illusion.
See? Four steps and you’re done. No fancy equipment needed—just your oven and some elbow grease.
Common Mistakes to Avoid
We’ve all been there, turning a simple recipe into a kitchen catastrophe. Here’s the lowdown on what not to do, served with a side of sarcasm.
- Skipping the peel on apples? Fine if you like extra texture, but if they’re tough, you’ll end up chewing forever. Peel for smoothness, lazy bones.
- Overloading on sugar: Thinking more brown sugar equals better? Nope, you’ll get a syrupy mess instead of crisp. Measure, people—it’s not rocket science.
- Not preheating the oven: Rookie move that leads to soggy bottoms. Give it time to heat up, or suffer the consequences.
- Using mushy apples: Pick firm ones; softies turn to applesauce mid-bake. Ain’t nobody got time for that texture fail.
- Forgetting to mix the topping well: Clumps are good, but uneven butter means dry spots. Get in there and mash it properly—your arms won’t fall off.
Avoid these, and you’ll look like a pro. Key tip: taste the filling mix before baking; adjust spices if needed.
Alternatives & Substitutions
Life happens—maybe you’re out of something or going vegan. No sweat; this recipe’s flexible like yoga pants. IMO, experimenting keeps things fun.
- Gluten-free? Swap regular flour for a 1:1 gluten-free blend, and use certified GF granola and oats. Tastes just as fab, promise.
- Vegan twist: Ditch the butter for coconut oil or vegan margarine. It adds a tropical vibe that pairs surprisingly well with apples.
- Nut-free granola: If allergies are in play, grab a seed-based one or make your own with just oats, seeds, and honey. Safety first, crunch second.
- Spice it up: Not a cinnamon fan? Try pumpkin pie spice or cardamom for an exotic kick. Or add chopped nuts like pecans to the topping for more texture—walnuts work too, but they’re a bit bitter.
- Fruit swaps: Mix in pears or berries with the apples for variety. Just adjust sugar if your add-ins are sweeter; nobody wants a toothache.
Feel free to play around—worst case, it’s still edible. What are you waiting for? Tweak away!
FAQs
Can I make this ahead of time?
Totally! Prep the filling and topping separately, store in the fridge overnight, then assemble and bake fresh. It’s like meal-prep but for dessert—who knew laziness could be so strategic?
What if I don’t have granola on hand?
No worries—sub with more oats mixed with nuts and a bit of honey. Bake it lightly first for that crunch factor. DIY granola? You’re basically a chef now.
Is this recipe kid-friendly?
Heck yeah! Kids love the sweetness, and you can sneak in healthy-ish apples. Just watch the hot dish—little hands and ovens don’t mix. Bonus: get them to help with mixing for family bonding points.
Can I use margarine instead of butter?
Technically yes, but why settle for meh when butter brings the flavor party? If you’re dairy-free, go for it, but expect a slightly different taste. Your call, butter purist here speaking.
How do I store leftovers?
If there are any (big if), cover and fridge for up to 3 days. Reheat in the oven at 350°F for 10 minutes to revive the crunch—microwave works in a pinch but softens things up.
What apples work best?
Tart ones like Granny Smith hold up well without turning mushy. Sweet varieties? They’ll work but cut back on sugar. Experiment—it’s not like the apple police are watching.
Can I add booze to this?
Why not? Splash some bourbon or rum into the filling for an adult twist. Evaporates during baking, so it’s family-safe but with a cozy kick. Cheers to that!
Final Thoughts
Whew, we’ve covered the crunchy basics and then some. Now it’s your turn—grab those apples, crank up some tunes, and whip up this bad boy. Whether you’re impressing a date, feeding the fam, or just treating yourself after a long day, this apple crisp with granola topping’s got your back. It’s simple, satisfying, and seriously addictive. Go on, channel your inner baker. You’ve got this, friend—now bake and enjoy the glory!
Printable Recipe Card
Want just the essential recipe details without scrolling through the article? Get our printable recipe card with just the ingredients and instructions.