So, you’re staring into the fridge’s abyss, hoping a fully-prepared, delicious meal will magically appear. We’ve allbeen there. You want something cheesy, satisfying, and frankly, you want it now without a mountain of dishes to clean afterward. Enter your new best friend: the mighty beef quesadilla. It’s the hero we all need on a busy Tuesday (or a lazy Saturday).
Why This Recipe is Awesome
Let’s cut to the chase. This isn’t just *a* quesadilla recipe. This is the quesadilla recipe. It’s the culinary equivalent of that one friend who is always fun, never lets you down, and is ridiculously easy to hang out with. It’s virtually foolproof. I’ve made these while simultaneously trying to work from home and stop my dog from eating a slipper, and they still turned out perfectly. They’re crispy on the outside, gloriously cheesy and beefy on the inside, and ready in under 30 minutes. What’s not to love?
Ingredients You’ll Need
Gather your squad. This is a simple list, so no need for a fancy grocery run. Pro tip: Grate your own cheese. The pre-shredded stuff is coated in anti-caking agents that prevent it from melting into that glorious, gooey perfection we’re after. Trust me on this.
- 1 lb Ground Beef: The star of the show. Lean is good, but a little fat equals more flavor.
- 1 packet Taco Seasoning: Your shortcut to flavor town. Plus, it’s like, 50 cents.
- 1/2 cup Water: For the seasoning packet. Don’t forget it!
- Large Flour Tortillas: The bigger, the better. The burrito-sized ones are perfect for folding.
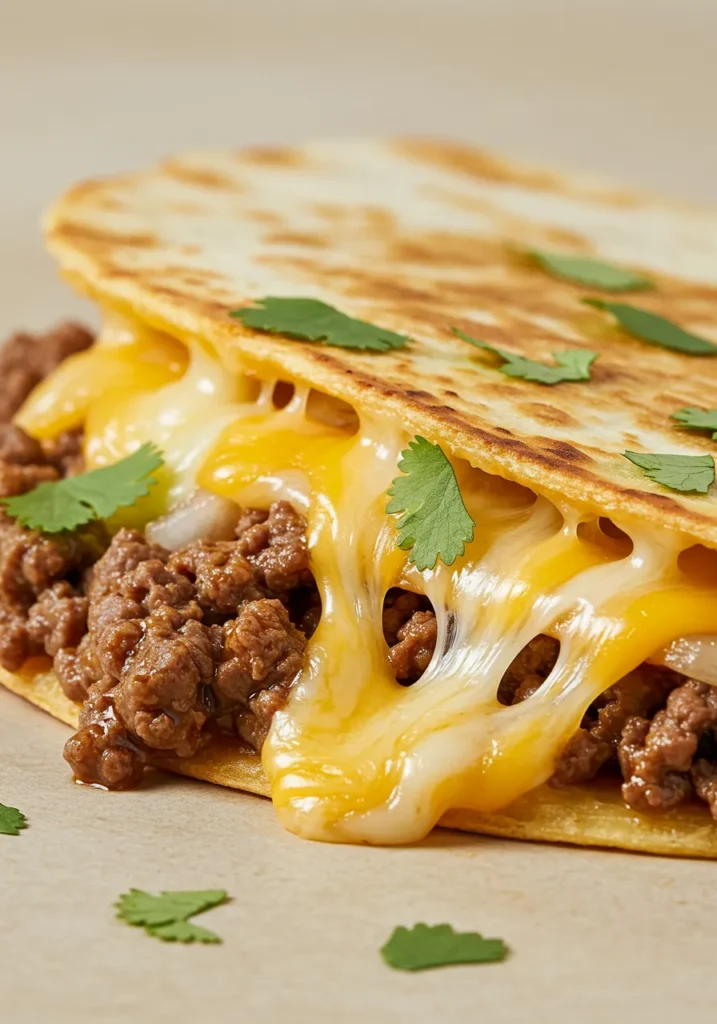
- 2 cups Shredded Cheese: A blend of Monterey Jack and cheddar is the dream team.
- 1 tbsp Olive Oil or Butter: For that golden, crispy exterior.
- Optional Add-ins:
- Diced onions or bell peppers (sauté them with the beef!)
- A can of black beans, rinsed and drained.
- Jalapeños for a kick.
- A handful of fresh cilantro, because it makes you feel fancy.
Step-by-Step Instructions
- Cook the Beef. Crumble the ground beef into a skillet over medium-high heat. Cook it until it’s no longer pink. Drain off any excess grease—unless you’re into that, I don’t judge.
- Season It Up. Sprinkle in that taco seasoning and the 1/2 cup of water. Let it simmer for a few minutes until the sauce thickens up and clings to the beef. Your kitchen should already smell amazing.
- Assemble the Quesadillas. Lay a tortilla flat. On one half, sprinkle a generous layer of cheese. This acts as a delicious glue. Spoon a healthy amount of your beef mixture on top of the cheese, then smother it with more cheese. Place the other half of the tortilla over the top like a delicious, cheesy blanket.
- Crisp Them to Perfection. Heat your oil or butter in a clean skillet over medium heat. Carefully slide your quesadilla in. Cook for 2-3 minutes per side, until it’s golden brown and the cheese is audibly sizzling. Repeat with the remaining tortillas and filling.
- Slice and Serve. Transfer your masterpiece to a cutting board, let it rest for like 30 seconds (so the cheese doesn’t immediately erupt onto your plate), and slice it into wedges. Serve with salsa, sour cream, or guac.
Common Mistakes to Avoid
- Overstuffing: I know, I know. You want all the fillings. But if you pile it too high, you’ll have a messy breakup when you try to flip it. The filling will escape and burn in the pan. Less is more.
- The Heat is Too High: Patience, young grasshopper. If your pan is too hot, the outside will burn before the cheese even thinks about melting. Medium heat is your sweet spot.
- Using Cold Tortillas Straight from the Fridge: This makes them more likely to crack and break. Let them sit out for a few minutes to come to room temperature—they’ll be much more flexible.
Alternatives & Substitutions
Dietary needs or just missing an ingredient? No sweat.
- No Beef? Ground chicken, turkey, or even a plant-based ground meat work great. You can also just do beans and corn for a veggie version.
- Dairy-Free? There are some fantastic melting vegan cheeses out there now. Violife and Chao are top-tier, IMO.
- Gluten-Free? Grab your favorite GF tortillas. Just be a little more gentle when flipping, as they can be less flexible.
- Spice Level: Control the heat! Use mild taco seasoning for the kids or add a dash of cayenne pepper or hot sauce to the beef for yourself.
FAQS
Can I make these ahead of time?
Absolutely. You can cook the beef filling up to 3 days in advance and keep it in the fridge. When the craving hits, just assemble and cook. FYI, cooked quesadillas can be reheated in a toaster oven or air fryer to bring back the crunch.
What’s the best way to keep them warm for a crowd?
Place finished quesadillas on a baking sheet in a single layer and pop them in a 200°F (95°C) oven. This keeps them warm and crispy without turning them soggy.
Can I bake these instead of pan-frying?
You can! Brush both sides of the assembled quesadilla with a little oil, place on a baking sheet, and bake at 400°F (200°C) for about 10 minutes, flipping halfway through. It’s great for making a big batch at once.
My cheese isn’t melting! Help!
This is almost always because the heat was too high. The outside cooked too fast, and the inside didn’t have time to heat up. Lower your heat next time and cover the skillet with a lid for the first minute to trap the heat and melt the cheese.
What else can I put in them?
The world is your oyster! Leftover fajita veggies, shredded rotisserie chicken, or even some cooked shrimp. Go wild.
Related Recipes
Final Thoughts
And there you have it. You are now officially a quesadilla master. This recipe is your ticket to a quick, delicious, and seriously satisfying meal any day of the week. It’s the kind of food that solves problems. Bad day? Quesadilla. Celebrating? Quesadilla. Can’t be bothered? You get the idea.
Now go forth and create your cheesy masterpiece. You’ve totally got this. And if you mess it up? Well, it’s still cheese and beef in a tortilla. It’s basically impossible to fail. Enjoy
Printable Recipe Card
Want just the essential recipe details without scrolling through the article? Get our printable recipe card with just the ingredients and instructions.