So, you’re staring into the abyss of your pantry, craving something sweet, crunchy, and spectacular, but your ambition levels are hovering somewhere around “can I just microwave this?” Same, friend. Same. What if I told you that the solution to all your problems is probably already lurking in your kitchen, disguised as a humble tortilla? Yeah, you heard me. We’re about to turn the most basic of ingredients into a snack so good, you’ll feel like a culinary wizard who barely tried.
Why This Recipe is Awesome
Let’s cut to the chase. This isn’t just a recipe; it’s a life hack for lazy geniuses. It requires exactly four basic ingredients you almost definitely own right now. We’re not reinventing the wheel here; we’re just making it taste like a cinnamon-y, sugar-coated dream. It’s idiot-proof. I made these while simultaneously answering emails and arguing with my cat about the meaning of “off the counter,” and they still turned out perfectly. They’re the perfect vehicle for satisfying that sweet tooth without requiring a PhD in pastry arts. Plus, your kitchen will smell like a cozy fall day, which is basically free aromatherapy.
Ingredients You’ll Need
Gather ’round, folks. This is the simplest grocery list known to humankind. If you don’t have this stuff, well, I’m a little concerned about your priorities, but it’s a cheap and easy fix.
- Flour Tortillas (6-inch): The blank canvas for our masterpiece. Stale ones work great here—no waste!
- Unsalted Butter (4 tbsp), melted: This is our edible glue. Salted butter works in a pinch, but we’re adding our own salt, so maybe ease up on the salt-shaker later.
- Granulated Sugar (½ cup): For that essential sweetness. Don’t you dare try to swap in a sugar cube. We need granules, people.
- Ground Cinnamon (1 tbsp): The co-star of the show. The more, the merrier, IMO.
- A Pinch of Salt: This is non-negotiable. It makes the sweet stuff taste even sweeter. Trust me.
Step-by-Step Instructions
- Heat Things Up: First, preheat your oven to 350°F (175°C). This is not the time for impatient guessing. A properly hot oven is what gives us that perfect crunch.
- Create Cinnamon-Sugar Magic: While the oven is waking up, grab a small bowl. Mix together your ½ cup of sugar, 1 tablespoon of cinnamon, and that all-important pinch of salt. Give it a good whisk until it’s one beautifully speckled, fragrant mixture. Congrats, you just made magic dust.
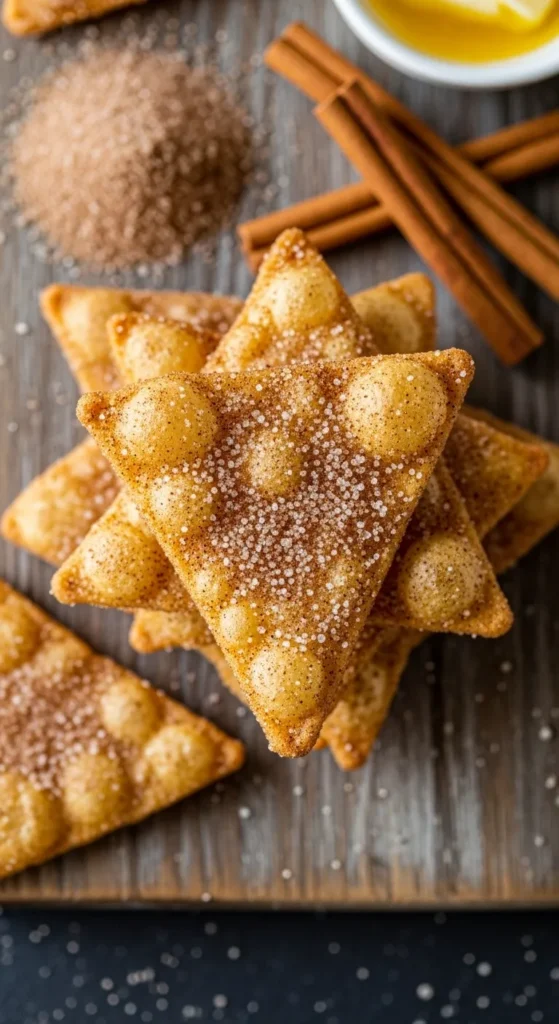
- Prep Your “Chips”: Lay your tortillas out on a cutting board. Using a pizza cutter or a sharp knife, slice each tortilla into 6 wedges (like a pizza!). This is the most difficult part of the recipe. You got this.
- Butter ‘Em Up: Brush both sides of each tortilla wedge with the melted butter. Don’t be shy. This is what helps the cinnamon sugar stick and gives us that gorgeous golden color. You can also lightly dunk them if you’re feeling wild and don’t mind buttery fingers.
- Sugar-Coated Bliss: Now for the fun part. Generously sprinkle your cinnamon-sugar mix over both sides of each wedge. I like to dunk the buttered wedges directly into the bowl for maximum coverage. No holding back.
- Bake to Perfection: Arrange the sugared wedges in a single layer on a baking sheet lined with parchment paper (for easy cleanup, you’re welcome). Bake for 8-12 minutes, or until they are golden and crisp. Keep an eye on them after the 8-minute mark—they go from perfectly golden to sadly charred in a flash!
- The Cool Down: This is crucial. Let them cool completely on the baking sheet. I know it’s tempting, but snatching one straight from the oven will result in a sad, floppy chip. Patience is a virtue that yields a satisfying crunch.
Common Mistakes to Avoid
Let’s learn from the hypothetical failures of others, shall we?
- Skipping the Preheating: Just don’t. A cold oven = soggy, steamed chips. Is that what you want? No. No, it is not.
- Crowding the Pan: If you pile those wedges on top of each other, they’ll steam instead of bake. Give them some personal space. They need room to get crispy.
- Under-buttering: This isn’t the time for a diet. The butter is essential for flavor and helping the cinnamon sugar adhere. Don’t be sparse.
- Eating Them Hot: I get it, the smell is intoxicating. But grabbing one too early is the number one reason for a floppy chip. Let them cool. I promise it’s worth the wait.
Alternatives & Substitutions
Look at you, wanting to get fancy! Here are some easy swaps:
- Tortilla Type: Feel free to use whole wheat or gluten-free tortillas. The cooking time might vary slightly, so keep a closer eye on them.
- Butter Substitute: For a dairy-free version, coconut oil works beautifully. Just make sure it’s melted.
- Sugar Swap: You can use a sugar alternative like Swerve or Lakanto monk fruit sweetener for a lower-carb option. The texture might be a tiny bit different, but it’ll still be delicious.
- Spice It Up: Add a pinch of nutmeg, cardamom, or even a tiny dash of cayenne pepper if you’re feeling adventurous and want a sweet-heat situation.
FAQ
Can I use an air fryer instead of the oven?
Absolutely! You’re speaking my language. Air fry at 350°F for 4-6 minutes, shaking the basket halfway through. They cook faster, so watch them like a hawk.
How do I store these so they stay crispy?
Let them cool completely first, then toss them into an airtight container or zip-top bag. They’ll stay crispy for about 3-4 days… if they last that long.
My chips are chewy, not crunchy. What did I do wrong?
You probably didn’t bake them long enough, or you overcrowded the pan. They might also be under-buttered. Or, the most likely culprit: you didn’t let them cool completely before diving in. The crunch develops as they cool!
Can I use something other than butter?
Yes, see above! Buttered-flavored cooking spray can work in a real pinch, but for flavor and results, real melted butter (or coconut oil) is the way to go.
What can I dip these in?
Oh, the possibilities! They are phenomenal with apple sauce, a scoop of vanilla ice cream, or even a simple cream cheese dip (mix whipped cream cheese with a little vanilla and powdered sugar). Or just eat them by the handful. No judgment here.
Related Recipes;
- 3-Ingredient Ice Cream Sandwiches: Quick & Fun Frozen Treat
- 3-Ingredient Stuffed Dates: Easy Healthy Snack or Dessert
- 3-Ingredient Chocolate Mousse: Easy & Creamy Dessert
Final Thoughts
And there you have it. You’ve just unlocked the secret to turning boring old tortillas into a snack that’s guaranteed to impress. It’s stupidly easy, incredibly satisfying, and proof that the best things in life don’t have to be complicated. Now go forth, bake up a batch, and enjoy the fruits of your (minimal) labor. You’ve earned every last crunchy, cinnamony bite
Printable Recipe Card
Want just the essential recipe details without scrolling through the article? Get our printable recipe card with just the ingredients and instructions.