So, you’re staring into the pantry abyss again. It’s just you, a half-empty bag of rice, and a craving for something that feels like a warm hug but doesn’t require a culinary degree or a full-blown kitchen meltdown. I get it. You want dessert, not a project. You want to feel fancy without the fuss. My friend, you have come to the right place. Let’s turn that boring rice into a tropical-inspired, soul-soothing bowl of glory.
Why This Recipe is Awesome
Look, I’m not here to sell you a lie. This isn’t a “5-minute, 1-ingredient, magically-defies-the-laws-of-physics” recipe. But it is spectacularly simple. It’s the kind of dessert you can whip up with one hand while scrolling through your phone with the other. It’s idiot-proof, even I didn’t mess it up, and I once tried to make toast in the microwave. It transforms the most basic pantry staples into a creamy, dreamy, restaurant-quality treat that will make you look like a domestic goddess (or god). Plus, your kitchen will smell like a beach vacation. You’re welcome.
Ingredients You’ll Need for Coconut Rice Pudding
Gather your squad. This is everything you need for a pot of pure comfort.
- White Rice (1 cup): The star. Short or medium-grain is best (think Arborio or even Jasmine) because they get nice and starchy. Don’t use instant. Just… don’t.
- Canned Coconut Milk (1 can, 13.5 oz): The rich, tropical co-star. Get the full-fat stuff for maximum creaminess. This is no time for calorie counting.
- Whole Milk (2 cups): For the perfect creamy balance. You can use 2% in a pinch, but whole milk makes it luxuriously rich.
- Sugar (½ cup): Sweetens the deal. Adjust to your taste. You do you.
- Salt (¼ tsp): The secret weapon. It makes all the other flavors pop. Don’t you dare skip it.
- Vanilla Extract (1 tsp): For that warm, cozy aroma.
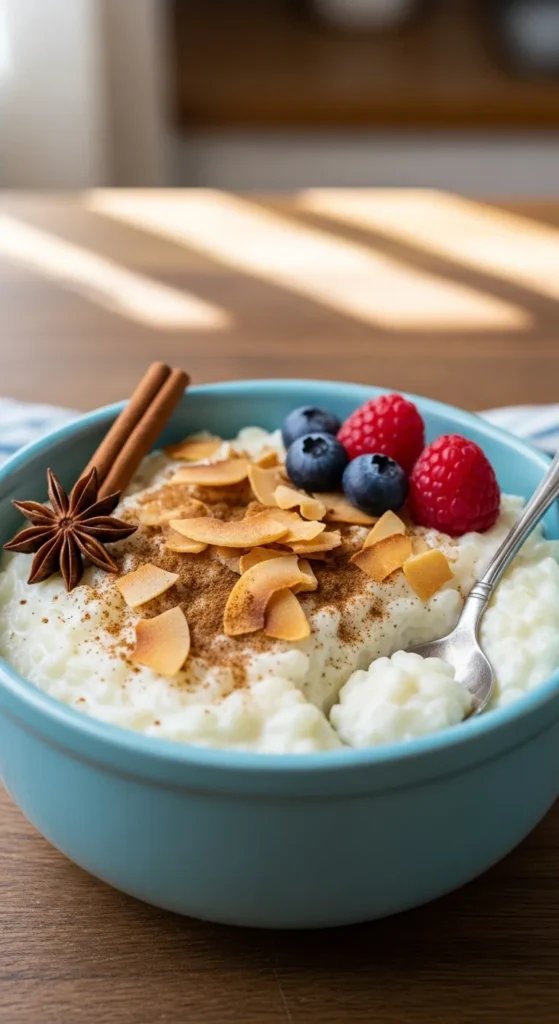
- Toppings (The fun part): Toasted coconut flakes, a sprinkle of cinnamon, a handful of mango chunks, or a drizzle of honey. Go nuts. Literally.
Step-by-Step Instructions
Let’s get this party started. It’s basically a “dump and stir” situation.
- Combine the Basics. In a medium, heavy-bottomed saucepan, throw in your uncooked rice, coconut milk, whole milk, sugar, and salt. Give it a good stir.
- Bring to a Simmer. Place the pot over medium-high heat. Bring the mixture to a gentle boil, stirring occasionally so the bottom doesn’t get jealous and burn.
- Low and Slow is the Way to Go. Once it’s bubbling, immediately reduce the heat to low. You want the laziest, gentlest simmer possible.
- Simmer and Stir. Let it cook for 30-40 minutes, stirring every 5-10 minutes. You’re waiting for it to thicken up and for the rice to become tender. It’s done when it has a thick, porridge-like consistency. Pro tip: The pudding will thicken more as it cools, so don’t over-reduce it to a paste.
- Vanilla Time! Remove the pot from the heat. Stir in the vanilla extract. Taste it. Is it sweet enough for you? Add a bit more sugar if needed.
- Chill Out (or Don’t). You can serve this warm, which is amazing. Or, for a firmer, more classic pudding texture, pour it into a bowl, press some plastic wrap directly onto the surface (to prevent a weird skin from forming), and pop it in the fridge for a few hours.
Common Mistakes to Avoid
Let’s learn from my many, many errors so you don’t have to.
- Cranking the Heat: High heat = scorched milk = sad, burnt-tasting pudding. Keep it low and gentle. Patience is a virtue, especially here.
- Not Stirring: Sure, you can walk away and forget about it. But you’ll come back to a cemented, stuck-on mess. Stir it occasionally. It’s not high maintenance, it just likes a little attention.
- Using the Wrong Rice: That parboiled long-grain rice your weird uncle swears by will not give you the same creamy result. Short-grain is your friend.
- Skipping the Salt: I said it before and I’ll say it again: SALT IS NON-NEGOTIABLE. It’s what separates “meh” from “MORE!”
Alternatives & Substitutions
You do you, boo. Here’s how to mix it up.
- Dairy-Free? Easy. Swap the whole milk for another can of coconut milk or your favorite unsweetened nut milk (almond or oat would be great).
- Want More Fun? Stir in a tablespoon of lime zest at the end for a key lime pie vibe. A pinch of cardamom or nutmeg while cooking adds a wonderful warmth.
- Out of Sugar? Brown sugar, maple syrup, or honey will work beautifully. Just add it to taste at the end, especially if using honey, as its flavor can change with heat.
- Vegan? See the dairy-free swap above and use maple syrup or agave instead of sugar. Boom, done.
FAQs about Coconut Rice Pudding
Can I use leftover cooked rice?
You absolutely can! This is a genius way to use up last night’s takeout rice. Use about 3 cups of cooked rice and reduce the simmering time to just 15-20 minutes, or until it’s thickened to your liking.
Why is my pudding too runny?
You probably didn’t let it reduce enough. No biggie! Just simmer it a bit longer. Remember, it also thickens significantly as it cools. If it’s still too thin after chilling, you can mix a teaspoon of cornstarch with a tablespoon of cold milk and stir it in over low heat until it thickens.
How long does this keep in the fridge?
It will be perfectly delicious for about 4-5 days stored in an airtight container. The texture might firm up a bit more, but it’s still amazing.
Can I make this in a rice cooker?
You can! Add all the ingredients (hold the vanilla), give it a stir, and set it to the regular “white rice” setting. Once it’s done, stir it well—it might look a bit loose at first, but it will thicken as it cools. Then stir in the vanilla.
Is this served warm or cold?
Yes. Seriously, it’s fantastic both ways. Warm is like instant comfort food. Cold is a refreshing, creamy treat. IMO, you can’t lose.
Related Recipes
Final Thoughts about Coconut Rice Pudding
And that’s it! You’ve just created a dessert that’s both impressively delicious and embarrassingly easy. You’ve tamed the rice, mastered the simmer, and are now the proud owner of a fantastic recipe. Now go impress someone—or, more importantly, yourself—with your new culinary skills. You’ve earned it! Now, where’s my spoon…
Printable Recipe Card
Want just the essential recipe details without scrolling through the article? Get our printable recipe card with just the ingredients and instructions.