So, you’ve decided your life needs more crunch, more sweet, more buttery, more… everything? You’re not just making dinner; you’re about to perform a little bit of kitchen sorcery that turns humble chicken into a spellbinding masterpiece. Forget everything you thought was complicated about frying—this is your ticket to crispy, juicy, soul-hugging glory.
Why This Recipe is Awesome
Let’s cut to the chase. This isn’t just another fried chicken recipe. This is the one that will make you look like a culinary rockstar with minimal effort. It’s the perfect combination of a shatteringly crisp exterior and a ridiculously juicy interior, all glazed in a sticky, sweet, and savory honey butter sauce that will have you licking your fingers with zero shame. It’s practically foolproof. I’ve tested it while distracted by a very important reality TV show, and it still came out perfect. If I can do it, you can absolutely crush it.
Ingredients You’ll Need
Gather your squad. This is the crew that’s going to make the magic happen.
For the Chicken & Brine:
- 1 lb chicken wings, drumettes, or thighs (because dark meat is where the flavor party’s at)
- 1 cup buttermilk (the secret juiciness agent)
- 1 tbsp hot sauce (Frank’s is a classic for a reason, but use your fave)
For the Crispy Coating:
- 1 cup all-purpose flour (the foundation of the crunch)
- 1/4 cup cornstarch (the crunch-enhancing sidekick)
- 1 tsp garlic powder (because, flavor)
- 1 tsp paprika (for color and a smidge of sweetness)
- 1 tsp salt (don’t be shy)
- 1/2 tsp black pepper (the essential zing)
- Oil for frying (vegetable, canola, or peanut oil are all great)
For the Honey Butter Glaze:
- 3 tbsp unsalted butter (real butter, please. Your soul will thank you.)
- 2 tbsp honey (the star of the show)
- 1 tbsp soy sauce (for that umami, salty kick)
- 1 clove garlic, minced (or 1/2 tsp garlic powder in a pinch)
- A pinch of red pepper flakes (optional, for a gentle kick)
Step-by-Step Instructions
- Get Your Chicken Juicy. In a bowl, combine the chicken, buttermilk, and hot sauce. Give it a good stir, cover it, and let it hang out in the fridge for at least 30 minutes. Overnight is even better if you have the patience of a saint. This is the non-negotiable step for tender chicken.
- Prep the Crunch Station. In another bowl, whisk together the flour, cornstarch, garlic powder, paprika, salt, and pepper. This is your crispy armor.
- Dredge Like a Boss. Take each piece of chicken from the buttermilk, let the excess drip off, and dredge it thoroughly in the flour mixture. Press it in to make sure every nook and cranny is coated. For extra crunch, you can do a double-dip: back in the buttermilk, then back in the flour. Place the coated pieces on a plate.
- Heat the Oil. Pour about 1.5 inches of oil into a heavy-bottomed pot or Dutch oven. Heat it over medium-high heat until it reaches 350°F (175°C). If you don’t have a thermometer, test it by dropping a small pinch of flour into the oil. If it sizzles immediately, you’re good to go.
- Fry to Perfection. Carefully place a few pieces of chicken in the hot oil using tongs. Don’t crowd the pot! Fry in batches for about 6-8 minutes per side, until they are a deep, gorgeous golden brown and cooked through. Transfer to a wire rack set over a baking sheet (this keeps them crispy, unlike a paper towel which can steam them).
- Whip Up the Magic Sauce. While the chicken is frying, melt the butter in a small saucepan over low heat. Whisk in the honey, soy sauce, minced garlic, and red pepper flakes (if using). Let it simmer for just a minute until it’s beautifully combined and fragrant.
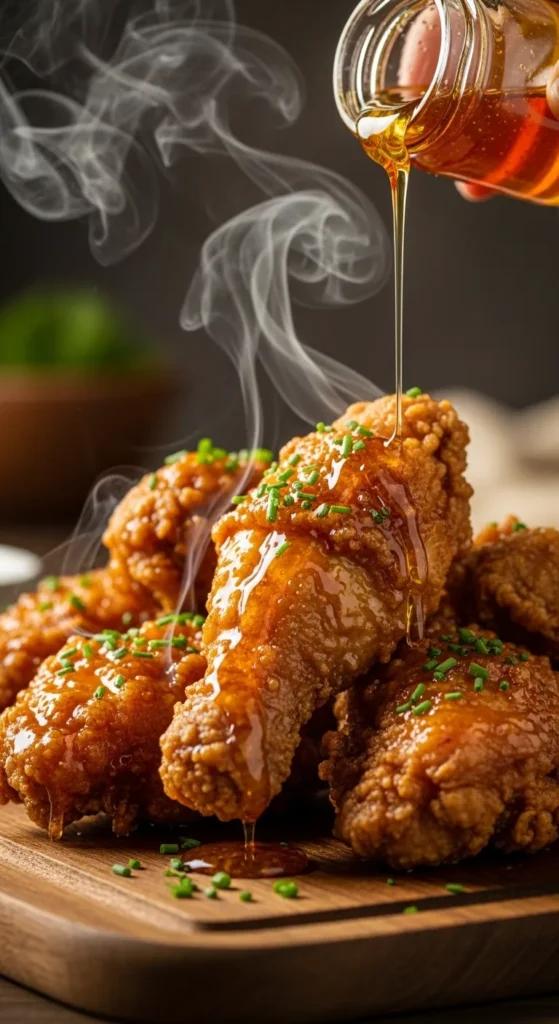
- The Grand Finale. Place all your crispy fried chicken in a large bowl. Pour that glorious honey butter sauce all over it. Toss gently until every single piece is glistening and coated in sticky, savory-sweet goodness.
- Serve Immediately. I mean it. Don’t wait. This is best eaten hot, with napkins on standby and a big ol’ smile on your face.
Common Mistakes to Avoid
- Crowding the Pot: This is the number one way to end up with soggy, greasy chicken. The temperature of the oil plummets, and the chicken steams instead of fries. Give your chicken some personal space!
- Skipping the Thermometer: Guessing the oil temperature is a gamble. Too hot, and the outside burns before the inside cooks. Too cool, and you get greasy chicken. A cheap kitchen thermometer is a game-changer.
- Ditching the Wire Rack: Placing your freshly fried chicken on a paper towel-lined plate is better than nothing, but it can create a soggy bottom. A wire rack allows air to circulate, keeping the entire piece crispy.
- Saucing Too Early: Only toss the chicken in the honey butter sauce right before you serve. If you do it too far in advance, the crispy coating will get soft. We worked hard for that crunch—protect it!
Alternatives & Substitutions
- No Buttermilk? No panic! Make a quick substitute by adding 1 tablespoon of lemon juice or white vinegar to a cup of regular milk. Let it sit for 5 minutes until it curdles slightly. Good to go.
- Gluten-Free? Swap the all-purpose flour for your favorite 1:1 gluten-free flour blend. The cornstarch is already GF!
- Spice Level: Control the heat! Omit the hot sauce from the brine and the red pepper flakes from the glaze for a mild version. Or, add a dash of cayenne pepper to the flour for an extra kick.
- Butter Alternative: For a dairy-free version, a high-quality plant-based butter works surprisingly well in the glaze.
FAQ
Can I bake this instead of frying?
You can, but you’ll lose the classic fried chicken texture. For a baked version, coat the chicken as instructed, place it on a wire rack on a baking sheet, spray generously with oil, and bake at 400°F (200°C) until cooked through. It won’t be the same, but it’ll still be tasty.
What’s the best cut of chicken to use?
Bone-in, skin-on pieces are the champions here. They stay incredibly juicy. Drumsticks, thighs, and wings are all fantastic choices. You can use breast, but be extra careful not to overcook it.
Can I make the honey butter sauce without soy sauce?
Absolutely! The soy sauce adds saltiness and umami. You can replace it with tamari, coconut aminos, or even just a good pinch of salt.
How do I store leftovers?
Leftovers? That’s adorable. If you somehow have any, store them in an airtight container in the fridge for up to 3 days. Reheat them in the air fryer or oven to try and recapture some of the crunch. The microwave will make it soft.
Can I use pre-cooked chicken?
Technically, yes. You could toss store-bought rotisserie chicken in the sauce. But you’d be missing out on the life-changing crispy coating we just spent all this time creating. Don’t cheat yourself!
Related Recipes:
- Making Crispy and Juicy Chicken Every Time: 10 Easy Recipes
- Juicy Grilled Tuna Steaks Recipes
- Chocolate Chip Cookies with Cottage Cheese Recipes
Final Thoughts
This dish is the perfect harmony of sweet, savory, and crunchy, offering a crave-worthy twist on classic fried chicken. Here’s a wrap-up of its magic:
What Makes It Special:
-
Crispy Perfection: The double-dredged coating gives it that ultra-crunch that holds up even after the glaze.
-
Honey Butter Glaze: Rich, buttery, and just sweet enough to elevate the savory chicken without overwhelming it.
-
Flavor Balance: The combination of salty fried chicken with the warm sweetness of honey and the richness of butter creates an addictive flavor profile.
-
Crowd-Pleaser: Whether you’re serving it at a casual dinner, party, or just indulging on a weekend, it’s a guaranteed hit.
Pro Tips:
-
Use buttermilk for your marinade — it tenderizes the meat and adds depth.
-
Let the chicken rest after frying before glazing so the coating stays crispy.
-
Spice up the glaze with a pinch of cayenne or hot sauce if you like heat.
Printable Recipe Card
Want just the essential recipe details without scrolling through the article? Get our printable recipe card with just the ingredients and instructions.

![The Secret to Making Crispy & Juicy Chicken Every Time [With Tutorial]](https://sumararecipes.com/wp-content/uploads/2025/03/1-7-1024x536.jpg)