Hey, picture this: It’s a chilly evening, you’re wrapped in your comfiest blanket, and the smell of cinnamon and apples is wafting through the house like a warm hug. But wait, you’re gluten-free and don’t want to deal with a kitchen disaster? Enter this gluten-free apple crisp—your new bestie for effortless dessert wins. Trust me, if I can whip this up without burning the place down, so can you. Let’s dive in and make your taste buds dance!
Why This Recipe is Awesome
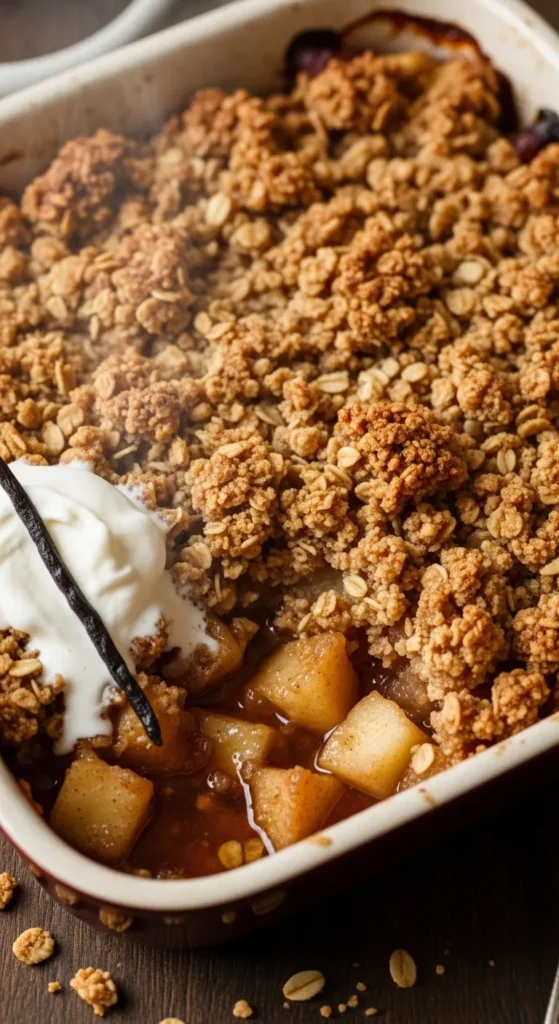
Okay, real talk—this gluten-free apple crisp isn’t just good; it’s the kind of dessert that makes you question why you ever bothered with complicated pies. First off, it’s ridiculously crispy on top thanks to that generous oat and almond flour crumble that bakes to golden perfection. No soggy messes here, folks. The apples turn into this jammy, spiced heaven that’s sweet but not cloying, with warm notes of cinnamon, ginger, and a hint of cloves that scream “fall vibes” without overwhelming your palate.
And get this: It’s naturally gluten-free, so no weird substitutions that taste like cardboard. Pro tip: Pre-baking the apples for a quick 10 minutes ensures they’re tender and saucy, not crunchy in a bad way. Plus, it’s quick—under an hour from start to finish—and uses stuff you probably have lurking in your pantry. IMO, it’s idiot-proof; even on my laziest days, it turns out flawless. Who doesn’t love a recipe that forgives your shortcuts?
What really seals the deal? That emotional punch of biting into something cozy and flavorful that feels like grandma’s hug, but without the gluten drama. If you’re skeptical, just try it—you’ll be hooked faster than you can say “seconds, please.”
Ingredients You’ll Need
Gather ’round, kitchen warriors—these are your weapons for crispy conquest. I’ve kept it simple, but feel free to eyeball if you’re feeling rebellious. Just don’t blame me if it goes sideways!
For the Filling:
- 6 medium Honeycrisp apples (or whatever crisp apples you snag—about 6 cups peeled and sliced into 1/2-inch wedges). These bad boys stay firm and juicy, no mushy regrets.
- 2 teaspoons fresh lemon juice—keeps things bright and prevents your apples from looking like they’ve seen better days.
- 1 1/2 teaspoons vanilla extract. Go for the real stuff; that fake vanilla is just sad.
- 1/4 cup granulated sugar—sweetens without overpowering.
- 1/4 cup packed light brown sugar—for that caramel-like depth. Don’t pack it too tight, or you’ll end up with a sugar brick.
- 2 tablespoons cornstarch—to thicken the juices into saucy bliss.
- 1 teaspoon ground cinnamon—the star spice that makes everything smell like heaven.
- 1/4 teaspoon ground ginger—adds a subtle kick, like a sneaky flavor ninja.
- 1/8 teaspoon ground nutmeg and 1/8 teaspoon ground cloves—because why stop at basic when you can go full autumn explosion?
For the Topping:
- 2 cups old-fashioned rolled oats (make sure they’re certified gluten-free, or you’re playing gluten roulette).
- 1 cup almond flour—gives that nutty crunch without nuts overpowering everything.
- 3/4 cup packed light brown sugar—more sweetness for the win.
- 1/2 teaspoon kosher salt—to balance the sweet and keep it from tasting like dessert soup.
- 1 teaspoon ground cinnamon—double down on the spice love.
- 3/4 cup unsalted butter, cold and cubed. Cold is key; warm butter is a crumbly fail waiting to happen.
That’s it—nothing fancy, just pure, flavorful magic.
Step-by-Step Instructions
Alright, let’s get our hands dirty—but not too dirty, because this is easy mode. Preheat your oven to 350°F right now; no excuses. Grab a large bowl and your baking dish (an 11-inch cast iron skillet is boss for extra crispiness, but any deep pan works).
- Start with the filling: Toss those peeled and sliced apples with the lemon juice, vanilla, both sugars, cornstarch, and all the spices in a big bowl. Mix until every apple slice is coated like it’s ready for a party. Pour this spiced apple goodness into your baking dish—make sure the apples cover the bottom evenly, no peeking through.
- Pop the dish into the oven for 10 minutes. This pre-bake softens the apples just enough to get that jammy texture without turning them to applesauce later. While that’s happening, don’t scroll on your phone—make the topping!
- For the topping: In another large bowl, whisk together the oats, almond flour, brown sugar, salt, and cinnamon. Throw in the cold cubed butter and use your fingers to mash and squish it all together. Keep at it until the butter vanishes and the mixture clumps when you squeeze it. Bold move: Don’t over-mix; chunky bits equal extra crisp.
- After 10 minutes, yank the apples out (oven mitts, duh) and sprinkle the topping all over, spreading it evenly to cover every inch. No skimping here—pile it on thick for maximum crunch.
- Slide it back into the oven and bake for 35-40 minutes. You’re looking for bubbly edges and a golden-brown top that screams “eat me.” If it’s browning too fast, slap some foil over it loosely and keep going.
- Let it cool for about 15 minutes—torture, I know, but it sets the juices. Serve warm, maybe with a scoop of vanilla ice cream if you’re feeling extra. Dig in and pat yourself on the back.
See? Six steps to glory. No fuss, all flavor.
Common Mistakes to Avoid
We’ve all been there—thinking we’re kitchen pros until the crisp turns into a crisp fail. Here’s the lowdown on pitfalls, served with a side of sarcasm.
- Skipping the pre-bake on the apples: Oh, you think raw apples will magically soften perfectly? Nope, you’ll end up with crunchy fruit and a sad topping. Always pre-bake for that tender, saucy base.
- Using warm butter for the topping: Rookie error—warm butter melts into a greasy mess instead of crisp crumbs. Keep it cold, or suffer the soggy consequences.
- Overcrowding the pan: If your apples are piled sky-high, the middle stays undercooked. Spread ’em out; they need room to bubble.
- Forgetting to peel the apples: Sure, skins add fiber, but in a crisp? It’s like chewing on leather. Peel for smooth, flavorful bites.
- Not checking for gluten in oats: Assuming all oats are GF is like assuming all coffee is decaf—disastrous for some. Certified only, please.
Avoid these, and you’re golden. Or should I say, crispy?
Alternatives & Substitutions
Life happens—maybe you’re out of something, or you’re tweaking for dietary drama. No worries; this recipe’s flexible like your weekend plans.
If almonds aren’t your jam (nut allergy, anyone?), swap the almond flour for oat flour or even finely ground pecans if nuts are cool. Just pulse ’em in a food processor—easy peasy. For a vegan twist, ditch the butter for plant-based or coconut oil; it still clumps up nicely and adds a tropical whisper, which I kinda love.
Apples wise, Honeycrisp rule, but mix in Granny Smith for tartness if you want that flavor pop. FYI: If using softer apples like McIntosh, cut the pre-bake to 5 minutes to avoid mush. Out of cornstarch? Arrowroot or tapioca starch works the same magic for thickening.
Spice it up your way—add a pinch of cardamom if you’re feeling fancy, or skip the cloves if they’re too “holiday” for you. IMO, these swaps keep things fun without ruining the crisp factor. Experiment, but don’t go wild; we’re aiming for bliss, not chaos.
FAQs
Can I make this ahead of time?
Absolutely! Assemble the filling and topping separately, stash ’em in the fridge overnight, then bake fresh. Or bake the whole thing and reheat at 300°F for 10 minutes—crisp restored, crisis averted. Why stress when you can prep like a pro?
What if I don’t have a cast iron skillet?
No biggie—use a deep pie dish or square baking pan. Just ensure the apples fit snugly without gaps. Cast iron amps the crispiness, but any oven-safe dish gets the job done. Who knew flexibility could taste so good?
Is this recipe dairy-free?
Out of the box? Nope, thanks to the butter. But swap it for vegan butter or coconut oil, and boom—dairy-free delight. It bakes up just as crispy, promise. Why limit yourself when swaps are this simple?
Can I add nuts to the topping?
Go for it! Toss in 1/2 cup chopped pecans or walnuts with the dry ingredients for extra crunch. Just chop ’em fine so they don’t overpower. Nutty twist? Yes, please—unless allergies say otherwise.
How do I know when it’s done?
Look for bubbling edges and a deep golden top. Poke an apple; it should be tender but not falling apart. If it’s pale, give it more time—patience pays off in crisp heaven. Overbaked? Still tasty, just drier.
What apples work best?
Honeycrisp or Fuji for sweetness and firmness—they hold up like champs. Mix with tart ones like Granny Smith for balance. Soft apples? Avoid ’em; they’ll turn to sauce. Pick wisely, and your crisp thanks you.
Can I freeze leftovers?
Sure thing—cool it completely, wrap tight in foil, and freeze up to 2 months. Thaw at room temp, then reheat. The topping might soften a tad, but flavor’s still on point. Waste not, want not, right?
Final Thoughts
Whew, we made it! This gluten-free apple crisp is your ticket to cozy, crispy joy without the hassle. Whether you’re impressing friends or treating yourself after a long day, it’s got that magical mix of flavor and fun. Now grab a spoon, dive in, and high-five yourself—you nailed it. What’s next on your baking list? Hit me up in the comments if you tweak it. Happy munching, friend!
Printable Recipe Card
Want just the essential recipe details without scrolling through the article? Get our printable recipe card with just the ingredients and instructions.