So, you’re tired of store-bought granola bars that taste like sweetened cardboard? Yeah, same here. 🙃 That’s why I finally decided to start making my own homemade granola bars. Spoiler alert: they’re way better, ridiculously easy, and (bonus!) you get to brag about them to everyone.
Whether you’re looking for a quick breakfast, a pre-workout snack, or just an excuse to eat something crunchy while pretending it’s healthy (it is… mostly), this recipe is going to rock your snack game.
Ready to ditch the plastic-wrapped, overpriced sugar bricks? Let’s do this.
Why Make Homemade Granola Bars?
First things first — why bother making them at home when you can grab a box at the grocery store? Oh, let me count the ways…
Taste and Customization
The biggest reason? You control the flavor.
Hate raisins? Leave them out. Love chocolate? Add more. Want something nut-free? Easy peasy.
Healthier Ingredients
Ever checked the ingredient list on store-bought bars? Half of it sounds like a chemistry experiment. Making them at home means you know exactly what goes in — no preservatives, no weird syrups, no nonsense.
Cost-Effective
Let’s be honest — those fancy organic bars cost as much as a decent lunch. Making your own is not only cheaper but also more satisfying.
And, FYI, nothing beats the smug satisfaction of saying, “Oh, I made these myself.”

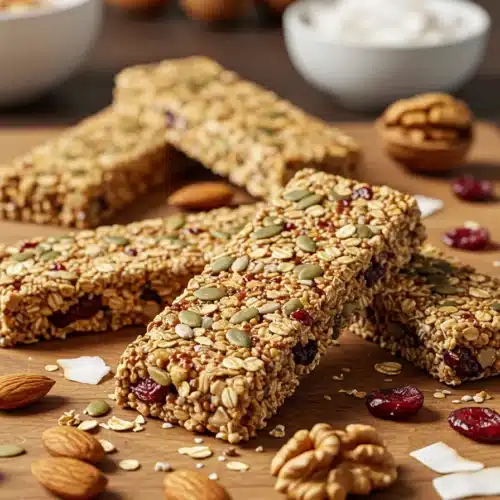
Ingredients You’ll Need for Homemade Granola Bars
Alright, let’s talk ingredients. No exotic powders from the Himalayas here — just stuff you probably already have in your pantry.
Here’s my go-to list:
- 2 cups rolled oats (the regular kind, not instant)
- 1/2 cup chopped nuts (almonds, pecans, or whatever you fancy)
- 1/2 cup dried fruits (cranberries, raisins, or chopped dates)
- 1/4 cup honey or maple syrup (both work great)
- 1/4 cup brown sugar (optional but adds sweetness & stickiness)
- 1/4 cup unsalted butter or coconut oil
- 1/2 teaspoon vanilla extract
- Pinch of salt
- Optional: chocolate chips, seeds, or shredded coconut (because why not?)
Pro tip: Keep it balanced. Too many dry ingredients? The bars will crumble like your willpower in front of a bakery. Too much liquid? You’ll end up with a sticky mess.
Step-By-Step: How To Make Homemade Granola Bars
Okay, here comes the fun part. I promise — no culinary degree required.
Step 1: Toast the Dry Stuff
Preheat your oven to 350°F (175°C). Spread oats and nuts on a baking sheet. Toast them for about 8–10 minutes, stirring halfway. This gives them that delicious nutty flavor you didn’t know you were missing.
Step 2: Make the Glue
In a small saucepan, melt the butter, honey, brown sugar, vanilla, and salt over medium heat. Let it bubble for a couple of minutes — not too long, unless you want caramel (which is a whole other thing).
Step 3: Mix It All Together
Combine the toasted oats and nuts with dried fruit and any extras in a big bowl. Pour the gooey mixture over it and stir until everything’s coated evenly.
Step 4: Press Like You Mean It
Line an 8×8-inch pan with parchment paper. Dump the mixture in and press it down really hard. Like, channel-your-inner-Frustrated-Monday hard. This step is crucial if you want bars that hold their shape instead of falling apart like a bad rom-com plot.
Step 5: Chill & Cut
Pop it in the fridge for about an hour. Once firm, lift it out and cut into bars or squares. Boom. Done.
Tips & Tricks for Perfect Granola Bars
Alright, let’s talk about what separates the sad, crumbly bars from the “OMG, you made these?!” ones.
Press, Press, Press
Seriously, I can’t emphasize this enough. If you don’t press the mixture firmly, it won’t hold together.
Experiment Fearlessly
Ever wondered if peanut butter works in place of butter? It does — and it’s amazing. Want to throw in some chia seeds for that trendy superfood vibe? Go for it.
Store Smart
Wrap bars individually in wax paper and store them in an airtight container. They’ll stay fresh for up to a week at room temp — or longer in the fridge.
Flavor Variations to Try
Here’s where things get really fun. IMO, the best part of making these yourself is all the crazy combinations you can dream up.
Chocolate Lover’s Dream
- Add mini chocolate chips and drizzle melted chocolate on top.
- Sprinkle with sea salt for that fancy “gourmet” vibe.
Tropical Paradise
- Use dried pineapple, coconut flakes, and cashews.
- A splash of lime zest takes it over the top.
PB&J Vibes
- Swirl in a spoonful of peanut butter and toss in dried strawberries or raspberries.
Honestly, you can even go wild and add crushed pretzels, marshmallows, or (don’t judge) potato chips. Why not?
Common Questions People Ask (A Lot)
Because apparently making granola bars is more mysterious than Area 51, here are some FAQs.
Why Do My Bars Keep Falling Apart?
Ah, the classic tragedy. Chances are you didn’t press them hard enough or you skimped on the sticky stuff. Next time, add a little more honey or brown sugar and press like your life depends on it.
Can I Make Them Vegan?
Yep! Use coconut oil instead of butter and maple syrup instead of honey.
Are They Gluten-Free?
If you use certified gluten-free oats, then yes. Just double-check your other ingredients.
Can I Freeze Them?
Absolutely. Wrap them individually and freeze. They thaw pretty fast, so no excuse not to have snacks ready.
Why Homemade Granola Bars Just… Hit Different
Let’s be real — homemade granola bars don’t just taste better, they feel better.
- You avoid weird additives you can’t pronounce.
- You save money and trips to the store.
- You get to be creative (and a little smug, which IMO is justified here).
- You actually look forward to snack time because they don’t taste like sad cardboard.
Honestly, why settle for “meh” when you can have “yum”?
Related Recipes
Final Thoughts about Homemade Granola Bars
Look, I get it — life is busy, snacks are everywhere, and the grocery store seems so convenient. But trust me on this one: once you try making these homemade granola bars, you’ll never go back.
Plus, they’re way more fun to show off than a boring old packaged bar.
So what are you waiting for? Grab those oats, pick your mix-ins, and channel your inner snack artist. 😉 And hey — if you come up with a killer flavor combo, don’t forget to share it. (Not that I’ll steal your idea… okay, maybe just a little.)
Quick Recap (Because I Love a TL;DR):
✅ Toast your oats and nuts for max flavor.
✅ Heat up your sticky glue.
✅ Mix everything together like a boss.
✅ Press it like you mean it.
✅ Chill, cut, and snack happily.
There you go — your foolproof guide to making the best homemade granola bars ever. Now go forth and snack gloriously.
Got questions? Or maybe a hilarious kitchen fail story? Drop it below. I promise not to laugh… much.
Homemade Granola Bars Recipe
Ingredients
- 2 cups rolled oats
- 1 cup chopped nuts almonds, walnuts, or pecans
- 1 cup dried fruit cranberries, raisins, or apricots
- ½ cup honey or maple syrup
- ¼ cup brown sugar
- ¼ cup butter or coconut oil
- 1 tsp vanilla extract
- ½ tsp ground cinnamon
- Pinch of salt
Instructions
- Preheat oven to 350°F (175°C) and line a baking dish with parchment paper.
- Toast oats and nuts in the oven for 8–10 minutes until lightly golden.
- In a saucepan, heat honey, brown sugar, and butter until melted.
- Stir in vanilla, cinnamon, and salt.
- Combine toasted oats, nuts, and dried fruit in a large bowl.
- Pour the syrup mixture over and mix well.
- Press mixture firmly into prepared baking dish.
- Bake for 15 minutes, then cool completely before cutting into bars.
Notes
- Press mixture firmly to avoid crumbly bars.
- Store in an airtight container for up to 1 week.
- Drizzle with melted chocolate for extra flavor
DID YOU MAKE THIS EASY RECIPE?
If you have, then share it with us by sending a photo. We’re excited to see what you’ve made 🙂Printable Recipe Card
Want just the essential recipe details without scrolling through the article? Get our printable recipe card with just the ingredients and instructions.