So, you want a meal that screams “gourmet chef” but requires the effort level of “microwave dinner,” huh? Same. Let’s be real: most of us are just one complicated recipe away from ordering takeout. But what if I told you that in the time it takes to scroll through your delivery app, you could be pulling this mind-blowingly good, sticky, sweet, and savory honey garlic glazed salmon out of the oven? Yeah, it’s that easy. And no, it doesn’t require a fancy culinary degree, just a craving for something awesome.
Why This Recipe is Awesome
Let’s cut to the chase. This isn’t just another salmon recipe. This is your new weeknight superhero. It’s:
- Stupidly Simple: We’re talking 5 main ingredients for the glaze. If you can measure and stir, you’ve got this.
- Impressively Fancy: The glossy, caramelized glaze looks like you slaved over a hot stove for hours. Your secret is safe with me.
- Actually Healthy: Packed with good-for-you fats and protein, so you can feel virtuous while eating something that tastes decadent.
- Idiot-Proof: I’ve tested this while distracted by a very dramatic reality TV show, and I still didn’t mess it up. That’s a ringing endorsement.
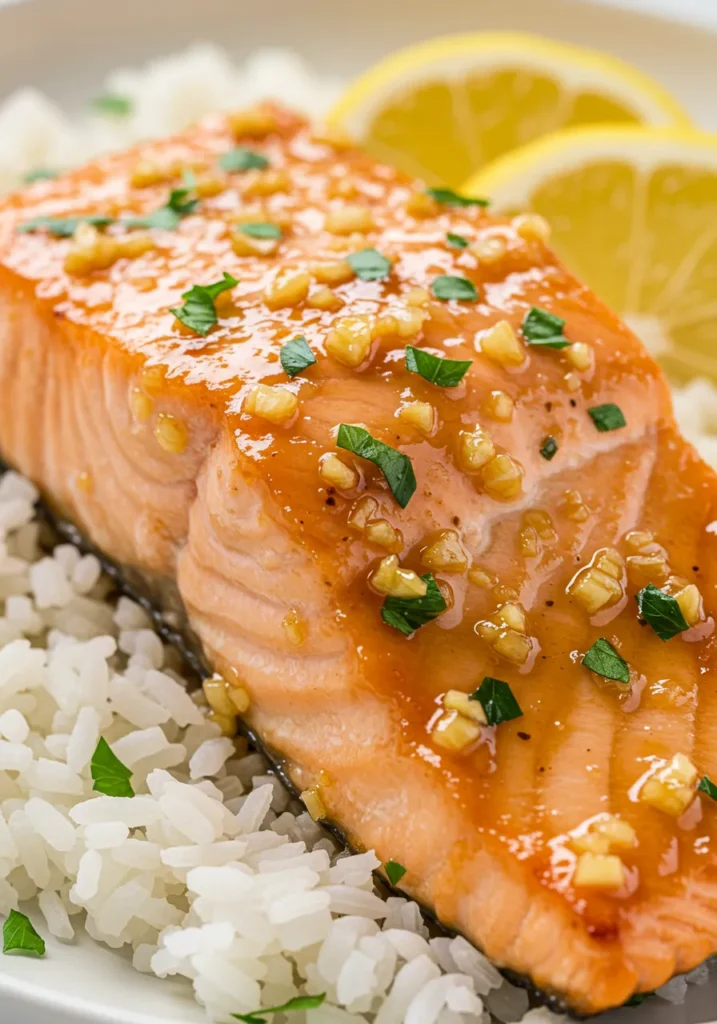
Ingredients You’ll Need for Honey Garlic Glazed Salmon
Gather your squad. This is all you need for culinary glory.
For the Salmon & Glaze:
- 2 salmon fillets (about 6 oz each) – skin-on or off, your call. Thawed if frozen, please. Don’t be that person.
- 3 tbsp honey – the good stuff, not the fossilized bear-shaped bottle from the back of your pantry.
- 2 tbsp soy sauce (or tamari for gluten-free) – for that essential salty umami kick.
- 3 cloves garlic, minced – fresh is best. Don’t you dare use the jarred stuff here.
- 1 tbsp lemon juice (or rice vinegar) – a little zing to cut through the sweetness.
- 1 tbsp olive oil or avocado oil – for a quick sear.
The Optional-but-Highly-Recommended Cast:
- Red pepper flakes – just a pinch for a subtle background heat.
- Black pepper – freshly ground, because you’re a classy human.
- Green onions & sesame seeds – for that Insta-worthy garnish that makes people think you’re a professional food stylist.
Step-by-Step Instructions
- Preheat & Pat. Crank that oven to 400°F (200°C). Now, take your salmon fillets and pat them absolutely DRY with a paper towel. This is the #1 rule for getting a beautiful sear, not a sad steam.
- Whisk the Magic Potion. In a small bowl, whisk together the honey, soy sauce, minced garlic, and lemon juice. That’s it. Your award-winning glaze is done. See? Told you it was easy.
- Sear the Salmon. Heat the oil in an oven-proof skillet over medium-high heat. Place the salmon fillets in the skillet, presentation-side down. Let them cook untouched for 3-4 minutes until you get a gorgeous golden-brown crust. Don’t poke it! Let it do its thing.
- Glaze & Bake. Flip the fillets. Now, pour that glorious glaze all over them. Let it bubble away for just 30 seconds, then transfer the whole skillet to the preheated oven.
- Bake to Perfection. Bake for 5-8 minutes, depending on thickness. You’re aiming for flaky, opaque flesh that just begins to flake when poked with a fork. Pro Tip: Baste the salmon with the pan sauce halfway through for extra flavor.
- Rest & Devour. Remove the skillet from the oven (carefully, the handle is hot!). Let the salmon rest for a minute—this lets the juices redistribute. Then, spoon more of that reduced, sticky glaze from the pan over the top, garnish, and serve immediately.
Common Mistakes to Avoid
Let’s avoid some classic kitchen face-palms, shall we?
- Soggy Salmon Skin: You didn’t pat it dry, did you? A wet fillet will steam instead of sear. Dry fish = crispy skin.
- Burnt Garlic Glaze: If you let the glaze boil for too long in the pan before going in the oven, the garlic can burn and turn bitter. 30 seconds is all it needs!
- Overcooking: This is the cardinal sin of seafood. Salmon continues to cook after it comes out of the oven (carryover cooking, fancy, right?). Take it out when it’s almost done to your liking. Remember: you can always cook it more, you can’t uncook it.
Alternatives & Substitutions
No soy sauce? Allergic to awesome? I got you.
- Soy Sauce Substitute: Use tamari (GF) or coconut aminos for a slightly sweeter, paleo-friendly option.
- Not a Honey Fan? Pure maple syrup works beautifully for a different flavor profile.
- Veggie Power: This glaze is incredible on roasted broccoli, carrots, or cauliflower. Seriously, try it.
- Protein Swap: Chicken thighs would love this treatment. Just adjust the cooking time accordingly.
FAQS about Honey Garlic Glazed Salmon
Can I make this in an air fryer?
Absolutely! Sear the salmon in a pan first for that crust (or skip it), then air fry at 400°F for 4-6 minutes, brushing with glaze halfway through.
What if I don’t have an oven-proof skillet?
No drama. Sear the salmon in a regular pan, then carefully transfer it to a lined baking sheet, pour the glaze over, and pop it in the oven.
How do I know when the salmon is done?
The best way is to gently press on the top with a fork. It should flake easily and feel slightly firm, not squishy. For the precision-obsessed, an internal thermometer should read 125-135°F for medium.
Can I use frozen salmon?
You can, but thaw it completely in the fridge first. If you try to sear a frozen block of fish, you’ll end up with a watery, steamed mess. Trust me on this.
Is this recipe keto-friendly?
Swap the honey for a sugar-free maple syrup alternative, and use coconut aminos instead of soy sauce. You’re golden!
How do I store the leftovers?
In a sealed container in the fridge for up to 2 days. Reheat gently in the oven or air fryer to keep the texture nice. The microwave will make it a bit sad.
Related Recipes
Final Thoughts about Honey Garlic Glazed Salmon
And that’s it! You’ve just unlocked the secret to a ridiculously easy, impossibly delicious dinner that will fool everyone into thinking you’re a kitchen genius. This honey garlic-glazed salmon is your ticket out of boring meal routines.
Printable Recipe Card
Want just the essential recipe details without scrolling through the article? Get our printable recipe card with just the ingredients and instructions.

![The Secret to Making Crispy & Juicy Chicken Every Time [With Tutorial]](https://sumararecipes.com/wp-content/uploads/2025/03/1-7-1024x536.jpg)