Hey, picture this: It’s a chilly evening, you’re wrapped in your favorite blanket, and the smell of cinnamon apples wafts through the house like a hug from grandma. But wait, you’re not slaving over a fancy dessert—nah, this is skillet apple crisp, baked right in that trusty cast iron pan you probably forgot you had. If you’re like me and crave something sweet without the drama of a full bakery session, buckle up. We’re diving into this easy, gooey delight that’ll have you high-fiving yourself in the kitchen.
Why This Recipe is Awesome
Okay, let’s cut the fluff—why bother with this skillet apple crisp when you could just grab a tub of ice cream and call it a night? First off, it’s ridiculously simple. We’re talking one pan, minimal cleanup, and results that look like you actually know what you’re doing. No rolling dough or tempering chocolate here; just slice some apples, toss on a crumbly topping, and let the oven do the magic.
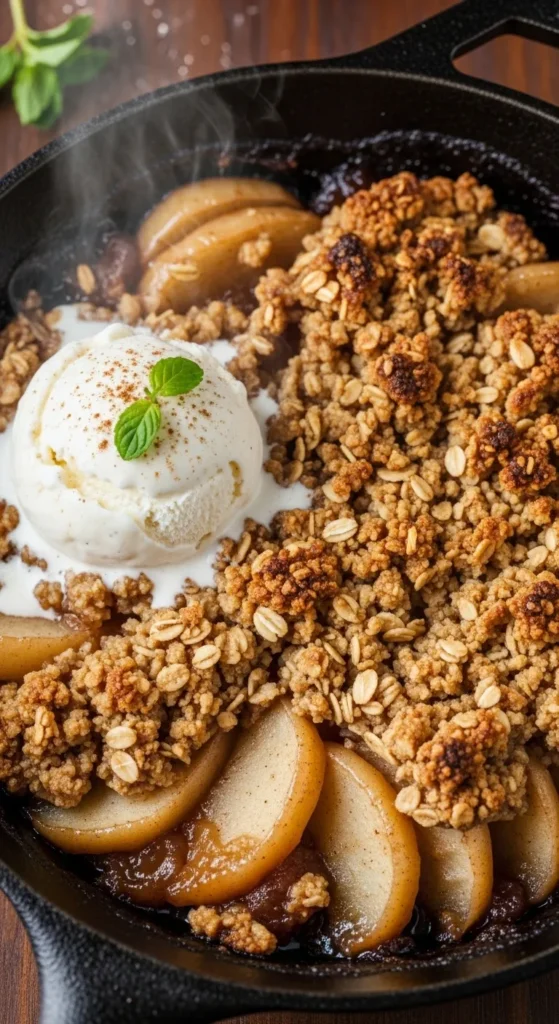
And the flavor? Explosive. The cast iron pan gives everything this caramelized edge that’s straight-up addictive—think tender apples bubbling under a crunchy, buttery oat streusel. It’s like apple pie’s cooler, lazier cousin who shows up unannounced but steals the show. Plus, it’s versatile as heck: Serve it warm with vanilla ice cream for that melty bliss, or cold the next day for breakfast (don’t judge, we’ve all been there).
Humor me for a sec—have you ever burned a dessert so bad it set off the smoke alarm? Yeah, me too. But this recipe is basically idiot-proof. Even on my worst days, when I’m juggling a million things, it turns out golden. It’s forgiving if you eyeball measurements, and the end result screams “autumn comfort” without needing a seasonal excuse. In a world of complicated recipes that demand unicorn ingredients, this one’s your reliable buddy. Trust me, after one bite, you’ll wonder why you ever bothered with anything else.
Ingredients You’ll Need
Alright, let’s raid the pantry. This recipe serves about 6-8 folks, or just you over a weekend binge—no shame. Keep it simple; we’re not building a rocket here.
- 6 medium apples: Go for tart ones like Granny Smith to balance the sweetness. If they’re looking sad in your fruit bowl, this is their redemption arc.
- 1/2 cup granulated sugar: For that sweet kick. Brown sugar works too if you’re feeling fancy.
- 1 teaspoon ground cinnamon: The spice that makes everything smell like heaven. Don’t skimp—it’s the MVP.
- 1 tablespoon lemon juice: Fresh if possible; it keeps those apples from turning brown and adds a zing. Bottled? Fine, we’re not purists.
- 3/4 cup old-fashioned oats: For that chewy, hearty topping. Quick oats? Eh, they’ll do in a pinch but won’t crisp as nicely.
- 3/4 cup all-purpose flour: Basic stuff; gluten-free if you swing that way.
- 1/2 cup brown sugar: Packed tight—it’s what gives the topping that caramel vibe.
- 1/2 teaspoon salt: Just a pinch to make flavors pop. Skip it and everything tastes flat, FYI.
- 1/2 cup unsalted butter: Cold and cubed. It’s the glue holding this crunchy dream together. Vegan butter? Totally swaps in.
- Optional: 1/2 cup chopped nuts: Pecans or walnuts for extra crunch. If nuts aren’t your jam, ditch ’em—no biggie.
Pro tip: Measure with your heart on the cinnamon if you’re a spice fiend. It’ll make the whole house smell amazing.
Step-by-Step Instructions
Fire up that oven to 375°F (190°C) first—don’t skip this, or you’ll regret it. Grab your 10-12 inch cast iron skillet; if it’s not seasoned, give it a quick oil wipe. Ready? Let’s roll.
- Prep the apples: Peel and slice those 6 apples into thin wedges. Toss them in a bowl with the granulated sugar, cinnamon, and lemon juice. Give it a good stir so everything’s coated. Let it sit for 5 minutes while you daydream about dessert—this lets the juices mingle.
- Melt butter in the skillet: Pop the skillet on medium heat on the stovetop. Add half the butter (1/4 cup) and let it melt and bubble. Dump in the apple mixture and cook for about 5-7 minutes, stirring occasionally. The apples should soften a bit and get syrupy. If they stick, add a splash of water—no panic.
- Make the topping: While apples cook, mix the oats, flour, brown sugar, and salt in a separate bowl. Cut in the remaining cold butter with a fork or your fingers until it looks like coarse crumbs. It should clump together when squeezed— that’s your sign it’s ready. If it’s too dry, add a teaspoon of water.
- Assemble and bake: Spread the topping evenly over the apples right in the skillet. No need to press it down hard; let it be crumbly. Slide the whole thing into the preheated oven and bake for 25-30 minutes. You’re aiming for a golden-brown top that’s bubbly around the edges. Poke a fork in an apple to check if it’s tender.
- Cool and serve: Pull it out (use oven mitts, genius) and let it cool for 10 minutes. This thickens the filling so it’s not a soupy mess. Scoop into bowls, top with ice cream or whipped cream, and dig in while it’s warm. Leftovers? Cover and fridge ’em for up to 3 days—reheat in the oven for that fresh crisp.
There you have it—under an hour from start to finish. Easy, right? If your kitchen smells like a bakery now, pat yourself on the back.
Common Mistakes to Avoid
We’ve all been there, turning a simple recipe into a kitchen disaster. Here’s the lowdown on pitfalls, served with a side of sarcasm so you don’t repeat my blunders.
- Forgetting to preheat the oven: Yeah, that “I’ll just wing it” attitude? It leads to soggy bottoms and uneven baking. Always preheat—it’s not optional, it’s science.
- Overcooking the apples on the stove: Stir them gently, not like you’re mad at them. If they turn to mush before baking, your crisp becomes apple sauce surprise. Keep an eye on the clock.
- Using warm butter for the topping: Cold butter is key for that flaky texture. If it’s melty from the start, you’ll end up with a greasy blob instead of crumbs. Chill out, literally.
- Skipping the lemon juice: Think it’s no big deal? Boom—brown apples that look unappetizing. Plus, it cuts the sweetness; without it, everything’s cloyingly sweet.
- Not seasoning your cast iron: If your pan’s rusty or sticky, the whole thing might taste off. A quick season before starting saves the day. Rookie move otherwise.
Laugh it off if you mess up—cooking’s supposed to be fun, not a stress test.
Alternatives & Substitutions
Life happens—maybe you’re out of oats or going dairy-free. No sweat; this recipe’s flexible like yoga pants. Here’s how to tweak it without ruining the vibe.
For apples, swap in pears or peaches for a twist. IMO, mixing half apples and half berries adds a juicy pop—think strawberry apple crisp for summer vibes. If you’re gluten-free, use almond flour or a 1:1 GF blend instead of regular flour; it crisps up just fine.
Butter alternatives? Coconut oil works for a tropical hint, or vegan margarine if that’s your thing. Just keep it solid for the topping. Oats out? Crushed graham crackers or even cornflakes can sub in for crunch—gets creative, right?
Sweetener swaps: Honey or maple syrup instead of sugar for a natural edge, but reduce the amount since they’re sweeter. Add nutmeg or ginger to the cinnamon for extra spice warmth. And if nuts are a no-go due to allergies, toss in chocolate chips post-bake—decadent upgrade.
Personal take: I once used canned apples in a pinch, and it was shockingly good. Lazy? Yes. Delicious? Absolutely. Experiment, but start small so you don’t end up with a weird hybrid.
FAQs
Can I make this ahead of time?
Totally! Prep the apples and topping separately, then assemble and bake when ready. It holds in the fridge for a day uncooked. Just add a few extra minutes to bake time if it’s cold. Why rush when you can chill?
What if I don’t have a cast iron skillet?
No panic—use any oven-safe pan or even a baking dish. But honestly, cast iron gives that killer sear. Borrow one from a friend; tell ’em it’s for science.
Is this recipe vegan-friendly?
Swap the butter for plant-based, and you’re golden. Everything else is already vegan. Who knew comfort food could be so inclusive? High-five to Mother Nature.
Can I add booze to amp it up?
Heck yes—splash some bourbon or rum into the apple mix while cooking. It evaporates but leaves a cozy warmth. Just don’t overdo it, or it’ll taste like a cocktail gone wrong. Fun for adults-only nights.
How do I store leftovers?
Fridge in an airtight container for 3-4 days. Reheat in the oven at 350°F for 10 minutes to crisp it back up. Microwave works too, but the topping gets soft—your call if you’re in a hurry.
What apples are best?
Tart ones like Granny Smith or Honeycrisp hold shape better. Sweet apples like Gala turn mushy fast. Mix varieties for depth—why settle for boring?
Can I double the recipe?
Sure, but use a bigger skillet or two pans. Baking time might extend a bit. Perfect for parties, unless you’re hoarding it all—totally understandable.
Final Thoughts
Whew, we’ve sliced, stirred, and baked our way to apple crisp nirvana. If your kitchen’s now a cinnamon-scented haven, mission accomplished. This skillet wonder proves you don’t need pro skills for epic eats—just a pan and some attitude. Now go whip this up, share it with pals (or not), and bask in the glory. You’ve got this, chef. Until next crave—stay saucy!
Printable Recipe Card
Want just the essential recipe details without scrolling through the article? Get our printable recipe card with just the ingredients and instructions.