Picture this: It’s December 23rd. You’ve baked a gorgeous, moist Christmas cake that smells like a holiday dream. But it’s sitting there… naked. Plain. A little sad, honestly. The pressure to transform it into a festive masterpiece feels immense. Do you splurge on a pricey bakery cake? Fight the supermarket crowds for a tub of lackluster frosting and some questionable sprinkles?
Nope. Not this year. This year, we’re taking back control of our holiday glamour, and we’re doing it with style, a dash of glitter, and zero professional pastry chef skills required. I’m talking about DIY decorations that look like a million bucks but are made with things you probably already have in your pantry. Because the best part of the holidays isn’t perfection—it’s the joy (and the hilarious, frosting-covered mess) you create along the way. So, pour yourself a glass of something merry, and let’s make your Christmas cake the star of the show.
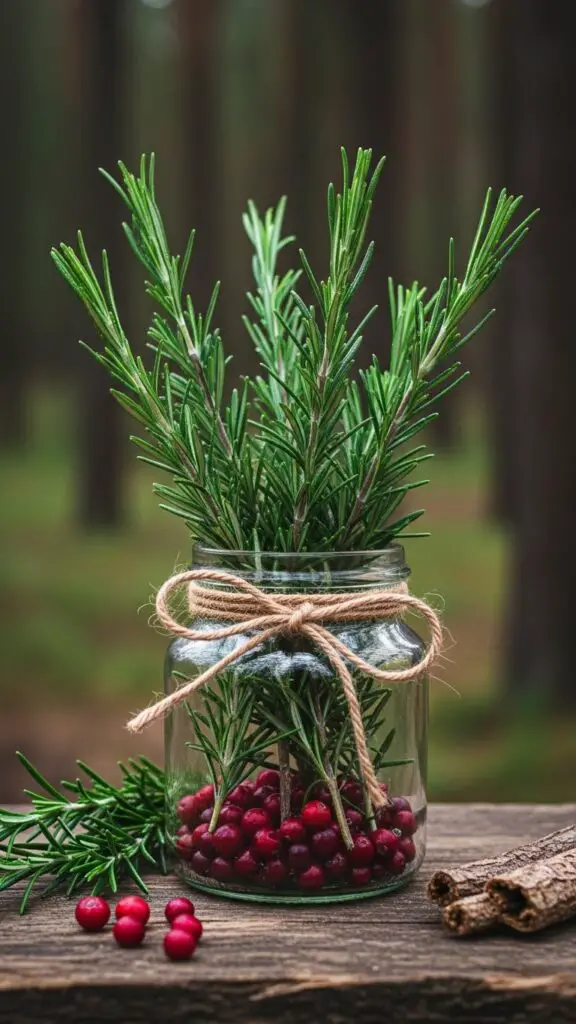
1. The Rustic Rosemary & Cranberry Forest
Short Hook / Why It’s Awesome: This is for anyone who wants maximum “wow factor” with minimal effort. It’s elegant, naturally gorgeous, and smells like Christmas in a pine forest. No piping skills required!
Ingredients:
- Fresh rosemary sprigs (6-8, of varying lengths)
- Fresh cranberries (a small handful)
- Granulated sugar, for coating
- A simple, snowy frosting (buttercream, cream cheese, or even just a thick dusting of powdered sugar on the cake)
- Optional: A few sprigs of thyme or small fir twigs
Step-by-Step Instructions:
- Wash and thoroughly dry your rosemary sprigs and cranberries. Any water will make the sugar melt.
- Roll the damp cranberries in granulated sugar until they look like little frosted gems. Set them on parchment paper to dry slightly.
- Frost your cake smoothly or with intentional swoops to look like snowdrifts.
- Now, just start arranging! Push the rosemary sprigs into the top of the cake to look like little trees. Cluster the sugared cranberries around the base of the “trees” and in little piles. Add smaller herb sprigs for undergrowth. That’s it. You’ve built a forest.
Why You’ll Love It:
It’s almost impossible to mess up, and it instantly gives your cake a magazine-worthy, rustic charm. The combination of deep green, red, and white is classic. Plus, you can snack on the extra sugared cranberries—they’re tart, sweet, and addictive. IMO, this beats a fussy fondant reindeer any day.
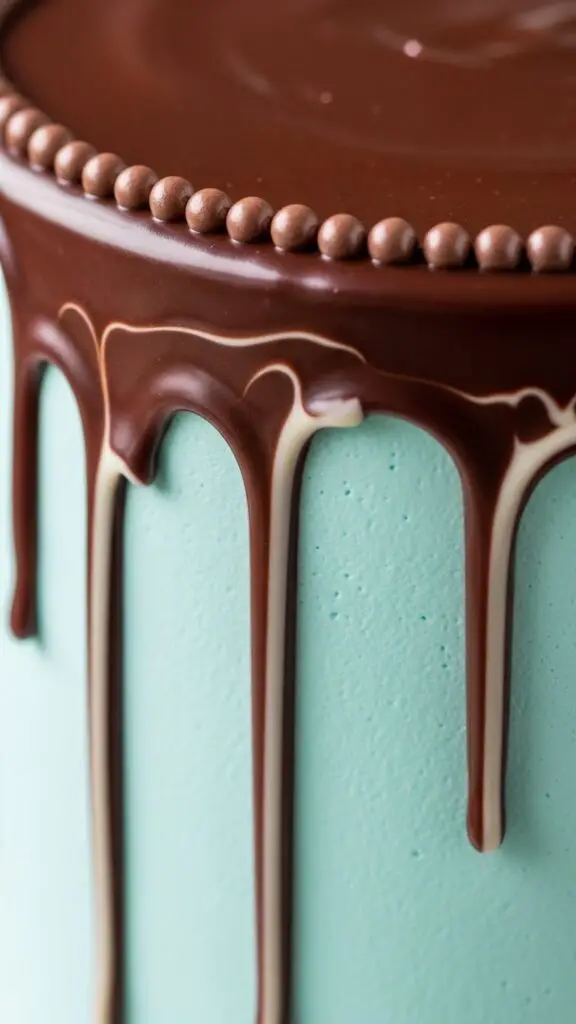
2. The Chocolate Drip That Actually Behaves
Short Hook / Why It’s Awesome: That gorgeous, glossy chocolate drip is the holy grail of cake decorating. It looks pro, feels luxurious, and here’s the secret: it’s stupidly easy if you get your ratios right. No more tear-inducing, too-thick globs or runny rivers.
Ingredients:
- 100g (about 3.5oz) of good quality dark or semi-sweet chocolate, finely chopped
- 100ml (about 1/3 cup + 1 tbsp) of heavy/double cream
- A pinch of sea salt (trust me)
- A fully frosted and chilled cake (this is non-negotiable!)
Step-by-Step Instructions:
- Place your chopped chocolate in a heatproof bowl.
- Heat the cream in a small saucepan until it just starts to simmer—tiny bubbles around the edges. Don’t let it boil wildly.
- Pour the hot cream over the chocolate and let it sit for 2 minutes without touching it. This feels like a test of patience, but it’s crucial.
- Add the salt, then whisk gently from the center out until you have a smooth, shiny, luxurious ganache. Let it cool for 5-10 minutes until it’s just slightly warmer than room temperature. It should be like warm honey.
- The Test: Spoon a little ganache down the side of your chilled cake. It should drip slowly, about halfway down, and then stop. If it races to the bottom, let it cool more. If it barely moves, warm it for 5 seconds in the microwave.
- Once it’s the right consistency, pour a pool in the center of the cake and gently push it to the edges with the back of a spoon, letting the beautiful drips fall naturally.
Why You’ll Love It:
Conquering the chocolate drip is a cake-decorating right of passage. It feels fancy and decadent, and when you nail it, you’ll feel like a Baking Champion. That pinch of salt? It cuts the sweetness and makes the chocolate flavor sing.
3. The “Snowfall” Meringue Kisses
Short Hook / Why It’s Awesome: These little puffs of sweet, crispy-chewy meringue look like magical snowballs or fluffy clouds. You can make them ahead of time, and they add incredible texture against smooth frosting.
Ingredients:
- 2 large egg whites, at room temperature
- 115g (1/2 cup + 2 tbsp) granulated sugar
- A pinch of cream of tartar (or 1/2 tsp lemon juice)
- Optional: 1/2 tsp vanilla or peppermint extract
Step-by-Step Instructions:
- Preheat your oven to 100°C (210°F) and line a baking sheet with parchment.
- In a super clean, grease-free bowl, whisk the egg whites and cream of tartar until soft peaks form.
- Gradually add the sugar, a tablespoon at a time, whisking on high speed until the meringue is thick, glossy, and holds stiff peaks. Rub a bit between your fingers; if it’s gritty, keep whisking.
- Fold in your extract, if using.
- Spoon or pipe small kisses onto the baking sheet. Bake for 1.5 hours, then turn the oven off and let them cool completely inside (this prevents cracking).
Why You’ll Love It:
They’re light as air, not too sweet, and they store for ages in an airtight container. Scatter them artfully on your cake for a whimsical, winter wonderland effect. They’re also the perfect “I need to do something productive” procrastination bake.
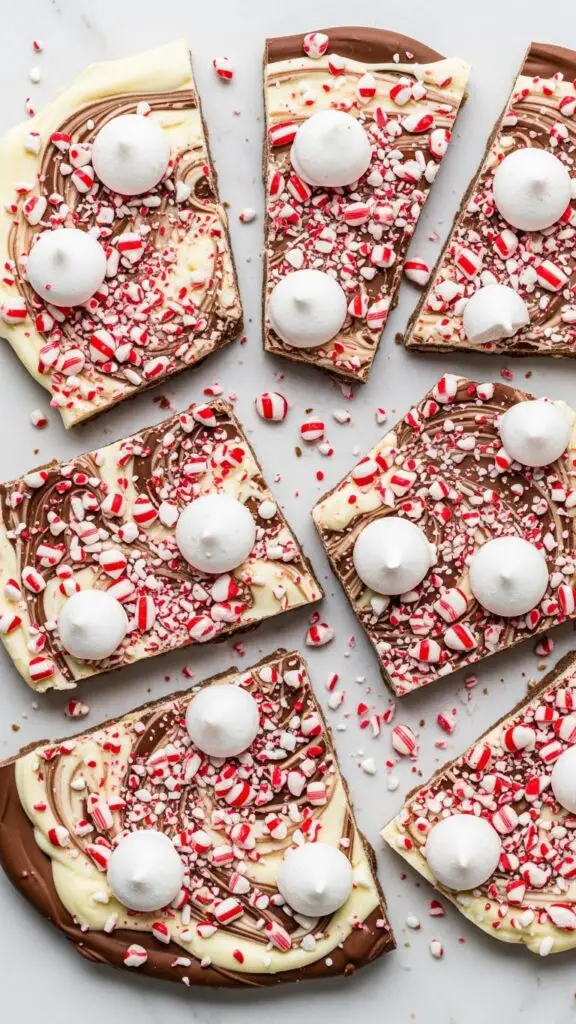
4. The Candy Cane Crunch Bark
Short Hook / Why It’s Awesome: It adds a fantastic CRUNCH, a huge pop of festive color, and uses up those extra candy canes you definitely bought too many of. It’s decoration you can also just snack on by the handful.
Ingredients:
- 4-5 candy canes or peppermint candies
- 200g (7oz) white chocolate
- Optional: A drizzle of dark chocolate, crushed freeze-dried raspberries
Step-by-Step Instructions:
- Unwrap your candy canes and place them in a sturdy zip-top bag. Channel your holiday frustrations and smash them with a rolling pin until you have a mix of chunks and dust. No food processor needed 🙂
- Melt the white chocolate gently (short bursts in the microwave, stirring between each, is my lazy method).
- Spread the melted chocolate thinly on a parchment-lined tray.
- Immediately shower it with the crushed candy cane. Press it in gently. Add any other extras.
- Let it set completely at room temp or in the fridge, then break it into wild, jagged pieces.
Why You’ll Love It:
Pressing pieces of this bark into the sides or top of a frosted cake creates an instant modern, graphic look. The sweet peppermint flavor is pure Christmas nostalgia. It’s a zero-stress, high-impact decoration.
5. The “I Can’t Believe It’s Buttercream” Poinsettias
Short Hook / Why It’s Awesome: Piping flowers sounds terrifying. Piping these flowers? Not so much. With one piping tip and a little confidence, you can create stunning edible poinsettias that’ll make your grandmother gasp.
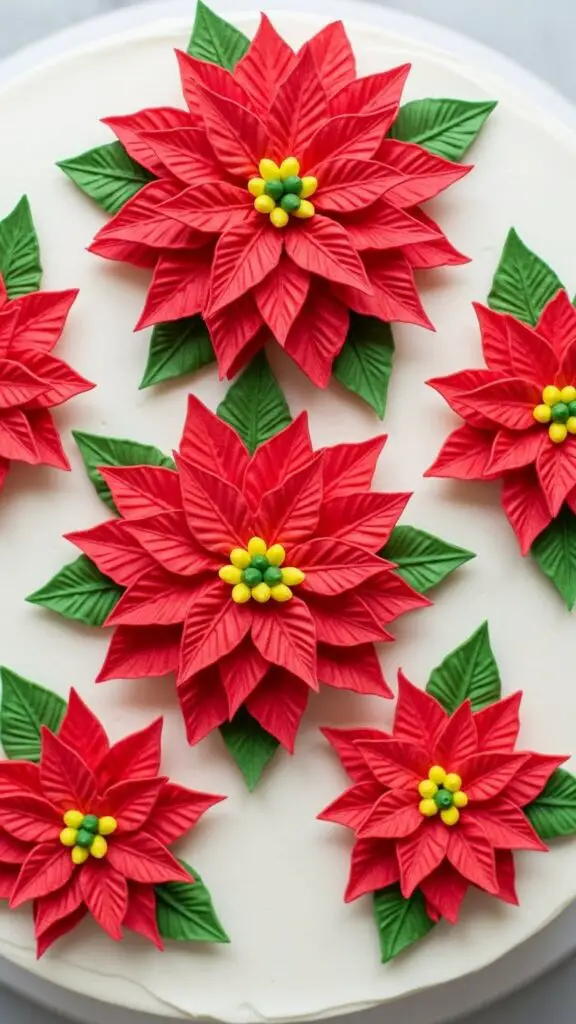
Ingredients:
- A batch of buttercream frosting, tinted red (and maybe a little green for leaves)
- Piping bags
- A petal tip (like Wilton 104) – this is the only special tool, I promise!
- A small round tip (like Wilton 3) or a toothpick for the center
Step-by-Step Instructions:
- Fit your bag with the petal tip and fill it with red buttercream. On a small square of parchment, practice: Hold the bag so the wide end of the tip touches the surface, the narrow end points up. Squeeze and pull a short, slightly curved petal. Release. See? You just made a petal!
- Pipe 5-7 petals in a circle to form one flower. Do this directly on your parchment squares. Pop them in the freezer for 10 minutes to firm up.
- Use a dab of frosting or a small spatula to carefully transfer the frozen flowers onto your cake. They’ll defrost quickly and stick.
- Pipe little yellow dots in the center with the round tip or a toothpick. Add green leaves if you’re feeling fancy.
Why You’ll Love It:
The look on people’s faces when you say you piped the flowers yourself? Priceless. It’s a simple technique that yields stunning results. And piping them on parchment first is a total game-changer—no stress, no ruining the cake.
6. The Gingerbread Cookie Topper Brigade
Short Hook / Why It’s Awesome: It’s a two-in-one holiday treat! Adorable, edible figurines that double as cake bling. Let the kids decorate the cookies, and you get the credit for the stunning cake. It’s a win-win.

Ingredients:
- Your favorite gingerbread cookie dough (stiffer dough holds shapes better)
- Royal icing for “glue” and details
- Lollipop sticks or paper straws (for securing)
Step-by-Step Instructions:
- Roll out your dough and cut into festive shapes: stars, trees, snowmen, reindeer. Make them slightly smaller than you think—they’re toppers, not a whole meal!
- Bake and cool completely.
- Decorate with royal icing. Have fun with it! The more personality, the better.
- Once the icing is rock hard, dip the end of a lollipop stick in a little royal icing and press it into the back of the cookie. Let it set as a “support.” Then, just push the other end of the stick into your frosted cake.
Why You’ll Love It:
It adds height, drama, and a ton of charm. Your cake becomes a festive scene. After serving, everyone gets their own cookie topper. Just make a few extras, because… well, you know.
7. The Honeycomb Gold-Dusted Walnuts
Short Hook / Why It’s Awesome: For a sophisticated, minimalist cake that still screams “special occasion.” This is about texture and subtle, elegant sparkle. It’s the little black dress of cake decorations.
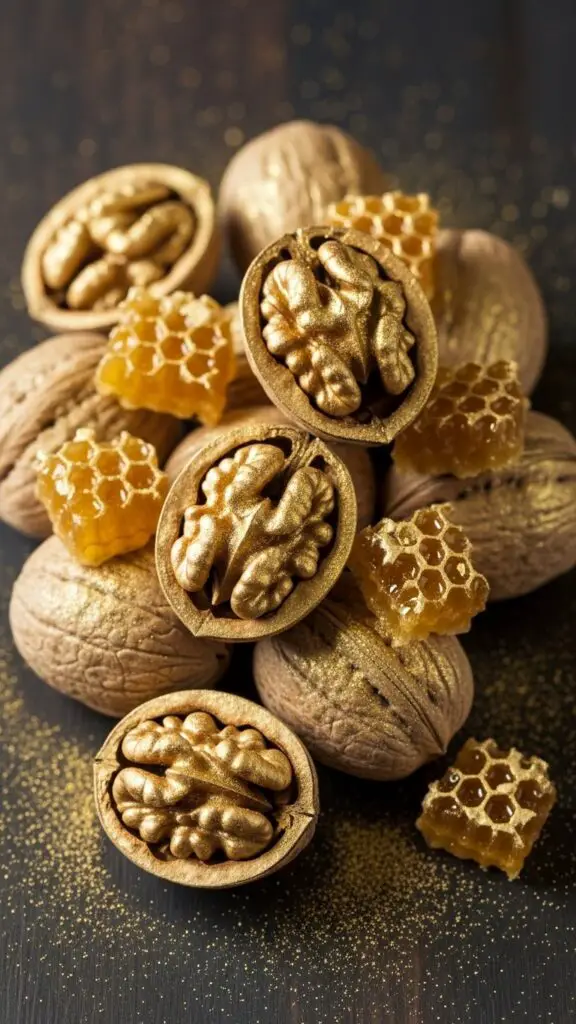
Ingredients:
- 1 cup walnut halves
- 2 tbsp honey
- A good pinch of flaky sea salt
- Edible gold luster dust (not glitter!)
- 1 tsp vodka or lemon extract (as a paint medium)
Step-by-Step Instructions:
- Preheat oven to 175°C (350°F). Toss walnuts with honey and salt.
- Spread on a parchment-lined tray and bake for 10-12 minutes, until fragrant and golden. Let cool.
- Mix a tiny amount of gold dust with a few drops of vodka/extract to make a paint.
- Using a clean brush, lightly dry-brush the tips and edges of the walnuts with the gold paint. Less is more here.
- Let dry, then pile them artfully on your cake.
Why You’ll Love It:
It’s ridiculously easy but looks incredibly expensive. The salty-sweet nuts add a grown-up flavor profile that balances a rich cake perfectly. It says, “I am a person who has my life together during the holidays.” (Even if my wrapping paper stash says otherwise.)
8. The Sugared Sage & Berry Garland
Short Hook / Why It’s Awesome: A beautiful, natural wreath to adorn the side of your cake. It’s fragrant, unique, and uses the kind of ingredients that make people go, “Ooh, how did you think of that?”
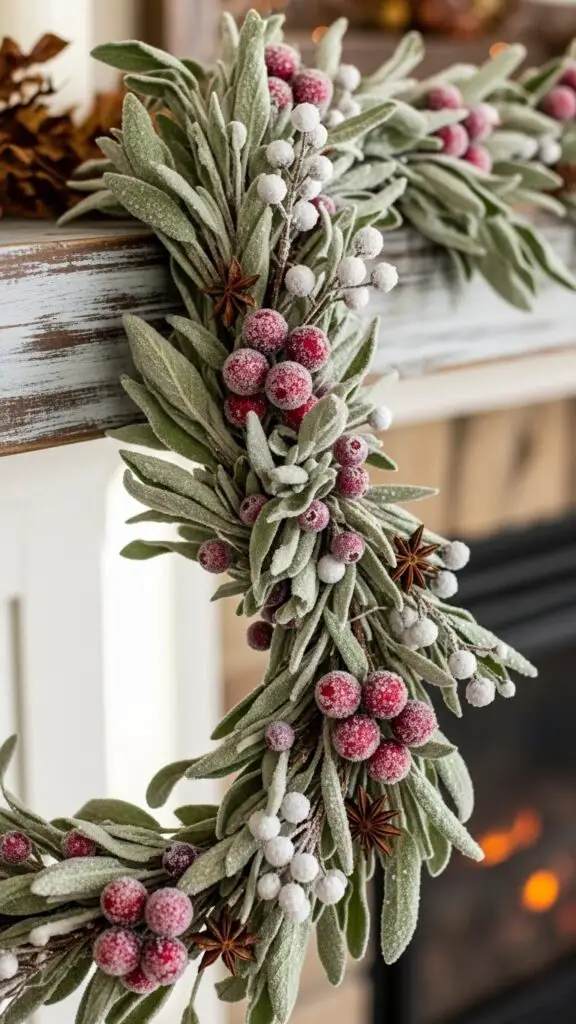
Ingredients:
- Fresh sage leaves (the bigger, the better)
- Small cluster berries (like red or black currants, or even small cranberries)
- 1 egg white, lightly beaten
- Superfine or caster sugar
Step-by-Step Instructions:
- Using a pastry brush, lightly coat each sage leaf and berry cluster with egg white.
- Immediately dredge them in sugar until fully coated. Shake off the excess.
- Lay them on a wire rack to dry for a few hours, until completely hard and crystallized.
- On your frosted cake, arrange the leaves and berries in a crescent or full circle around the base or top edge, using a little extra frosting as glue if needed.
Why You’ll Love It:
It’s shockingly beautiful. The sage leaves look like frosted silver-green velvet, and the berries sparkle like jewels. It’s a fantastic decoration for a cheese-based cake (like a ricotta or mascarpone frosting) or a spiced cake.
9. The Whipped Cream Cloud & Pomegranate Jewels
Short Hook / Why It’s Awesome: For when you want something light, fresh, and bursting with color. It’s vibrant, juicy, and takes about 30 seconds to assemble. Perfect for a festive pavlova or a simple sponge.
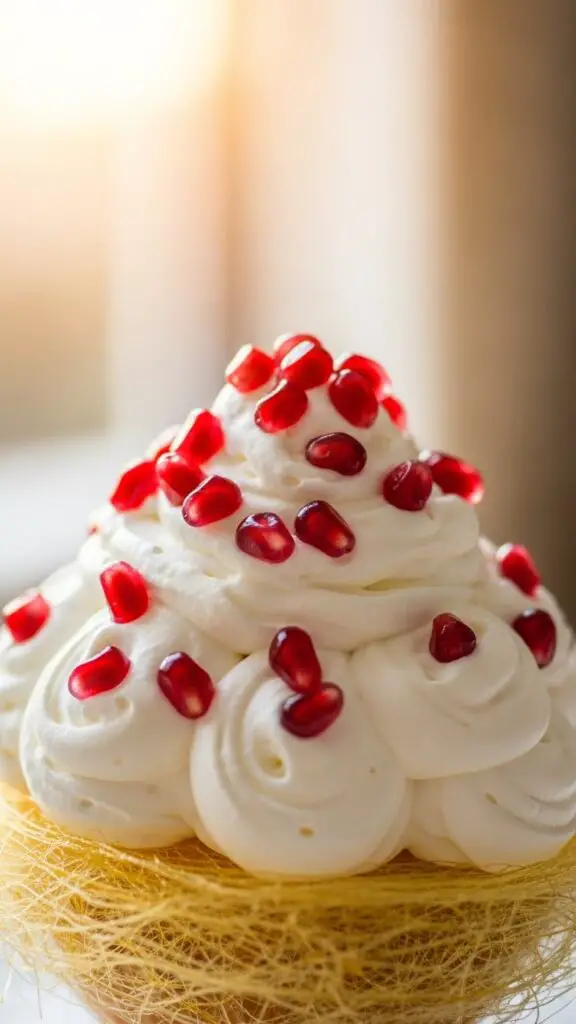
Ingredients:
- 1-2 cups of firmly whipped heavy cream, sweetened lightly
- The seeds of 1 pomegranate (aka the “jewels”)
- Optional: A few mint leaves
Step-by-Step Instructions:
- Pile or swoop the whipped cream high on your cake.
- Generously scatter the bright red pomegranate arils all over the top, letting them tumble down the sides.
- Tuck in a few mint leaves for a green contrast.
- Serve immediately (whipped cream waits for no one).
Why You’ll Love It:
It’s a showstopper in its simplicity. The tart pop of the pomegranate against the sweet cream is divine. It’s also a lifesaver if you’re decorating at the last minute and need instant beauty. No one needs to know it took you less time than boiling the kettle.
10. The Salted Caramel Pretzel Snowflakes
Short Hook / Why It’s Awesome: Sweet, salty, crunchy, and surprisingly delicate-looking. It’s the perfect blend of rustic and chic, and it solves your salty-sweet cravings in one decorative flourish.
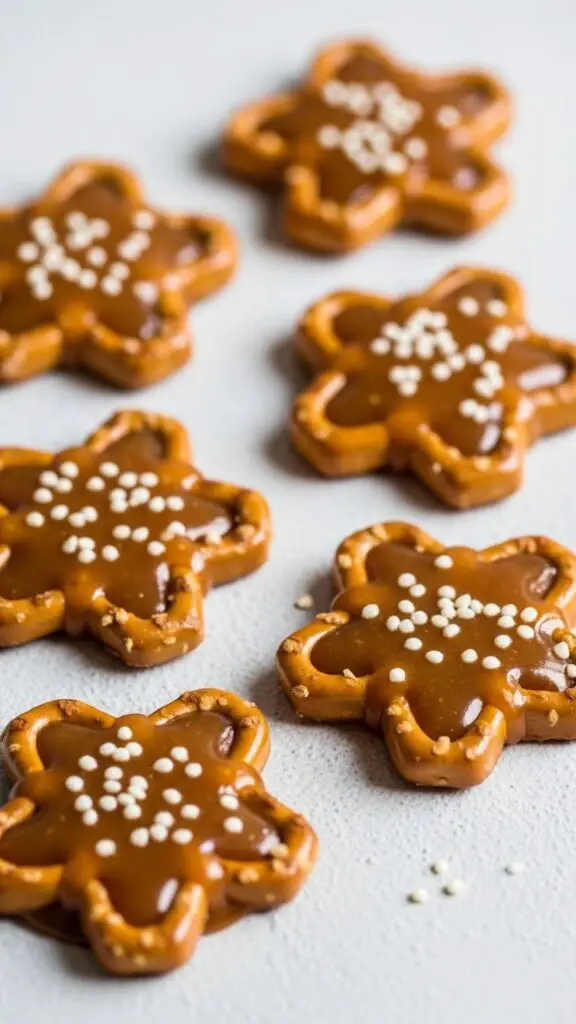
Ingredients:
- Mini pretzel twists
- 1 cup salted caramel sauce (store-bought is absolutely fine, I won’t tell)
- Optional: White chocolate for drizzling
Step-by-Step Instructions:
- Lay out a sheet of parchment. Dip one side of each pretzel twist in the salted caramel, let the excess drip off, and place it on the parchment.
- While the caramel is still sticky, press the pretzels together in groups of 3 or 4, with their ends touching in the center, to form simple snowflake shapes.
- Let them set completely. If you like, drizzle with a little melted white chocolate for extra snowiness.
- Gently press these pretzel clusters into the top and sides of your frosted cake.
Why You’ll Love It:
It’s that irresistible sweet-and-salty combo everyone loves. The geometric shapes look modern and cool, and they add an amazing crunch. It’s a decoration that promises—and delivers—big flavor.
Your Festive Masterpiece Awaits!
So there you have it—ten ways to take your Christmas cake from “nice” to “Santa himself would pause for a slice.” The best part? None of these require a degree in pastry arts. They just require a little fun, a willingness to get your fingers a bit sticky, and the understanding that the most memorable holiday creations often come from our own kitchens, not a pristine bakery box.
This year, don’t just bake a cake. Create a moment. Tell a story with sugared sage and chocolate drips. Make people laugh with a gingerbread reindeer staring solemnly from the cake summit. The magic isn’t in perfection; it’s in the glittery, delicious, heartfelt attempt. Your cake, with all its homemade charm, will be the one everyone remembers.
Now go on—pick your favorite, make a glorious mess, and have the merriest, most delicious Christmas yet. You’ve totally got this. 🎄✨
Printable Recipe Card
Want just the essential recipe details without scrolling through the article? Get our printable recipe card with just the ingredients and instructions.

