So, you’re craving something zesty, sweet, and spectacular but your motivation to actually make it is hovering somewhere around zero? Same, my friend. Same. You’ve stared into the abyss of complicated dessert recipes that require 17 bowls, a stand mixer you don’t own, and the patience of a saint. Well, look no further. This isn’t just a recipe; it’s a culinary cheat code for brilliant people who are spectacularly lazy. Welcome to your new obsession.
Why This Recipe is Awesome
Let’s cut to the chase. This recipe is idiot-proof. I’ve made these while simultaneously arguing on the phone, burning a separate dinner, and questioning all my life choices—and they still turned out perfectly. They’re the Houdini of desserts: magically transforming three simple ingredients into a treat that will have people thinking you slaved away for hours. The tangy lemon curd layer sitting on that shortbread-esque crust is a masterpiece of contrast. It’s the kind of dessert that earns you compliments and lets you keep your lazy reputation intact. It’s a win-win.
Ingredients You’ll Need
Gather your tiny but mighty army. That’s it. Seriously.
- 1 (14-16 oz) box of shortbread cookie dough: The pre-made, press-in-the-pan kind is your best friend here. Don’t overthink it. This genius block of buttery goodness is your crust and your base.
- 2 (11-12 oz) jars of lemon curd: Not pie filling! Curd! It’s smoother, tangier, and absolutely perfect for this. You’ll find it near the jams and jellies.
- 1 (8 oz) container of frozen whipped topping, thawed: (Yes, like Cool Whip). This is the secret weapon that makes the filling set into a creamy, dreamy, cloud-like layer instead of a puddle of lemon soup. Don’t skip this!
Step-by-Step Instructions
- Preheat & Prep. Crank your oven to 350°F (175°C). Take a 9×13 inch baking pan and show it some love with a light spritz of non-stick spray. No one likes a stuck-on bar.
- Create the Crust. Plop that entire block of shortbread cookie dough into the pan. Now, get in there with your clean fingers and press, push, and prod it into a beautiful, even layer across the bottom. It doesn’t have to be perfect, but try to get it as uniform as possible. This is your foundation—make it proud.
- Bake That Base. Slide the pan into your preheated oven and let the crust bake for 15-20 minutes. You’re looking for a lovely light golden brown color around the edges. Once it’s there, pull it out and let it cool completely on a wire rack. IMPORTANT: Let it cool! If you add the topping to a hot crust, you’ll have lemon soup. Not ideal.
- Whip Up the Filling. While the crust is cooling, grab a big bowl. Dump in both jars of lemon curd and the entire container of thawed whipped topping. Now, whisk it all together until it’s smooth, creamy, and a gorgeous pale yellow. It should look like sunshine in a bowl.
- Assemble the Magic. Pour your sunny lemon mixture over the completely cooled crust. Use a spatula to spread it into every corner, nice and even.
- Chill Out. This is the hardest part: patience. Carefully cover the pan and refrigerate it for at least 4 hours, but overnight is honestly best. This gives the filling time to firm up perfectly so you get clean, beautiful slices.
Common Mistakes to Avoid
Let’s avoid kitchen tragedies, shall we?
- Using a Hot Crust: I’m saying it again because it’s the #1 way to ruin this. Hot crust + cool topping = weepy, runny mess. Let. It. Cool.
- Confusing Curd for Pie Filling: Lemon pie filling is chunkier and has a different texture. Lemon curd is smooth and spreadable. Grab the right jar!
- Skimping on Chill Time: I see you, getting impatient and cutting into it after an hour. You’ll get a goopy spoonful, not a elegant bar. Trust the process. The fridge is your friend.
Alternatives & Substitutions
Want to get fancy? IMO, it’s not necessary, but you do you.
- No Shortbread Dough? A sleeve of graham crackers crushed and mixed with 6 tbsp of melted butter and a tbsp of sugar makes a great press-in crust. Bake it for 8-10 minutes first.
- Want a Zestier Kick? Feel free to stir the zest of one real lemon into the filling mixture. It adds a gorgeous burst of fresh flavor and makes it look extra fancy.
- Whipped Topping Substitute? You can use an equal amount of sweetened, stabilized whipped cream, but honestly, the frozen stuff is foolproof and easier for this specific recipe.
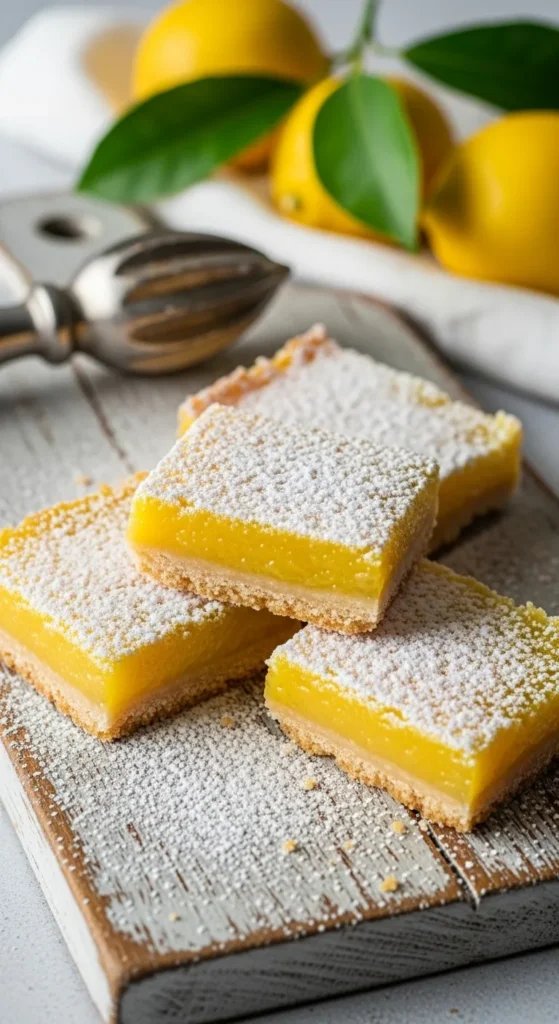
- Feeling Fancy? Dust the top with a snowfall of powdered sugar right before serving. It looks professional and adds a little extra sweetness.
FAQ
1. Can I use bottled lemon juice instead of fresh lemons?
Yes, you can, but fresh lemon juice gives the best flavor. Bottled juice may taste slightly less vibrant.
2. How do I store 3-ingredient lemon bars?
Store them in an airtight container in the refrigerator for up to 5 days. For longer storage, freeze them for up to 2 months.
3. Can I make these lemon bars gluten-free?
Absolutely! Just swap the crust ingredient (like graham crackers or cookies) with a gluten-free version.
4. Why are my lemon bars too runny?
They may not have baked long enough. Be sure to let them cool completely so they firm up properly before cutting.
5. Do lemon bars need to be refrigerated?
Yes, because of the egg and lemon mixture, they should be stored in the refrigerator for freshness and food safety.
Related Recipes:
- Almond Flour Zucchini Bread Recipe That’ll Make You Love Veggies
- Strawberry Tiramisu Recipe That Steals Hearts
- Strawberry Swiss Roll Cake Recipe: Perfect Summer Dessert
Final Thoughts
And there you have it. You’ve just unlocked the secret to impossibly easy, ridiculously delicious lemon bars that require barely any effort and even fewer ingredients. You’re now armed and dangerous with a dessert that impresses every single time. So go forth, bask in the glory of your newfound kitchen wizardry, and maybe even take a nap afterward. You’ve earned it. Now, who’s ready for a snack?
Printable Recipe Card
Want just the essential recipe details without scrolling through the article? Get our printable recipe card with just the ingredients and instructions.

