So, you’re staring into the pantry abyss, craving something sweet, but the mere thought of creaming butter and sifting flour makes you want to take a nap instead of preheat the oven. Same, my friend. Same. What if I told you that the solution to your lazy-baker’s dilemma is probably sitting in your cupboard right now? Get ready to have your mind (and your taste buds) utterly blown.
Why This Recipe is Awesome
Let’s cut to the chase. This recipe is the culinary equivalent of a magic trick. It’s so stupidly simple, it feels like you’re getting away with something. We’re talking three ingredients. That’s it. You can count them on one hand and still have fingers left to press the fork into the dough. It’s idiot-proof, even I didn’t mess it up, and my culinary history includes a “smoke alarm soufflé.” They’re gluten-free by accident, require zero chill time (for the dough or for you), and you can go from craving to cookie-coma in under 20 minutes. Mic drop.
Ingredients You’ll Need
Gather ’round, folks. This is the shortest shopping list of your life. Pro-tip: Using a standard, conventional peanut butter (like Jif or Skippy) works best here. The natural, oily kinds can make the texture a bit funky.
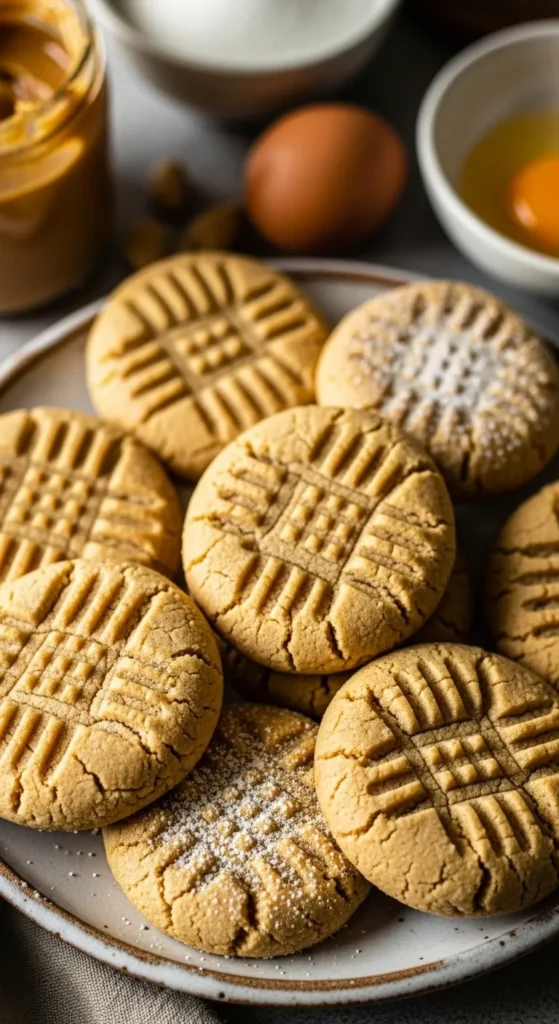
- 1 cup of peanut butter: Smooth, crunchy, whatever floats your boat. This is a judgment-free zone.
- 1 cup of sugar: White granulated sugar is the classic move. It gives them that perfect crackly top.
- 1 large egg: The mighty binder. The glue that holds our three-ingredient dream together.
See? I told you. You probably have this stuff. Now stop reading and go preheat your oven to 350°F (175°C). Seriously, go do it now. I’ll wait.
Step-by-Step Instructions
Okay, oven on? Great. Let’s make some cookies.
- The Big Mix. Dump your peanut butter, sugar, and that lone egg into a medium-sized bowl. Now, mix it. You can use a spoon, a spatula, or if you’re feeling fancy, a hand mixer. Just mix until it’s all one homogenous, slightly-sticky cookie dough situation. No fancy techniques here. Just mix until you stop seeing streaks of egg.
- The Scoop and Roll. Your dough might be a little sticky. That’s A-okay. Grab a tablespoon-sized portion and roll it into a ball between your palms. Place each glorious little ball onto a baking sheet lined with parchment paper. Give them about two inches of space to do their thing. They won’t spread a ton, but they need personal space, just like us after a long day.
- The Classic Criss-Cross. This is the most important step for that authentic PB cookie look! Take a fork and gently press down on each ball to flatten it. Then, turn the fork 90 degrees and press again to create that classic crosshatch pattern. It’s not just for looks; it helps them bake evenly. Pro-tip: Dip your fork in a little sugar between presses to prevent sticking. It’s a game-changer.
- Bake to Perfection. Slide your beautiful creations into that preheated oven of yours. Bake for 10-12 minutes. They won’t look super golden brown when they’re done; the edges might just be barely firming up. They firm up a LOT as they cool, so underbaking is your friend here. Trust the process.
- The Patience Test. This is the hardest part. Take them out of the oven and let them cool on the baking sheet for at least 5-10 minutes before you even think about moving them. They are fragile, delicate little angels straight out of the oven and will fall apart if you manhandle them. Let them cool and transform into actual cookies.
Common Mistakes to Avoid
Let’s learn from the hypothetical failures of others, shall we?
- Using all-natural peanut butter. IMO, this is the #1 reason for cookie despair. The extra oil can make your cookies spread into sad, oily puddles or become overly crumbly. Save the fancy, stir-it-yourself stuff for your toast.
- Skipping the preheat. Thinking you don’t need to preheat the oven—rookie mistake. Your baking time will be all out of whack, leading to potential cookie chaos.
- Overbaking because they “look too soft.” They are supposed to be soft coming out! They continue to cook on the hot tray. If you wait for them to look firm and golden, you’ll end up with peanut butter rocks. No one wants a rock.
- Not letting them cool. I know, I know. It’s torture. But moving them too early is a one-way ticket to Crumbville. Be cool. Let them cool.
Alternatives & Substitutions
Want to get a little wild? Here are some ideas.
- Sugar Swap: You can use a cup of brown sugar for a deeper, richer, almost molasses-like flavor. They’ll be a bit chewier and darker.
- Add-in Ideas: Stir in a handful of chocolate chips, some chopped peanuts for extra crunch, or even a dash of cinnamon to the dough. You rebel, you.
- For my vegan friends: You can try using a “flax egg” (1 tbsp ground flaxseed mixed with 3 tbsp water, let sit for 5 mins). The texture might be a bit more crumbly, but it should work in a pinch!
- No oven? FYI, you can actually microwave a single portion of the dough for about 30-45 seconds for an instant, warm, cookie-for-one experience. You’re welcome.
FAQ
Can I use margarine instead of butter?
There is no butter in this recipe. That’s the point! So, no. Please do not add butter or margarine. Just follow the simple, beautiful instructions.
Why did my cookies turn out super crumbly?
This usually means you overbaked them or possibly used a natural peanut butter. Next time, bake for less time and use a conventional PB.
Can I double this recipe?
Absolutely. Double all the ingredients. Your math skills are clearly superior. Just be prepared for a bit more arm workout when mixing.
How do I store these masterpieces?
Keep them in an airtight container at room temperature for up to a week. If they last that long. They also freeze beautifully for up to 3 months.
Can I use an egg substitute?
You can try a commercial egg replacer or the flax egg mentioned above, but the classic egg really does work best for binding. It’s a gamble with substitutes!
Are these really gluten-free?
Yep! As long as your peanut butter and other ingredients are certified gluten-free, these cookies are accidentally and wonderfully gluten-free.
Related Recipes;
- Almond Flour Zucchini Bread Recipe That’ll Make You Love Veggies
- Strawberry Tiramisu Recipe That Steals Hearts
- Strawberry Swiss Roll Cake Recipe: Perfect Summer Dessert
Final Thoughts
And there you have it. The cookie recipe for when you have zero time, zero energy, but 100% of a sweet tooth. You have no excuses now. Go forth and bake. Impress your friends, your family, or just your future self who will be very grateful you took ten minutes to make these. You’ve totally earned that warm, chewy, peanut buttery bite. Now go get ‘em, tiger
Printable Recipe Card
Want just the essential recipe details without scrolling through the article? Get our printable recipe card with just the ingredients and instructions.

