So, you’re hit with a sudden, massive craving for gooey, chocolatey, marshmallowy s’mores, but the thought of building a campfire in your living room seems… ill-advised? Same. What if I told you that the solution to your problem is literally three ingredients, one pan, and about ten minutes away from your face? Stop what you’re doing. This isn’t a drill. This is your ticket to dessert paradise, no kindling required.
Why This Recipe is Awesome
Let’s be real for a hot second. This recipe is the culinary equivalent of finding a $20 bill in your pocket. It’s stupidly easy, requires zero fancy skills, and the payoff is absolutely monumental. We’re talking about a warm, bubbly, decadent dip that tastes like a campfire memory but requires about 1% of the effort. It’s the ultimate party trick, the perfect “I-deserve-a-treat” treat, and the answer to “what can I bring?” that will make you an instant legend. It’s so simple, it’s almost embarrassing. But the kind of embarrassment you’re totally cool with when you’re scooping up a giant glob of deliciousness.
Ingredients You’ll Need
Gather ’round, friends. This is the shortest grocery list of your life. You probably have this stuff already.
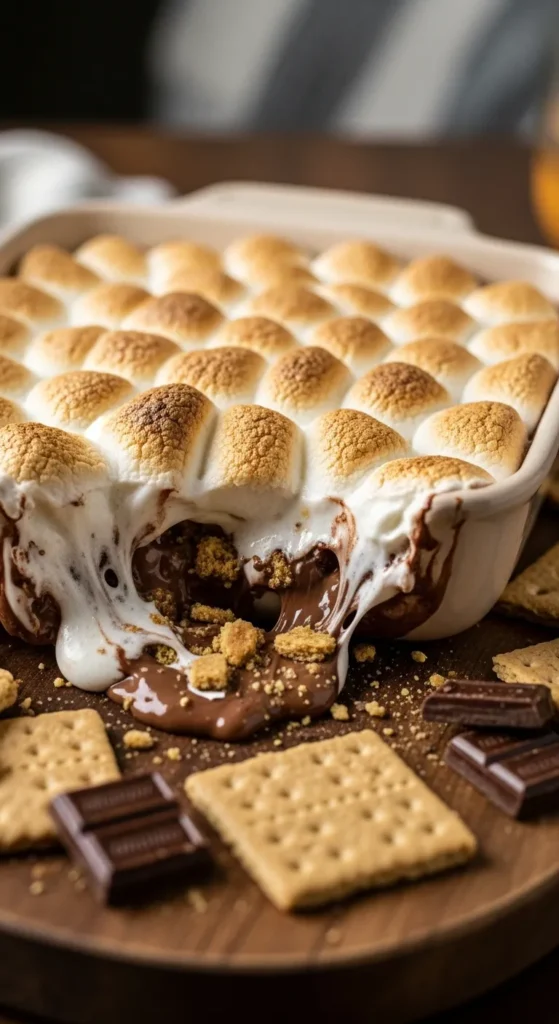
- 1 (11oz) bag of Milk Chocolate Chips: The foundation of our delicious operation. Don’t skimp! The quality of your chocolate is the star here. Semi-sweet works too if you’re not a milk chocolate maniac like me.
- 1 (7oz) jar of Marshmallow Fluff: Not mini marshmallows, not large marshmallows—Fluff. This magical, spreadable cloud is the key to achieving that perfect, gooey-smooth top layer. Trust me on this.
- Heavy Cream (approx. 1/2 cup): This is our secret weapon for achieving a dip-able, silky-smooth consistency instead of a burnt, chalky mess. Do not substitute milk. The fat content in heavy cream is non-negotiable for luxury.
See? I told you it was easy. Now, go raid your pantry.
Step-by-Step Instructions
Preheat your oven to 350°F (175°C). Go on, do it now. I’ll wait. [Insert elevator music here] Done? Awesome. Let’s get dipping.
- Grab your pan. You’ll need an oven-safe skillet or baking dish. A 9-inch cast-iron skillet is perfect for that rustic, “look-at-me-I’m-a-chef” vibe, but any small casserole dish works just fine.
- Create the chocolate layer. Pour the entire bag of chocolate chips into your chosen vessel. Drizzle the heavy cream over the top until the chips are mostly covered. You might not need the full 1/2 cup, just enough to make everything look nice and saucy.
- Smooth on the fluff. Now, for the fun part. Plop giant, glorious spoonfuls of the marshmallow fluff on top of the chocolate chips. You don’t have to be neat. In fact, chaotic blobs are encouraged. You can gently swirl it a tiny bit with a knife if you’re feeling fancy, but it’s not necessary.
- Bake to bubbly perfection. Pop that beautiful creation into your preheated oven for 10-15 minutes. You’re looking for the entire surface to be golden brown and bubbly. The chocolate underneath will be melted and perfect.
- Serve immediately. Carefully remove your masterpiece from the oven (THE PAN IS HOT, FYI). Let it sit for just a minute or two so you don’t scorch your tongue off, then dive in!
Common Mistakes to Avoid
Even the simplest recipes can have pitfalls. Let’s avoid them together, shall we?
- Using a flimsy baking dish: That plastic container from your takeout last night is not going to cut it. Use a proper oven-safe dish. Please.
- Skipping the heavy cream: I see you, thinking you can use milk. You’ll end up with a seized, clumpy chocolate disaster. The heavy cream keeps it smooth and dippable. It’s a must.
- Overbaking into a charcoal briquette: We are going for golden brown, not jet black. Set a timer! Once those bubbles are vigorous and the top is tan, it’s done.
- Trying to use whole marshmallows: They just won’t melt the same way! You’ll get weird chewy blobs instead of an even, toasted Fluff layer. Stick to the script.
Alternatives & Substitutions
Want to mix it up? You do you, boo. Here are some ideas.
- Chocolate: Swap the milk chocolate for semi-sweet, dark chocolate, or even a mix! Chopped-up chocolate bars work great too for a richer flavor.
- Dipper Vehicles: Graham crackers are the classic choice, but don’t stop there! Try it with pretzels (salty + sweet = YES), sliced strawberries, apple slices, or even just a big ol’ spoon.
- Flavor Boosts: Add a pinch of sea salt over the top before baking for a next-level sweet/salty situation. A tiny splash of vanilla extract or a sprinkle of cinnamon mixed with the chocolate chips is also a winner.
- No Oven? No Problem! You can make this dip in the microwave! Combine the chocolate chips and cream in a microwave-safe bowl and heat in 30-second bursts, stirring in between, until melted. Then, dollop the Fluff on top and microwave for another 30-45 seconds until warm and puffy.
FAQ
Can I make this ahead of time?
IMO, this is a strictly “make-and-devour-immediately” situation. The magic is in its warm, gooey state. It doesn’t reheat well, as the Fluff gets weird and chewy.
Help! My marshmallow fluff is stuck to the jar!
Pro tip: run the closed jar under very hot water for a minute. The Fluff will loosen up and become way easier to scoop. You’re welcome.
Can I use this as a fruit dip?
Absolutely! It’s phenomenal with strawberries, bananas, and pineapple. It’s basically a fondue, but we’re calling it a dip because it sounds more fun.
What if I don’t have an oven-safe skillet?
No sweat! Any 8×8 baking dish or small pie plate will work perfectly. Just make sure it’s not too big, or your dip layer will be too thin.
Is it possible to burn this?
Is it possible to trip over your own feet? Yes. Keep an eye on it! Ovens vary, so start checking at the 10-minute mark.
Can I add peanut butter?
Now you’re thinking! Dropping little spoonfuls of peanut butter in with the chocolate layer would be a glorious, glorious decision.
Related Recipes:
- Chocolate Bark: Easy Homemade Candy Recipe
- 3-Ingredient Lemon Bars: Quick & Easy Dessert Recipe
- Oreo Truffles: Easy No-Bake Chocolate Dessert Bites
- 3-Ingredient Peanut Butter Cookies: Quick & Easy Recipe
Final Thoughts
And there you have it. The world’s easiest, most crowd-pleasing dessert that requires barely any effort and even fewer ingredients. You now possess the knowledge to create pure, unadulterated joy in a pan. So what are you waiting for? Go forth, create your dip, and watch it disappear. You’ve earned every last sticky, delicious bite. Now go impress someone—or just yourself—with your newfound “culinary genius.” You’ve got this
Printable Recipe Card
Want just the essential recipe details without scrolling through the article? Get our printable recipe card with just the ingredients and instructions.

