Alright, let’s have a real talk. You’re scrolling through your phone, menu planning for the big holiday feast, and it’s the same list every single year: mashed potatoes, green bean casserole, sweet potato something-or-other. They’re classics for a reason, I get it. They’re comfortable. They’re familiar. They’re… maybe a little bit boring?
What if we took everything we love about those classic dishes—the creamy textures, the savory herbs, the cozy feels—and smashed them together with something unexpected? Imagine the best parts of a loaded baked potato crashing into your creamy mashed potatoes. Or your green bean casserole getting a major glow-up from a crunchy, fancy French onion topping.
That’s what we’re doing today. We’re throwing the holiday recipe rulebook out the frosty window and creating some truly epic comfort food mashups. These are the kind of dishes that will have your guests asking, “Wait, what is this?” followed immediately by, “Can I get the recipe?” Get ready to become a legend.
1. Fully Loaded Mashed Potato Bake
Why It’s Awesome: We took ultra-creamy mashed potatoes and gave them the personality of a fully loaded baked potato. It’s a two-for-one side dish deal that’s basically a meal in itself.

Ingredients
- 3 lbs russet potatoes, peeled and quartered
- 1 cup sour cream (plus more for topping)
- ½ cup whole milk
- 4 tbsp unsalted butter
- 1 ½ cups sharp cheddar cheese, shredded (divided)
- 6 slices bacon, cooked crispy and crumbled
- 3 green onions, thinly sliced (divided)
- Salt and freshly ground black pepper to taste
Step-by-Step Instructions
- Preheat your oven to 375°F (190°C) and grab a medium baking dish.
- Boil the potatoes in a large pot of salted water until they are fork-tender, about 15-20 minutes. Drain them really well.
- Return the hot potatoes to the pot and mash them until smooth.
- Add in the sour cream, milk, and butter. Keep mashing until everything is combined and gloriously creamy.
- Fold in 1 cup of the cheddar cheese, half of the crumbled bacon, and half of the green onions. Season aggressively with salt and pepper. Don’t be shy!
- Spread the mixture evenly into your baking dish. Top with the remaining ½ cup of cheese.
- Bake for 20-25 minutes, until the cheese is melted and bubbly and the edges are just starting to turn golden.
- Right before serving, top with the rest of the bacon, green onions, and a few extra dollops of sour cream.
Why You’ll Love It
This dish solves the age-old “mashed potatoes or baked potato?” debate by being both. The creamy base is pure comfort, while the crunchy, salty toppings add so much texture and flavor. It’s the ultimate crowd-pleaser and IMO, way more exciting than a standard bowl of mash.
2. French Onion Green Bean Casserole
Why It’s Awesome: We’re ditching the canned soup and those, let’s be honest, sometimes-soggy fried onions for the deep, caramelized flavor of real French onion soup. Your holiday table deserves this upgrade.

Ingredients
- 2 lbs fresh green beans, ends trimmed and cut into 2-inch pieces
- 3 large yellow onions, thinly sliced
- 3 tbsp butter
- 1 tbsp olive oil
- 2 cloves garlic, minced
- 1 tbsp fresh thyme leaves
- ¼ cup dry white wine (or sub beef broth)
- 2 cups beef broth
- 1 cup Gruyère cheese, shredded
- ½ cup Parmesan cheese, grated
- Salt and pepper
Step-by-Step Instructions
- Steam or boil the green beans until they are bright green and just tender-crisp, about 5-6 minutes. Drain and plunge them into ice water to stop the cooking. This keeps them perfectly snappy!
- In a large skillet, melt the butter and olive oil over medium-low heat. Add the sliced onions and a pinch of salt. Cook, stirring occasionally, for 30-40 minutes until they are deeply golden brown and caramelized. (This takes time, but don’t rush it! This is where the magic happens.)
- Add the garlic and thyme and cook for one more minute until fragrant.
- Pour in the white wine to deglaze the pan, scraping up all those tasty browned bits. Let it simmer for 2 minutes.
- Add the beef broth and bring to a simmer. Let it reduce slightly for about 5 minutes.
- Preheat your broiler. Toss the blanched green beans with the onion and broth mixture. Transfer everything to a baking dish.
- Top generously with the shredded Gruyère and Parmesan.
- Broil for 2-4 minutes, watching closely, until the cheese is melted, bubbly, and spotted with golden brown perfection.
Why You’ll Love It
The depth of flavor from the real caramelized onions is an absolute game-changer. It’s rich, savory, and feels incredibly fancy without being actually difficult. It might just upstage the main course. 🙂
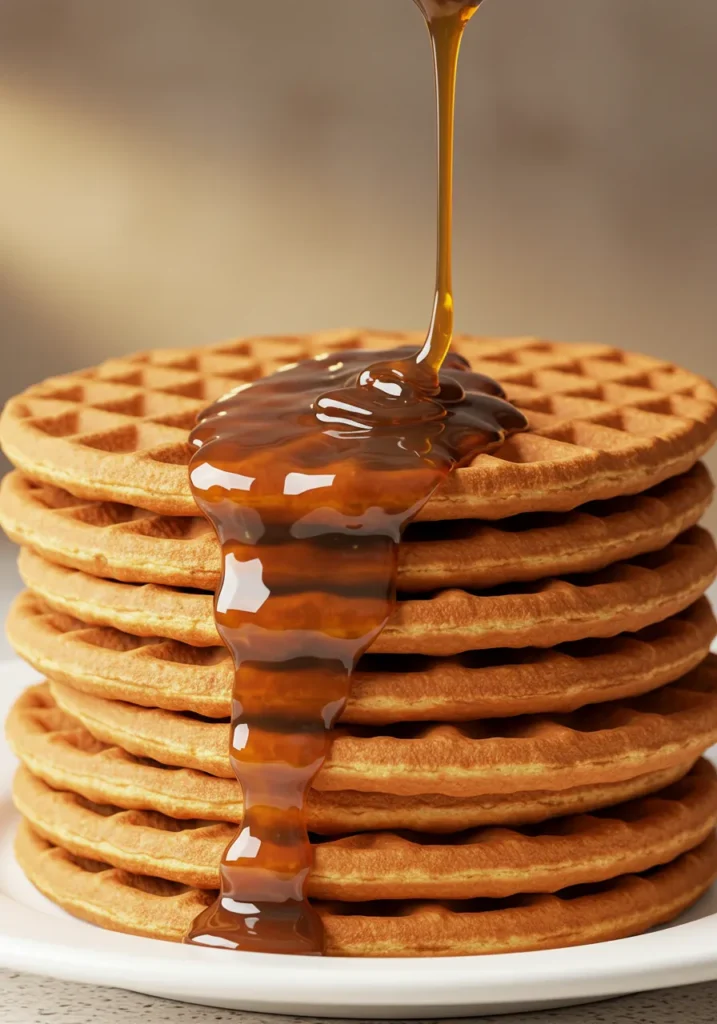
3. Stuffing Waffles with Gravy Syrup
Why It’s Awesome: We’re transforming your favorite Thanksgiving stuffing into a crispy, golden waffle. And yes, you read that right—we’re using gravy like syrup. It’s a brunch-ready, leftover-redefining miracle.
Ingredients
- 4 cups prepared stuffing (preferably chilled)
- 2 large eggs, lightly beaten
- ¼ cup chicken or vegetable broth (as needed)
- Non-stick cooking spray or butter for waffle iron
- 2 cups of your favorite prepared turkey or chicken gravy, warmed
Step-by-Step Instructions
- Fire up your waffle iron to a medium-high setting.
- In a large bowl, mix the chilled stuffing with the beaten eggs. This acts as your binder. If your stuffing is on the drier side, add a splash of broth until the mixture holds together when you press it.
- Lightly grease the hot waffle iron. Press a hearty scoop of the stuffing mixture onto the iron, close the lid, and cook for 5-7 minutes, or until the waffle is deeply golden brown and crispy on the outside.
- Carefully remove the waffle—it will be fragile but crispy. Repeat with the remaining mixture.
- Serve immediately, topped with a generous pour of warm gravy. (Fried eggs and a dash of hot sauce are also highly recommended additions.)
Why You’ll Love It
This is the ultimate leftover hack, but it’s so good you’ll want to make a fresh batch of stuffing just to try it. The contrast between the crispy waffle edges and the soft, herby interior is textural heaven. Using gravy as syrup is a fun, savory twist that just makes sense.
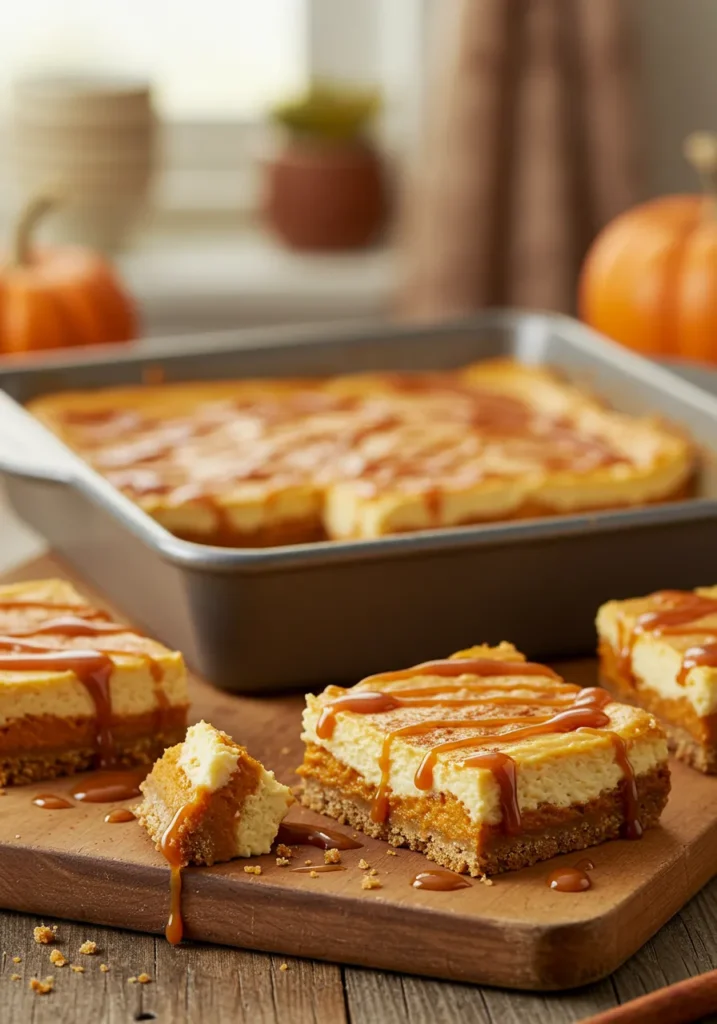
4. Pumpkin Pie Cheesecake Bars
Why It’s Awesome: Can’t decide between rich, tangy cheesecake and spiced, familiar pumpkin pie? You don’t have to. This mashup gives you a creamy pumpkin cheesecake layer on a ginger snap crust. It’s a slice of holiday harmony.
Ingredients
- For the Crust:
- 2 cups ginger snap cookie crumbs
- 6 tbsp unsalted butter, melted
- 2 tbsp brown sugar
- For the Filling:
- 16 oz cream cheese, softened to room temperature
- ¾ cup granulated sugar
- 1 cup canned pumpkin puree (not pumpkin pie filling)
- 2 large eggs
- 1 tsp vanilla extract
- 1 ½ tsp pumpkin pie spice
- Pinch of salt
Step-by-Step Instructions
- Preheat oven to 325°F (160°C). Line an 8×8 or 9×9 inch baking pan with parchment paper, leaving an overhang for easy removal.
- Make the crust: In a bowl, mix the ginger snap crumbs, melted butter, and brown sugar until it resembles wet sand. Press firmly and evenly into the bottom of your prepared pan. Bake for 10 minutes. Remove and let it cool slightly.
- Make the filling: Using a hand mixer or stand mixer, beat the softened cream cheese and sugar together until completely smooth and no lumps remain.
- Beat in the pumpkin puree, vanilla, pumpkin pie spice, and salt until combined.
- Add the eggs one at a time, beating on low speed just until each egg is incorporated. Don’t overmix! This keeps the filling from cracking.
- Pour the filling over the pre-baked crust and spread it evenly.
- Bake for 35-45 minutes, or until the edges are set but the center still has a slight jiggle.
- Let the bars cool completely at room temperature, then refrigerate for at least 4 hours, or ideally overnight, before slicing into squares.
Why You’ll Love It
The ginger snap crust adds a spicy, crunchy kick that a regular graham cracker crust just can’t match. It’s the perfect partner for the smooth, spiced pumpkin filling. These bars are portable, pre-portioned, and guaranteed to be the first dessert to disappear from the platter.
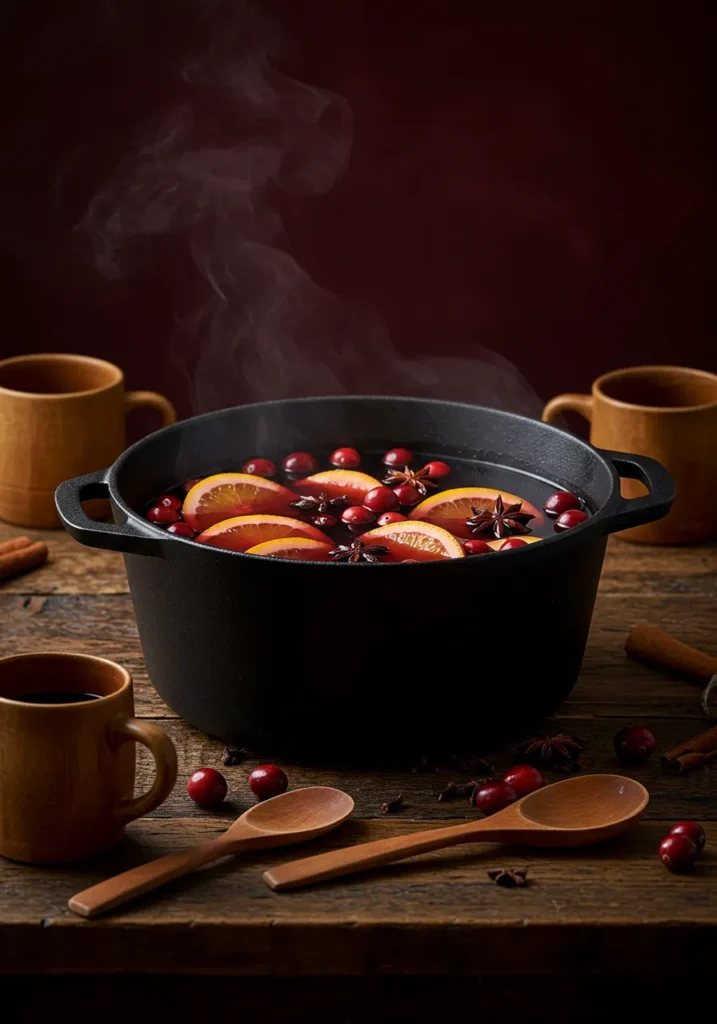
5. Cranberry Orange Mulled Wine Glaze for Ham
Why It’s Awesome: We’re combining the cozy, spiced vibes of mulled wine with the sweet-tart punch of a classic cranberry glaze. Your holiday ham is about to become the star of the entire season.
Ingredients
- 1 (12-oz) bag fresh cranberries
- 1 cup dry red wine (like Cabernet Sauvignon or Merlot)
- ¾ cup orange juice
- ½ cup brown sugar, packed
- ⅓ cup honey
- 1 orange, zest and juice
- 2 cinnamon sticks
- 3 whole cloves
- 1 star anise pod (optional, but so pretty)
- Pinch of salt
Step-by-Step Instructions
- In a medium saucepan, combine the cranberries, red wine, orange juice, brown sugar, honey, orange zest, and juice.
- Add the cinnamon sticks, cloves, star anise, and salt.
- Bring to a simmer over medium heat, stirring until the sugar dissolves.
- Reduce heat to low and let it simmer for 15-20 minutes, stirring occasionally, until the cranberries have burst and the liquid has thickened to a syrupy consistency. (It will thicken more as it cools).
- Remove from heat and fish out the whole spices (the cinnamon sticks, cloves, and star anise). You can discard them now; they’ve done their job.
- Use an immersion blender to blitz the glaze until mostly smooth, or leave it a bit chunky for texture—your call!
- Let it cool slightly before brushing it over your pre-baked ham during the last 20-30 minutes of baking, creating a gorgeous, sticky, flavorful crust.
Why You’ll Love It
This glaze is the ultimate multitasker. The mulled wine spices add a warm, complex depth that feels incredibly festive, while the cranberry and orange keep it bright and tangy. It’s a huge leap beyond the jarred stuff, and the smell alone will make your house feel like a holiday movie set.
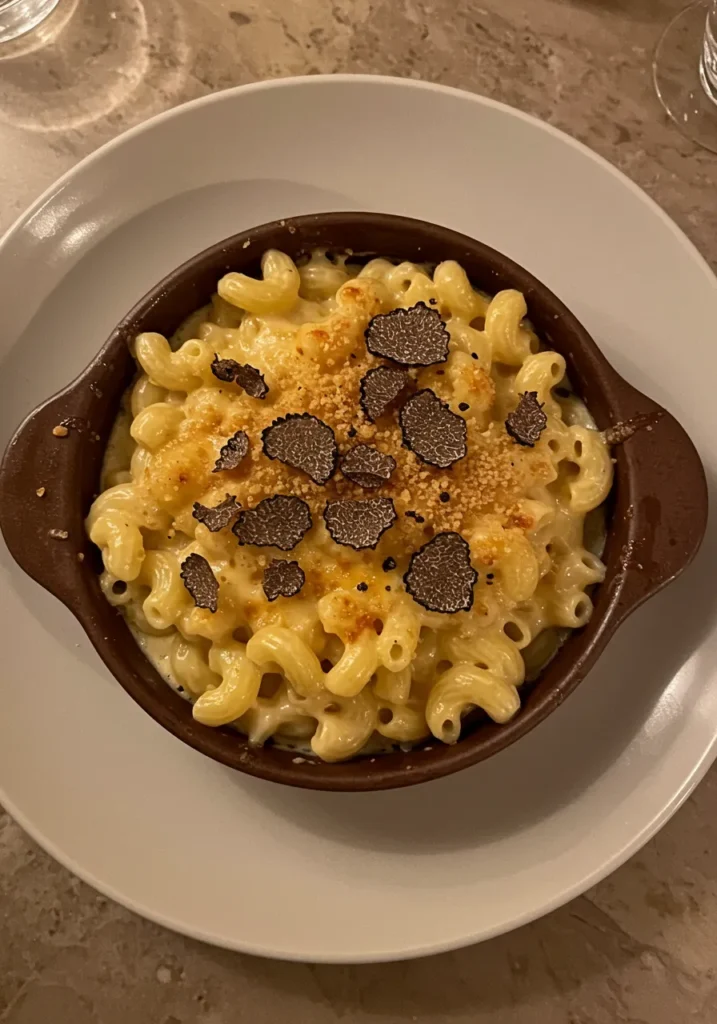
6. Truffled Mac & Cheese with Crispy Shallots
Why It’s Awesome: We’re taking the ultimate kid-friendly comfort food and giving it a seriously elegant adult makeover. A drizzle of truffle oil and a crown of crispy shallots transforms this dish from a side to a main event.
Ingredients
- 1 lb pasta (cavatappi or elbow macaroni work great)
- 4 tbsp unsalted butter
- 3 large shallots, thinly sliced
- 3 tbsp all-purpose flour
- 3 cups whole milk, warmed
- 2 cups Gruyère cheese, shredded
- 1 ½ cups sharp white cheddar, shredded
- ½ cup Parmesan cheese, grated
- 1 tsp truffle oil (or more to taste)
- ½ tsp smoked paprika
- Salt and white pepper to taste
- 2 tbsp chopped fresh chives
Step-by-Step Instructions
- Cook the pasta according to package directions, but stop 1 minute shy of al dente. It will finish cooking in the sauce. Drain and set aside.
- Make the Crispy Shallots: In a skillet, melt 2 tablespoons of butter over medium heat. Add the sliced shallots and cook, stirring frequently, for 8-10 minutes until they are golden brown and crispy. Remove with a slotted spoon and let them drain on a paper towel. They are your golden crown!
- Make the Sauce: In a large pot or Dutch oven, melt the remaining 2 tablespoons of butter over medium heat. Whisk in the flour and cook for 1 minute to make a roux.
- Gradually whisk in the warm milk until the mixture is smooth. Bring to a gentle simmer and cook, whisking constantly, until the sauce thickens enough to coat the back of a spoon, about 5-7 minutes.
- Remove the pot from the heat. Stir in the shredded Gruyère, cheddar, and Parmesan until the cheese is completely melted and the sauce is smooth.
- Stir in the truffle oil, smoked paprika, salt, and white pepper. Taste it! Does it need more truffle? More salt? You’re the boss.
- Add the drained pasta to the cheese sauce and stir until every noodle is coated in glorious, cheesy goodness.
- Serve immediately, topped with the crispy shallots and a sprinkle of fresh chives.
Why You’ll Love It
This is mac and cheese for a black-tie optional dinner party. The truffle oil adds that unmistakable, luxurious aroma and flavor, while the crispy shallots provide a perfect salty, crunchy contrast to the rich, creamy pasta. It’s decadent, impressive, and still 100% comforting.
Mashup Your Way to a Memorable Feast
Look, nobody is saying you have to replace all your traditions. Grandma’s perfect pumpkin pie should probably stay exactly as it is. But picking one or two of these holiday comfort mashups to add to your lineup? That’s how you create new memories and maybe even start a new tradition of your own.
The best part of cooking is the play, the experimentation, and the joy of sharing something you created with people you love. These recipes are your invitation to get a little playful in the kitchen this year. So put on your favorite holiday playlist, pour yourself a glass of that mulled wine (hey, the bottle is open now, right?), and get mashing… up.
Happy cooking, fellow foodie! May your holidays be filled with delicious, un-boring food. 🎄
Related Recipes;
- 5 Cozy Fall Dinner Ideas That Bring the Family Together
- Creamy Butternut Squash Soup for Cozy Fall Nights
- 10 Cozy Soup Recipes for Chilly Fall Evenings
Printable Recipe Card
Want just the essential recipe details without scrolling through the article? Get our printable recipe card with just the ingredients and instructions.