So, you want a dessert that makes you feel like a domestic goddess but requires the effort level of a couch potato? Same. You’re not looking for a fancy, 15-step pastry that dirties every bowl in your kitchen. You want something warm, fruity, and satisfying that you can eat for breakfast without too much guilt. Welcome, friend. You’ve found your snack soulmate.
Why This Recipe is Awesome
Let’s cut to the chase. This isn’t just a recipe; it’s your new secret weapon. It’s the dessert you can bring to a potluck that will have people asking for the recipe, and the breakfast you can sneak without side-eye from your nutritionist-app (we won’t tell). The best part? It’s seriously idiot-proof. The crust and crumble are the same mixture. You just press some down and sprinkle the rest on top. Even if you’ve burned water before, you can handle this. I believe in you.
Ingredients You’ll Need for Apple Blackberry Oat Bars
Gather your squad. Most of this is probably already in your pantry, languishing in the back waiting for a moment of glory.
For the Filling:
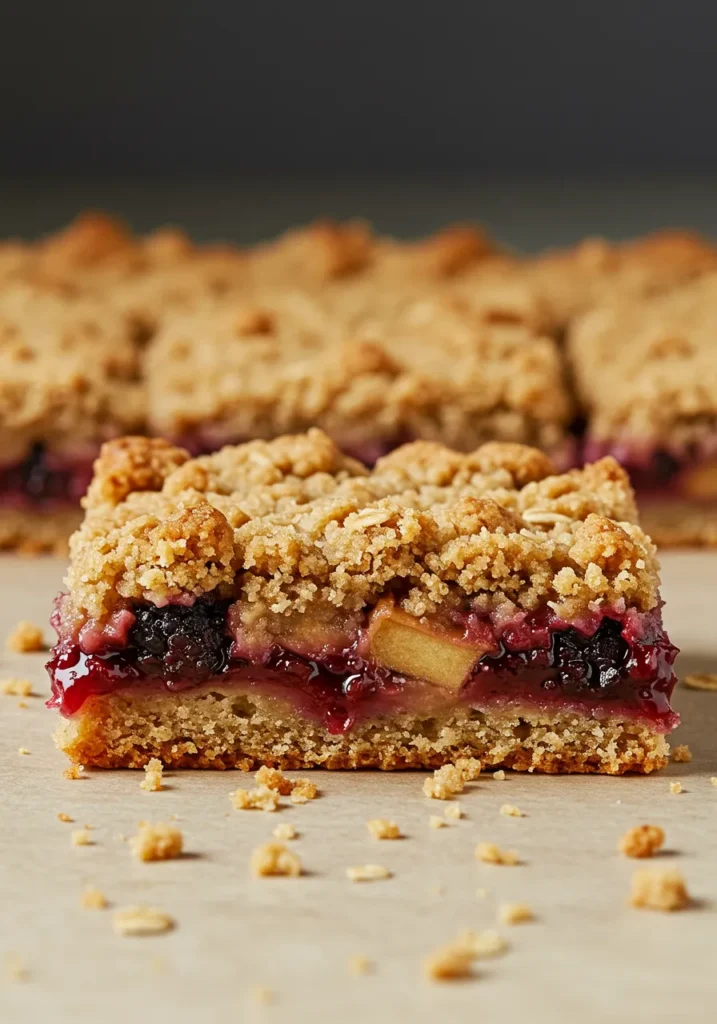
- 2 medium apples (Granny Smith are great for tartness, but any work) – peeled, cored, and chopped into small chunks.
- 1 cup blackberries (fresh or frozen, we don’t judge)
- 1/4 cup maple syrup or honey (because sugar is sugar, but this feels fancier)
- 1 tbsp lemon juice (the bottled stuff is fine, we’re not running a Michelin star kitchen)
- 1 tsp cinnamon (the spice of life)
- 1 tbsp cornstarch (this is the magic glue that keeps the filling from becoming soup)
For the Oaty Base & Crumble:
- 1 ½ cups old-fashioned rolled oats (not instant oats, they’ll turn to mush)
- ¾ cup all-purpose flour (gluten-free 1-to-1 blend works perfectly too!)
- ½ cup brown sugar, packed (pack it like you mean it)
- ¼ tsp baking soda
- ¼ tsp salt
- ½ cup melted butter (salted or unsalted is fine, we’ll adjust our souls accordingly)
- 1 tsp vanilla extract (the good stuff, if you have it)
Step-by-Step Instructions
- Preheat and Prep. Crank that oven to 350°F (175°C). Grab an 8×8 inch baking pan and line it with parchment paper, leaving some overhang on two sides. This is your future lifeline for lifting these beautiful bars out. Lightly grease the paper too. Trust me on this.
- Make the Filling. In a medium bowl, toss your apple chunks, blackberries, maple syrup, lemon juice, cinnamon, and cornstarch together. Be gentle if your berries are fresh! Set this bowl aside and let the fruit get to know each other while you work on the base.
- Create the Magic Mixture. In a larger bowl, whisk together the oats, flour, brown sugar, baking soda, and salt. Pour in the melted butter and vanilla extract. Mix it with a fork until everything is combined and crumbly. It should feel like wet sand that clumps together when you squeeze it.
- Assemble the Layers. This is the only “hard” part. Take about two-thirds of the oat mixture and dump it into your prepared pan. Press it down firmly and evenly into the bottom. I mean FIRMLY. Use the bottom of a measuring cup to really pack it down—this is your foundation!
Now, pour your fruity filling over the pressed base, spreading it out evenly. Sprinkle the remaining one-third of the oat mixture over the top. No need to press it—this is your crumble topping! - Bake to Perfection. Slide your creation into the oven and bake for 35-45 minutes. You’re looking for a golden brown top and bubbly fruit filling around the edges. Your kitchen will smell like heaven.
- The hardest step: WAIT. I know, it’s cruel. But you must let the pan cool completely on a wire rack. I’m talking a few hours. If you cut into them warm, they will be a delicious but gooey mess. Letting them cool completely is non-negotiable for clean bars. Once cool, use the parchment paper to lift the whole block out onto a cutting board and slice into squares.
Common Mistakes to Avoid
- Skipping the Parchment Paper: Trying to pry these out with a spatula is a one-way ticket to Crumbly Mess Town. Just use the paper. It’s there to help.
- Not Packing the Base: A lazy press means a base that falls apart. Channel your inner strength and pack it like you’re mad at it.
- Cutting While Warm: I see you, impatient one. You’ll get a delicious fruit crisp, not a neat bar. Resist the urge!
Alternatives & Substitutions
No blackberries? No problem. This recipe is your flexible friend.
- Berries: Raspberries, blueberries, or a mix of all three work beautifully.
- No Apples? Pears are a fantastic swap for a different vibe.
- Vegan? Use vegan butter or coconut oil instead of butter. For the sweetener, agave nectar works perfectly.
- Nutty Crunch? Toss in 1/4 cup of chopped walnuts or pecans into the oat mixture for some extra texture.
- Extra Fancy? A drizzle of vanilla glaze (powdered sugar + milk) on top after they cool takes it to a whole new level.
FAQS about Apple Blackberry Oat Bars
Can I use frozen fruit?
Absolutely! No need to thaw. Toss them in frozen to prevent them from turning into a mushy mess before they hit the oven. You might need to add a couple of minutes to the bake time.
How do I store these bad boys?
Keep them in an airtight container at room temp for 2 days, or in the fridge for up to 5 days. They also freeze amazingly well for up to 3 months.
Why is my filling runny?
You probably skipped the cornstarch or didn’t let the bars cool completely. The cornstarch and the cooling process are what thicken the filling into a glorious, sliceable jam.
Can I use steel-cut oats?
Do not do this. They will remain hard and crunchy and ruin the texture. Stick to old-fashioned rolled oats for the perfect chew.
Are these actually healthy-ish?
IMO, they’re a way better option than a sugar-loaded pastry! You’ve got whole grains, fruit, and you control the sugar. So, yes, let’s go with that.
Related Recipes
Final Thoughts about Apple Blackberry Oat Bars
And there you have it. You’ve just created something incredibly delicious with minimal fuss. These bars are the ultimate multitasker: dessert, snack, breakfast, and a total crowd-pleaser. Now go forth, bake, and then bask in the glory. You’re basically a baking pro now. Don’t forget to text a pic to someone who will be properly impressed
Printable Recipe Card
Want just the essential recipe details without scrolling through the article? Get our printable recipe card with just the ingredients and instructions.

