So, you’ve decided you want your entire house to smell like a hug from a grandmother you never had. Excellent choice. Forget fancy, fussy desserts that require a chemistry degree; you’re about to make a classic, the MVP of the baking world: apple pie. It’s the dessert that says, “I’m a domestic god/goddess,” even if your main cooking skill is successfully microwaving leftovers without setting off the smoke alarm. Let’s get into it.
Why This Recipe is Awesome
Look, there are a million apple pie recipes out there. This one, however, is idiot-proof, forgiving, and designed for maximum flavor with minimal fuss. It’s the pie you make when you want to impress your in-laws, your date, or just your own sad self on a Tuesday night. It’s flaky, it’s spiced to perfection, and it has that perfect gooey-but-not-soupy filling. Plus, it gives you a legitimate excuse to eat a giant scoop of vanilla ice cream. You’re welcome.
Ingredients You’ll Need
Gather your troops. We’re keeping this simple. For a 9-inch pie.
For the Crust (or the easy way out):
- 2 premade pie crusts (Look, we’re not all pastry chefs. No shame in the store-bought game. They’re brilliant.)
- Or, if you’re feeling ambitious: 2 ½ cups flour, 1 cup cold butter (cubed), 1 tsp salt, 6-8 tbsp ice water.
For the Apple Filling:
- 6-7 medium apples (Mix it up! Granny Smith for tartness, Honeycrisp or Fuji for sweetness)
- ¾ cup granulated sugar (because life is sweet)
- ¼ cup brown sugar (for that deep, molasses-y goodness)
- 3 tbsp all-purpose flour (to thicken the apple juices)
- 1 tsp ground cinnamon (the undisputed king of spices)
- ¼ tsp ground nutmeg (cinnamon’s fancy cousin)
- ¼ tsp salt (to make the sweet stuff pop)
- 1 tbsp lemon juice (to keep the apples from looking sad and brown)
- 2 tbsp butter (to dot on top because more butter is always the answer)
For the Top:
- 1 egg (for an egg wash—fancy term for making the crust shiny)
- 1 tbsp coarse sugar (for that delightful crunch)
Step-by-Step Instructions
- Preheat and Prep. Crank that oven to 425°F (220°C). If your oven is still cold when the pie goes in, it will be a sad, soggy mess. Trust me on this.
- Conquer the Crust. If you’re using store-bought, let them sit on the counter for 15 minutes to thaw. If you’re going homemade, mix your flour and salt, cut in the cold butter until it looks like pebbles, then add ice water until it just comes together. Divide dough in two, form into discs, and chill.
- Apple Armageddon. Peel, core, and slice your apples about ¼-inch thick. Toss them in a big bowl with the lemon juice. This is the most labor-intensive part. Put on some music. Power through.
- Mix the Magic. In a small bowl, whisk together the white sugar, brown sugar, flour, cinnamon, nutmeg, and salt. Dump this glorious mixture over the apples and toss until every slice is coated. It will already smell amazing.
- Construct Your Masterpiece. Roll out one pie crust and gently place it in your 9-inch pie dish. Let the edges hang over. Dump the entire bowl of apple filling into the crust. Dot the top with those little pats of butter.
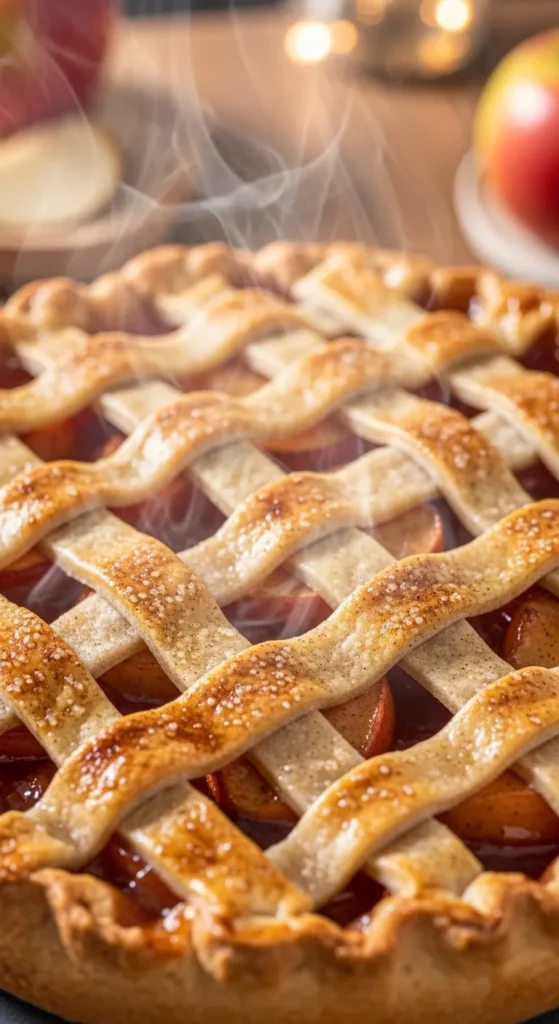
- Top It Off. Roll out your second crust. You can just lay it on top and cut some slits for steam to escape, or get fancy with a lattice weave if you’re showing off. Crimp the edges together with a fork to seal the deal.
- Make It Pretty. Beat the egg with a tablespoon of water and brush it over the top crust. Sprinkle generously with that coarse sugar.
- Bake to Perfection. Place your beautiful pie on a baking sheet (to catch any bubbly drips!) and bake for 45-55 minutes. The crust should be a deep golden brown, and you should see the filling bubbling through the vents. If the edges brown too fast, cover them with foil or a pie crust shield.
- The Hardest Part: Wait. I know. It’s cruel. But you MUST let the pie cool for at least 3-4 hours. This allows the filling to set. Cutting into a hot pie is a one-way ticket to Soup Town. Be strong.
Common Mistakes to Avoid
- Using Only One Type of Apple: Don’t be basic. A mix of tart and sweet apples creates a far more interesting flavor and texture profile.
- Skipping the Lemon Juice: This isn’t just for flavor. The acid prevents the apples from oxidizing and turning an unappetizing grey color. Your pie will look as good as it tastes.
- Not Letting It Cool: I said it once, I’ll scream it from the rooftops: WARM PIE IS RUNNY PIE. Let it set. Your patience will be rewarded with perfect, non-watery slices.
- Forgetting the Baking Sheet: The filling will bubble over. It’s a fact of life. Save yourself from scrubbing a smoky oven by putting a baking sheet on the rack below.
Alternatives & Substitutions
- Gluten-Free? Use a 1:1 gluten-free flour blend for the thickening agent in the filling and for a GF pie crust.
- Dairy-Free? Use vegan butter or shortening in the crust and for dotting the top. The filling is naturally dairy-free already!
- No Brown Sugar? Just use all white sugar. The flavor will be slightly less complex, but it’ll still be delicious.
- Spice It Up: Feel free to add a pinch of cardamom, allspice, or even a tiny dash of black pepper for a little kick.
- The Crust: If you hate making crust, BUY ONE. I will never judge you. The filling is the real star here anyway.
FAQ
Can I make this pie ahead of time?
Absolutely! You can assemble the pie and keep it tightly wrapped in the fridge for up to 24 hours before baking. You might need to add a few extra minutes to the bake time since it’s going in cold.
My filling is runny. What did I do wrong?
You probably either didn’t use enough thickening agent (flour) or, more likely, you didn’t let the pie cool completely before slicing. The filling continues to set as it cools.
Can I use margarine instead of butter?
Technically, yes. But why would you want to? Butter provides a far superior flavor. If you must, a high-quality vegan butter will work better than margarine.
What’s the best apple for apple pie?
There is no single “best,” but a combination is best! Granny Smith, Braeburn, Honeycrisp, and Jonagold are all fantastic choices. Avoid Red Delicious—they turn to mush.
Do I have to peel the apples?
You don’t have to do anything. But the peels can become tough and separate from the apple slices in the filling, creating a weird texture. I highly recommend peeling for a smoother experience.
My crust is burning! Help!
This is why foil or pie crust shields are your best friend. If the edges are getting too dark, just cover them for the remainder of the baking time.
Is it necessary to serve it with ice cream?
Is it necessary to breathe? Okay, fine, it’s not necessary. But it is highly, highly recommended. The contrast of hot pie and cold, creamy ice cream is what dreams are made of.
Related Recipes;
🥧 Final Thoughts on Apple Pie
Apple pie isn’t just a dessert — it’s a symbol of comfort, tradition, and home. Whether you’re baking it for a holiday table, a cozy weekend treat, or just because apples are in season, the warm cinnamon-spiced filling and buttery, flaky crust never fail to satisfy.
Here are a few parting tips:
-
Apples Matter: Use a mix of tart and sweet apples for a more complex flavor and better texture.
-
Crust Counts: A homemade crust makes a difference — but a good store-bought crust can still deliver great results if you’re short on time.
-
Let It Rest: Give the pie time to cool before cutting. It helps the filling set and makes slicing easier.
-
Customize It: Try adding caramel, raisins, cranberries, or even a crumble topping if you’re feeling adventurous.
No matter how you make it, apple pie is best enjoyed warm, with good company and maybe a scoop of vanilla ice cream on top. 🍨
Would you like a printable version of the recipe or a digital recipe card?
Printable Recipe Card
Want just the essential recipe details without scrolling through the article? Get our printable recipe card with just the ingredients and instructions.

