So, you’ve decided you want your house to smell like a professional bakery but your actual baking skills are on par with a drowsy panda? Same. Well, my friend, you’ve stumbled upon the holy grail of baking: the idiot-proof, soul-warming, impossibly fluffy bread roll. Forget everything you think you know about yeast being a scary, fickle beast. We’re about to become bread-making legends. Or at least, we’re about to make some seriously delicious carbs.
Why This Recipe is Awesome
Let’s cut to the chase. This recipe is awesome because it’s ridiculously forgiving. Did you kill the yeast? Probably not. Will you end up with a dense, hockey-puck-like substance? Almost certainly not. These rolls are so soft, so pillowy, they’re basically edible clouds. They’re the kind of thing that makes people think you slaved away for hours, when in reality, you were mostly just binge-watching your favorite show while the dough did all the work. It’s the ultimate culinary magic trick.
Ingredients You’ll Need for Bread Rolls
Gather your squad. This isn’t a complicated cast of characters.
- 2 ¼ tsp Active Dry Yeast (1 packet): The tiny, sleepy monsters that make our rolls rise. Don’t scare them.
- 1 cup Warm Water (around 110°F/43°C): Think baby bottle warm, not hot tub hot. Too hot and you murder the yeasties. Too cold and they just take a nap.
- 2 tbsp Granulated Sugar: Food for the yeast, and a little sweetness for us.
- 2 tbsp Unsalted Butter, melted (plus more for brushing): Because fat = flavor and tenderness. Obviously.
- 1 tsp Salt: The flavor booster. Don’t you dare skip it.
- 2 ½ – 3 cups All-Purpose Flour, plus more for dusting: The main event. We’ll start with 2 ½ and add more as needed. Dough can be moody based on the weather.
Step-by-Step Instructions
- Wake Up the Yeast: In a large bowl, combine the warm water, sugar, and yeast. Give it a quick stir and walk away for 5-10 minutes. You’re waiting for it to get all foamy and frothy on top. If it doesn’t, your yeast is dead and you need to start over. No foam, no glory.
- Make the Dough: To the yeasty mixture, add the melted butter, salt, and 2 ½ cups of flour. Stir with a wooden spoon until a shaggy dough forms. It’s okay if it’s sticky!
- Knead It Out: Turn the dough out onto a lightly floured surface. Knead for about 5-7 minutes, adding the remaining ¼-½ cup of flour a little at a time, until the dough is smooth, elastic, and only slightly tacky. Pro tip: Set a timer! It’s longer than you think. This is your arm workout for the day. You can also use a stand mixer with a dough hook for this if you’re fancy and lazy (my favorite combination).
- Let It Rise (First Nap): Place your beautiful dough ball in a lightly oiled bowl, turning it once to coat it in oil. Cover the bowl with plastic wrap or a damp kitchen towel and let it rise in a warm, draft-free spot for 1-1.5 hours, or until doubled in size. FYI, your oven with just the light on is a perfect rising spot.
- Shape the Rolls: Punch that dough down! It’s satisfying, go on. Turn it out onto a clean surface and divide it into 12 equal pieces. Roll each piece into a smooth ball. Place them in a generously buttered 9×13 inch baking pan, giving them a little room to snuggle up and expand.
- Let It Rise Again (Second Nap): Cover the pan and let the shaped rolls rise again for another 30-45 minutes. They should look nice and puffy.
- Bake to Golden Perfection: While they rise, preheat your oven to 375°F (190°C). Once risen, bake those bad boys for 18-22 minutes, or until they are gloriously golden brown on top.
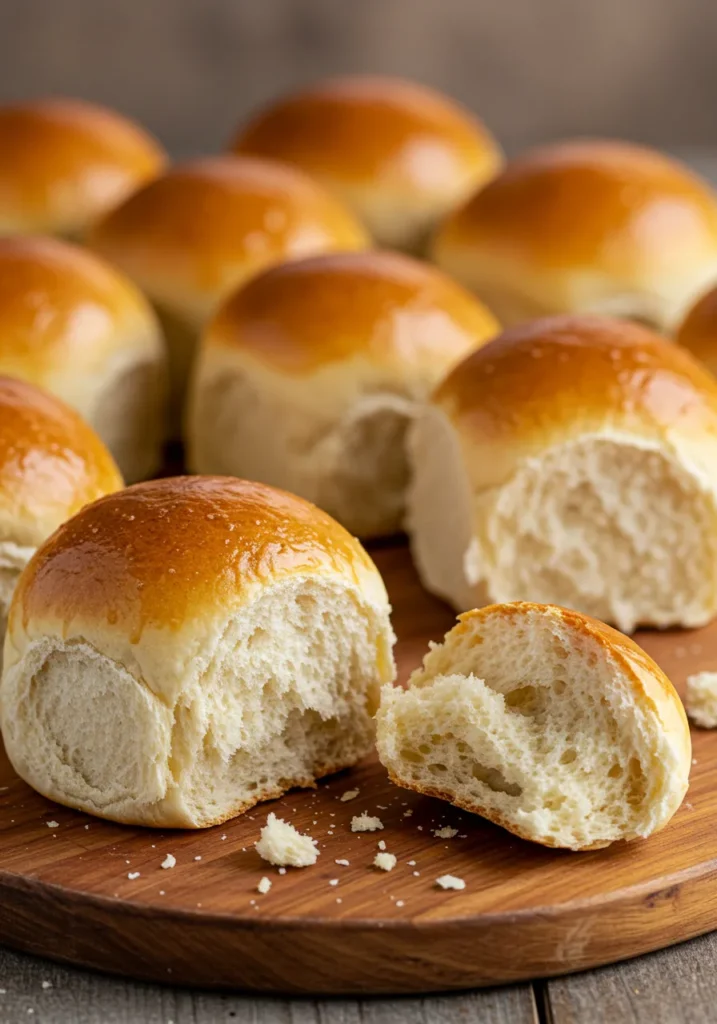
- Butter ‘Em Up: The most crucial step. As soon as the rolls come out of the oven, brush the tops with melted butter. This gives them that gorgeous, glossy finish and an extra layer of “oh my god” flavor.
Common Mistakes to Avoid
- Murdering Your Yeast: Seriously, the water temp is key. If you can’t hold your finger in it comfortably, it’s too hot for the yeast. You’re a caretaker, not an assassin.
- Adding Too Much Flour: The dough should be soft and slightly tacky, not dry and stiff. Adding cup after cup of flour is a one-way ticket to Dense Roll City. Population: your sad dinner guests.
- Skipping the Second Rise: I see you, getting impatient. Don’t. The second rise is what gives them that perfect, light-as-air texture. Let the dough have its beauty sleep.
- Overbaking: You want golden brown, not mahogany. Set a timer and check on them. An overbaked roll is a tragic roll.
Alternatives & Substitutions
- Want Whole Wheat? Substitute up to half of the all-purpose flour with whole wheat flour. The rolls will be a bit denser but still delicious.
- No Butter? You can use a neutral oil like vegetable or canola oil, but IMO, butter is always better for flavor.
- Make It Herby: Add a tablespoon of dried herbs (rosemary, thyme, everything bagel seasoning!) to the flour for a savory twist.
- Dairy-Free? Use a plant-based butter alternative and you’re good to go.
- Sugar Swap: Honey or maple syrup can work in place of the granulated sugar.
FAQs about Bread Rolls
Can I make these rolls ahead of time?
Absolutely! After shaping the rolls in the pan, cover them tightly and pop them in the fridge overnight. The next day, let them sit on the counter for an hour to come to room temperature and finish rising, then bake as directed. Easy brunch hero.
Why are my rolls so dense?
This usually means your yeast was old/dead, you used too much flour, or you didn’t let the dough rise long enough. Check those three things next time!
Can I freeze them?
Yes! These freeze like a dream. Let them cool completely, then store in a freezer bag for up to 3 months. Thaw at room temperature and warm in the oven for a few minutes to revive that fresh-baked magic.
My dough is too sticky! What do I do?
Don’t panic! Just add a little more flour, one tablespoon at a time, while kneading until it becomes manageable. It will be sticky at first, that’s normal.
Can I use instant yeast instead?
Yep! You can skip the “proofing” step (step 1) and just mix the instant yeast in with your dry ingredients. Easy peasy.
What can I serve these with?
…Everything. Soup, stew, roast chicken, Thanksgiving dinner, a giant pat of butter, your bare hands. There are no wrong answers.
Related Recipes
Final Thoughts about Bread Rolls
Look at you, you magnificent baker, you. You’ve just created something wonderful from a few simple ingredients. There’s something incredibly satisfying about pulling a pan of golden, homemade rolls out of your own oven. Now, go tear one open (because slicing is for cowards), slather it with an irresponsible amount of butter, and enjoy the fruits of your not-that-hard labor. You’ve earned it. Now, who’s impressed? Everyone. Everyone is impressed.
Printable Recipe Card
Want just the essential recipe details without scrolling through the article? Get our printable recipe card with just the ingredients and instructions.

