Who doesn’t love those cute, bite-sized cake pops from Starbucks? They’re like tiny hugs in dessert form—sweet, colorful, and just the right amount of indulgent. Whether you’re planning a party, craving a fun baking project, or just want to impress your friends with your barista-level skills, this guide will walk you through how to make cake pops like Starbucks at home. No fancy equipment or culinary degree needed—just some patience, a love for sweets, and maybe a sprinkle of sarcasm for when things get messy (because they will). Ready to whip up these adorable treats? Here’s everything you need to know, plus three recipes to nail that Starbucks vibe. 😊
Why Make Cake Pops at Home?
Starbucks cake pops are iconic, but let’s be real: those $3-a-pop prices add up fast. Making them yourself is cheaper, lets you customize flavors, and—honestly—it’s just fun to play baker for a day. Plus, you get to eat the crumbs along the way. Win-win, right? Below, I’m sharing three recipes inspired by Starbucks classics: Vanilla, Chocolate, and Birthday Cake. Each one’s easy to follow, packed with tips from my own kitchen disasters (RIP my first batch that looked like lumpy snowmen), and guaranteed to make you feel like a dessert pro.
1. Vanilla Cake Pops
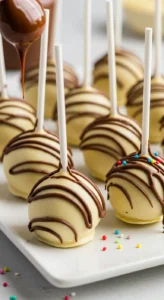
Starbucks’ vanilla cake pops are like the little black dress of desserts—simple, elegant, and universally loved. This recipe nails their creamy, sweet flavor with a smooth white chocolate coating that’s just chef’s kiss.
Ingredients
- 1 box vanilla cake mix (or your favorite homemade recipe—go you!)
- 1/2 cup vanilla frosting (store-bought or homemade, no judgment)
- 12 oz white chocolate melting wafers (Ghirardelli is my go-to)
- 1 tbsp vegetable oil (for smooth dipping)
- Sprinkles (optional, but who skips sprinkles?)
- Lollipop sticks (grab these at any craft store)
Step-by-Step Instructions
- Bake the vanilla cake according to the box or recipe. Let it cool completely—patience is key here, or you’ll have a crumbly mess.
- Crumble the cake into a large bowl until it’s fine and powdery. Think sandcastle vibes, but edible.
- Mix in 1/2 cup vanilla frosting. Start with a little and add more if needed; you want a dough-like texture that holds together without being gooey.
- Roll the mixture into 1-inch balls. Place them on a parchment-lined tray and chill in the fridge for 30 minutes. Cold balls are easier to dip (no snickering).
- Melt the white chocolate wafers with 1 tbsp vegetable oil in a microwave-safe bowl, stirring every 30 seconds until smooth.
- Dip the end of a lollipop stick into the melted chocolate, then insert it halfway into a cake ball. This helps it stick (pun intended).
- Dip each cake pop into the melted chocolate, gently tapping off excess. Add sprinkles before the chocolate sets.
- Stick the pops upright in a foam block or cup to dry. Chill for 15 minutes to set.
Why You’ll Love It
These vanilla cake pops are sweet without being cloying, and the white chocolate shell adds a satisfying crunch. They’re perfect for gifting (or hoarding—your call). Pro tip: I once tried using cheap chocolate chips instead of melting wafers, and let’s just say it was a gloppy disaster. Stick with the good stuff.
2. Chocolate Cake Pops
If you’re a chocoholic, these rich, fudgy cake pops are your jam. They’re like Starbucks’ chocolate version but with a homemade glow-up that’ll make you question why you ever paid for them.

Ingredients
- 1 box chocolate cake mix (or homemade—channel your inner chocolatier)
- 1/2 cup chocolate frosting (Betty Crocker’s got your back)
- 12 oz milk chocolate melting wafers (dark chocolate works too if you’re feeling fancy)
- 1 tbsp vegetable oil
- Chocolate sprinkles or cocoa nibs (for that extra cocoa kick)
- Lollipop sticks
Step-by-Step Instructions
- Bake the chocolate cake and let it cool. Seriously, don’t skip the cooling part unless you want a crumbly crime scene.
- Crumble the cake into a bowl until it’s fine and even. Imagine you’re a kid destroying a sandcastle—fun, right?
- Mix in 1/2 cup chocolate frosting. Adjust as needed to get a moldable dough. Too much frosting = sticky sadness.
- Roll into 1-inch balls and place on a parchment-lined tray. Pop them in the fridge for 30 minutes to firm up.
- Melt the milk chocolate wafers with 1 tbsp vegetable oil, stirring until silky smooth.
- Dip a lollipop stick into the chocolate, then insert it into a cake ball. This keeps your pop from falling apart mid-dip.
- Dunk each ball into the chocolate, letting excess drip off. Sprinkle with chocolate sprinkles or cocoa nibs for flair.
- Let them set upright in a foam block or cup. Chill for 15 minutes to harden.
Why You’ll Love It
These are rich, indulgent, and perfect for when you need a chocolate fix. They’re also stupidly easy to customize—swap milk chocolate for dark if you’re feeling sophisticated. FYI, I once tried dipping these in warm chocolate straight from the microwave. Big mistake. Let it cool slightly for a smoother coat.
3. Birthday Cake Pops
Starbucks’ birthday cake pops are the life of the party with their pink coating and festive sprinkles. This recipe captures that confetti-cake magic, and it’s so fun you’ll want to bake them for every occasion (or no occasion at all).

Ingredients
- 1 box confetti cake mix (Funfetti is the gold standard)
- 1/2 cup vanilla frosting (go for the creamy kind)
- 12 oz pink candy melts (Wilton’s are reliable)
- 1 tbsp vegetable oil
- Rainbow sprinkles (because it’s a party!)
- Lollipop sticks
Step-by-Step Instructions
- Bake the confetti cake per the box instructions. Let it cool completely, or you’ll regret it when your pops fall apart.
- Crumble the cake into fine crumbs in a bowl. Get aggressive—it’s therapeutic.
- Mix in 1/2 cup vanilla frosting until you get a dough-like consistency. Not too wet, not too dry.
- Roll into 1-inch balls and place on a parchment-lined tray. Chill in the fridge for 30 minutes.
- Melt the pink candy melts with 1 tbsp vegetable oil, stirring until smooth. Pink perfection awaits.
- Dip a lollipop stick into the melted candy, then insert it into a cake ball. This is your glue, so don’t skip it.
- Dip each pop into the pink candy, tapping off excess. Shower with rainbow sprinkles before it sets.
- Stand them upright in a foam block or cup to dry. Chill for 15 minutes to set the coating.
Why You’ll Love It
These pops scream celebration with their bright pink shell and playful sprinkles. They’re a hit with kids and adults alike, and they’re so cute you’ll want to Instagram them before eating. True story: I once dropped a tray of these mid-dip, and my dog thought it was Christmas. Use a sturdy tray, friends.
Tips for Cake Pop Success
- Chill, chill, chill. Cold cake balls are your best friend for clean dipping. Warm ones? A recipe for frustration.
- Don’t overdo the frosting. Too much makes the pops too soft to hold their shape. Start with less and add as needed.
- Use quality melting wafers. Cheap chocolate chips are tempting, but they clump and ruin the vibe. Trust me, I learned the hard way.
- Get creative with decorations. Mix up colors, sprinkles, or even drizzle extra chocolate for a fancy touch.
- Store smart. Keep finished pops in an airtight container in the fridge for up to a week. If they last that long, you’re stronger than me.
More Recipes:
Why These Recipes Work
These recipes are designed to mimic Starbucks’ signature cake pops while being approachable for home bakers. Each one uses simple ingredients you probably already have (or can grab on a quick grocery run). The key is in the details: crumbling the cake finely, chilling the balls, and using the right amount of frosting for that perfect texture. Plus, they’re endlessly customizable—swap out flavors or colors to match your mood or event. Want a mocha vibe? Mix espresso powder into the chocolate pops. Hosting a baby shower? Go pastel with the candy melts.
A Little Cake Pop History (Because Why Not?)
Cake pops became a Starbucks staple around 2010, thanks to baker extraordinaire Bakerella, who popularized them. They’re basically cake truffles on a stick, blending the best parts of cake and frosting into a portable treat. Starbucks made them iconic with their sleek coatings and cute designs, but you can totally outdo them at home. IMO, homemade ones taste better because you control the sweetness and quality.
Troubleshooting Common Cake Pop Fails
- Crumbly balls? You didn’t add enough frosting. Mix in a bit more, a tablespoon at a time.
- Chocolate too thick? Add a touch more vegetable oil to thin it out.
- Pops falling off the stick? Make sure to dip the stick in chocolate before inserting it—it’s like edible glue.
- Coating cracking? Your cake balls were too cold. Let them sit at room temp for a few minutes before dipping.
Conclusion
Making cake pops like Starbucks is easier than it looks, and these recipes prove it. Whether you’re Team Vanilla, Chocolate, or Birthday Cake, you’ll end up with adorable, delicious treats that rival the coffee shop’s version—without the hefty price tag. They’re perfect for parties, gifting, or just treating yourself because you deserve it. So grab your ingredients, channel your inner pastry chef, and get popping! What’s your favorite flavor to try first? 😄
Printable Recipe Card
Want just the essential recipe details without scrolling through the article? Get our printable recipe card with just the ingredients and instructions.

