So, you’re staring into the abyss of your pantry, craving something gloriously chocolatey but your motivation to actually cook is approximately zero. Same, friend. Same. What if I told you that the most sophisticated, crowd-pleasing treat in your culinary arsenal requires more effort to eat than it does to make? Stop nodding, and let’s make this stupidly easy 3-Ingredient Chocolate Bark.
Why This Recipe is Awesome
Let’s cut to the chase. This recipe is the culinary equivalent of finding a $20 bill in your winter coat—pure, unadulterated joy with minimal effort. It’s idiot-proof. I’ve made this while simultaneously binge-watching a true crime series and arguing with my cat. The bar for success is so low it’s practically a tripping hazard. You get a massive payoff (a gorgeous, custom dessert) for a laughably tiny investment. It’s the perfect project for a lazy Sunday, a last-minute gift, or when you need to bribe your kids (or your significant other) into doing the dishes.
Ingredients You’ll Need
Gather your tiny but mighty army. Quality matters a bit more here since there’s nowhere for subpar ingredients to hide.
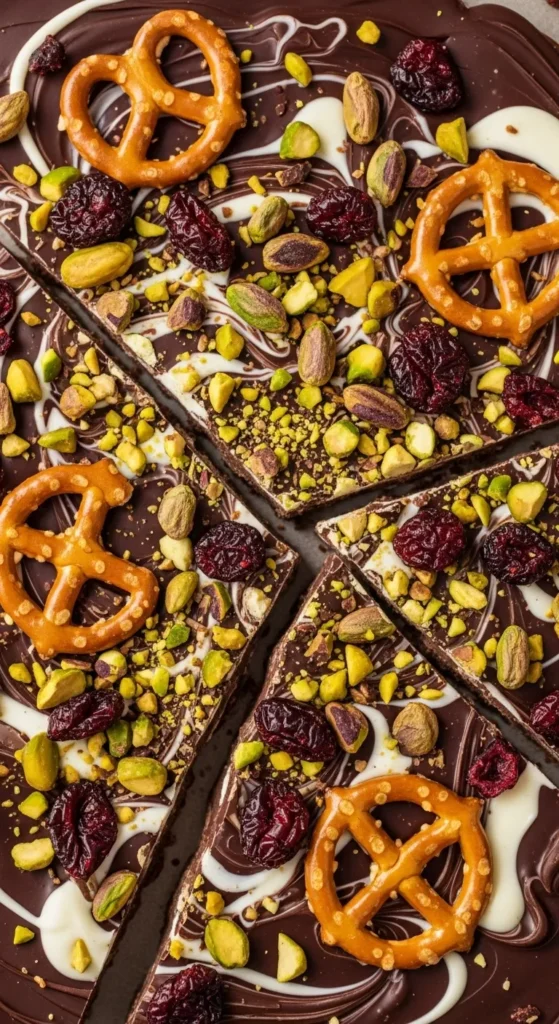
- 16 oz (about 450g) Semi-Sweet Chocolate: You can use chips or a bar you’ve roughly chopped. Just please, for the love of all that is holy, make sure it’s real chocolate, not that weird chocolate-flavored candy coating. The taste and snap will be infinitely better. This is your canvas.
- 1-1.5 cups of Toppings: This is where your personality shines. Go nuts! Literally.
- Salty/Savory: Pretzel pieces, crushed potato chips (trust me), flaky sea salt.
- Crunchy: Toasted almonds, pecans, pistachios, hazelnuts.
- Sweet/Chewy: Dried cranberries, chopped apricots, mini marshmallows, crushed peppermint candies.
- 1 tbsp Coconut Oil (optional but brilliant): A tiny splash makes the chocolate extra smooth, helps it set with a beautiful snap, and makes it easier to melt. Don’t have it? No biggie, but it’s a great little pro-move.
Step-by-Step Instructions
- Line a Baking Sheet. Grab a standard baking sheet and line it with parchment paper or a silicone mat. Do not skip this. Unless you enjoy chiseling chocolate off a pan, in which case, you do you. Set this aside.
- Melt the Chocolate. This is the only “cooking” part. Dump your chocolate (and the coconut oil, if using) into a microwave-safe bowl. Nuke it in 20-second bursts, stirring vigorously after each one. Why? Because microwaves are sneaky and will look like they’re doing nothing until they suddenly turn your chocolate into a burnt, grainy mess. Stop when just a few small lumps remain—the residual heat will melt them as you stir. You can also use a double boiler if you’re feeling fancy.
- Spread It Out. Pour your beautifully melted chocolate onto your prepared baking sheet. Use a spatula or the back of a spoon to spread it into an even layer, about ¼ inch thick. This doesn’t need to be a perfect rectangle. Rustic is charming! Act quickly here before the chocolate starts to set.
- The Grand Topping Ceremony. Immediately shower your toppings evenly over the molten chocolate. This is not the time to be shy. Press down on any larger chunks (like whole nuts) very gently to make sure they’re embedded and won’t fall off later.
- Chill Out. Carefully transfer the entire tray to your refrigerator. Let it set completely for at least 2 hours, or until rock solid. Do not rush this. Impatience leads to broken bark and a broken spirit.
- Smash It Up. Once it’s fully set, take it out. Grab the edges of the parchment paper and lift the entire giant chocolate slab out. Place it on a cutting board and use your hands to break it into rustic, uneven pieces. You can also use a knife for cleaner breaks. Pro-tip: Let it sit on the counter for 5 minutes before breaking to avoid it shattering into a million pieces.
Common Mistakes to Avoid
- Getting Water in Your Chocolate: Water is the mortal enemy of melting chocolate. It will cause it to “seize” up into a gritty, gross mess. Ensure your bowl, spatula, and even your hands are completely dry.
- Microwave Mayhem: Zapping the chocolate for one full minute because you’re impatient. You will burn it. You will curse. Just take the 90 seconds to do it properly in bursts.
- Warm Toppings: Adding room-temperature toppings is fine. Adding warm toasted nuts straight from the oven? They’ll melt your beautiful chocolate and create a swirly, messy (though sometimes delicious) situation. Let them cool first!
- The Impatient Chill: Putting it in the fridge for 20 minutes and then trying to break it. It will bend. It will be a mess. Walk away. Watch an episode of something. Let science do its thing.
Alternatives & Substitutions
The beauty of this is its versatility. Don’t like my ideas? Fine, be that way. Here are some other paths to bark glory.
- Chocolate: Use milk chocolate for a sweeter bark or dark chocolate (70%) for a more intense, less sweet vibe. White chocolate works too! Just be extra careful melting it, as it’s even more delicate.
- Toppings: Raid your pantry. Granola, cereal (like crushed-up Chex or Corn Flakes), pumpkin seeds, crystallized ginger, orange zest—if you can eat it, it can probably go on bark.
- Dietary Needs: For dairy-free, just ensure your chocolate is dairy-free. For nut-free, use seeds, pretzels, and crushed cereal.
- Flavor Twists: Add a pinch of espresso powder to the chocolate while melting for a mocha kick, or a sprinkle of chili powder for a real adventure.
FAQ
How long does this chocolate bark last?
Stored in an airtight container in the fridge, it’s good for up to two weeks. If it even lasts that long. IMO, it’s best eaten within the first week for maximum crunch.
Can I use the freezer instead of the fridge?
You can! It will set much faster (about 30 minutes). Just be sure to let it sit at room temp for a few minutes before breaking so it doesn’t shatter.
My chocolate seized! Can I save it?
Ugh, the worst. If it’s just a little grainy, try adding a tiny bit more coconut oil or even a teaspoon of vegetable oil and stirring like crazy. If it’s a full-on brick, it’s probably a lost cause. Learn from it and use a drier bowl next time!
Is this a good gift idea?
Is the sky blue? Yes! Pile the pieces into a cute cellophane bag or a nice box, and you’ve got a homemade, incredibly impressive gift for teachers, neighbors, friends… anyone you need to butter up.
Can I use margarine instead of coconut oil?
Technically, yes, a tiny bit will work to smooth the chocolate. But why? The flavor of coconut oil is neutral, and it’s a healthier fat. Margarine just makes me sad.
Why is my bark soft and sweaty looking?
That’s condensation. It means you took it out of the cold container and into warm, humid air too quickly. It’s still edible, just a little less pretty. To avoid it, let it sit in the container at room temp for a few minutes before opening.
Related Recipes:
- Almond Flour Zucchini Bread Recipe That’ll Make You Love Veggies
- Strawberry Tiramisu Recipe That Steals Hearts
- Strawberry Swiss Roll Cake Recipe: Perfect Summer Dessert
Final Thoughts
And there you have it. You’re now a certified chocolate bark artisan. You didn’t break a sweat, you barely dirtied a dish, and you created something truly magnificent. This recipe is your secret weapon for effortless entertaining, a quick sweet fix, or just proving to yourself that you can, in fact, “make something.” Now go forth and impress someone—even if that someone is just you on the couch in your pajamas. You’ve totally earned it.
Printable Recipe Card
Want just the essential recipe details without scrolling through the article? Get our printable recipe card with just the ingredients and instructions.

