So, you’re staring into the pantry, craving something delightfully sweet but are fully committed to your status as a person who does not want to spend all day in the kitchen. I feel you. What if I told you the ultimate lazy-person-turned-culinary-genius treat exists, and it involves zero baking and maximum fun? Welcome to the magical world of Chocolate Dipped Marshmallows. They’re fluffy, they’re chocolatey, and they’re so easy you could probably make them with one hand tied behind your back (though I don’t recommend it—things could get messy).
Why This Recipe is Awesome
Let’s be real, this recipe is basically foolproof. It’s the culinary equivalent of hitting the easy button. You get an insane amount of deliciousness for a hilariously small amount of effort. They’re perfect for satisfying a sudden sugar crash, impressing last-minute guests, or bribing small children (or significant others). They look fancy and taste like a million bucks, but they require the skill level of someone who can successfully operate a microwave. If you can melt stuff and dip other stuff into the melted stuff, you, my friend, are qualified.
Ingredients You’ll Need
Gather your squad. This is the easiest grocery list of your life.
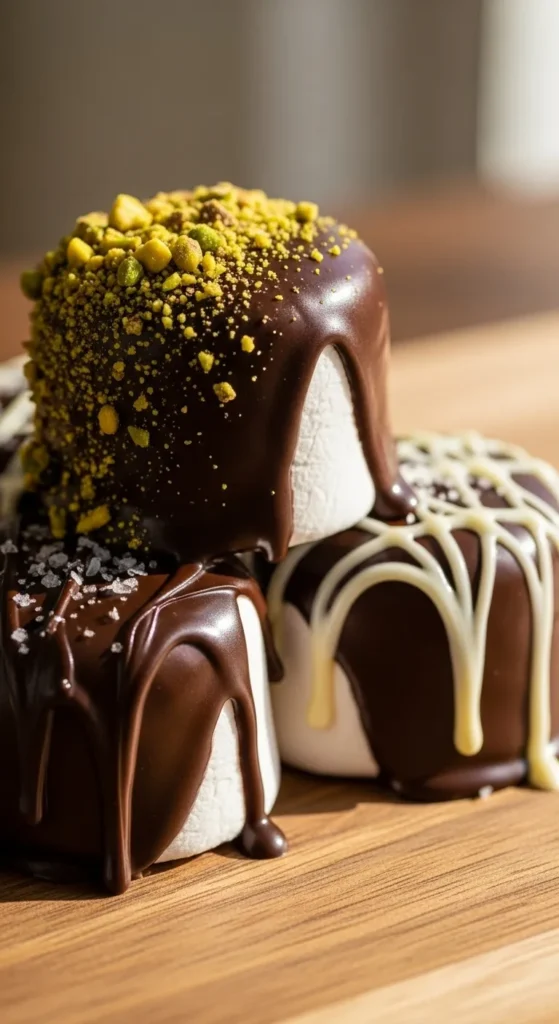
- 1 bag (10.5 oz) of jumbo marshmallows: Go for the big, fluffy ones. The mini guys are for hot chocolate, not for this luxurious dipping operation.
- 12 oz of semi-sweet chocolate chips or bars, chopped: The star of the show. Use good quality chocolate—it makes a HUGE difference. Don’t you dare use that weird chocolate-flavored coating stuff.
- 1 tablespoon of coconut oil or shortening: This is our secret weapon for making the chocolate perfectly smooth and dippable.
- A pinch of salt: Trust me, this makes the chocolate flavor pop and keeps things from being too one-note sweet.
- Your favorite toppings: This is where the party starts. Think:
- Crushed graham crackers (s’mores vibes, anyone?)
- Crushed peppermint
- Sprinkles, because sprinkles make everything better
- Crushed nuts like pistachios or peanuts
- Shredded coconut
- Flaky sea salt for the fancy folks
Step-by-Step Instructions
Okay, team. Let’s do this. Clear a little space on the counter, and let’s get dipping.
- Prep Your Station. Line a baking sheet with parchment or wax paper. Have your toppings ready in small, shallow bowls. This is your mise en place, or as I like to call it, “preventing a chaotic mess.”
- Melt the Chocolate. Combine your chocolate, coconut oil (or shortening), and that pinch of salt in a microwave-safe bowl. Microwave in 30-second bursts, stirring vigorously in between each burst. Do NOT walk away and forget about it! Burnt chocolate is a sad, sad thing. Stop when it’s almost all melted and just keep stirring until it’s completely smooth.
- The Dip. Hold a marshmallow by its bottom (get your mind out of the gutter) and dip the top 2/3 of it into the luxurious chocolate bath. Swirl it around to get a good, even coat.
- The Decoration. While the chocolate is still wet, immediately roll the dipped part into your chosen topping. Go on, give it a generous roll. This is no time to be shy.
- Set It and Forget It. Place your newly decorated marshmallow on the prepared baking sheet. Repeat until you have a small army of deliciousness. Once the tray is full, pop it into the fridge for about 15-20 minutes so the chocolate can set completely.
Common Mistakes to Avoid
Even the easiest recipes have pitfalls. Let’s avoid them together.
- Skipping the Oil/Shortening: Without it, your chocolate will be thick, clumpy, and a nightmare to dip with. It’s the difference between a smooth, professional-looking shell and a sad, lumpy mess.
- Using a Double Boiler When You Don’t Have To: Look, if you’re a purist, go for it. But the microwave method is faster and creates fewer dishes to wash. IMO, it’s the clear winner for laziness efficiency.
- Dipping with Wet Hands or Tools: Water is the enemy of melting chocolate. If even a single drop gets in there, it can cause the whole batch to “seize” up and become a grainy, solid lump. Keep everything completely dry!
- Impatience: Let the chocolate set completely in the fridge. If you try to eat one too soon, you’ll end up with chocolate all over your face. (Okay, that might still happen, but at least the marshmallow will be intact).
Alternatives & Substitutions
Want to mix it up? You do you.
- Chocolate Choices: Not a semi-sweet fan? Use milk chocolate for a sweeter treat or dark chocolate for a richer, less sweet bite. White chocolate is also a fantastic option!
- Dairy-Free? No problem! Use your favorite dairy-free chocolate chips and ensure your toppings are compliant.
- Coconut Oil Allergy: Just use an equal amount of neutral-flavored shortening. It works exactly the same.
- Kick it Up a Notch: Add a 1/2 teaspoon of flavoring extract (like orange, mint, or almond) to the melted chocolate for an extra flavor dimension. Just make sure it’s an oil-based extract, not water-based!
- For the Grown-Ups: Right before dipping, try rolling the marshmallow in a tiny bit of cocoa powder or espresso powder for a sophisticated twist.
FAQ
Can I use marshmallow fluff instead?
Technically, you could try to dip something into fluff, but for this specific recipe of dipping the marshmallow itself, fluff won’t work. We need a solid form to hold onto. So, no.
How long do these last?
They are best enjoyed within 2-3 days. Keep them stored in an airtight container in the fridge. After that, the marshmallow might start to get a little stale and the chocolate might “sweat.”
My chocolate seized! What do I do?!
First, pour one out for your lost chocolate. Then, try to salvage it by stirring in a tiny bit more coconut oil or shortening (a teaspoon at a time) until it smooths out again. Sometimes you can bring it back from the brink!
Can I use sticks to make them like pops?
Absolutely! For a fun twist, stick a lollipop stick or a paper straw into the bottom of the marshmallow before you dip it. Instant chocolate marshmallow pops!
Why did my toppings not stick?
You probably waited too long to roll them! The chocolate sets surprisingly fast. You gotta be quick—dip and immediately roll. Have your topping bowls lined up and ready for action.
Related Recipes:
Final Thoughts
And there you have it! You’ve just created a treat that is ridiculously simple yet looks and tastes incredibly impressive. You’ve conquered chocolate, mastered the marshmallow, and hopefully didn’t make too much of a mess in the process.
Now go forth and enjoy your delicious creations. Share them with friends, hoard them for yourself, or use them as a bargaining chip. You’ve earned it, you culinary wizard, you.
Printable Recipe Card
Want just the essential recipe details without scrolling through the article? Get our printable recipe card with just the ingredients and instructions.

