So, you want the bragging rights of pulling a gorgeous, crackly loaf of bread from your own oven, but you’re also deeply committed to your couch-time? Same, friend. Same. What if I told you that the secret to jaw-dropping, bakery-quality bread involves about 5 minutes of actual work and a lot of ignoring a bowl of dough while you binge your favorite show? Let’s get this bread.
Why This Recipe is Awesome
Let’s cut to the chase. This recipe is the culinary equivalent of finding a twenty in an old jacket—maximum reward for minimal effort. It’s idiot-proof, even I didn’t mess it up, and my culinary history includes a smoke alarm symphony. There’s no kneading (yes, you read that right), no fancy equipment, and no need to be a contestant on the Great British Bake Off. You mix, you forget, you bake, you become a hero. It’s that simple.
Ingredients You’ll Need
Gather these simple staples. No obscure, unpronounceable ingredients here.
- Bread Flour (3 cups): The high protein content is the secret to that glorious, chewy interior and big oven spring. All-purpose will work in a pinch, but bread flour is the overachiever we need.
- Instant Yeast (¾ tsp): Just a little! This isn’t a typo. We’re using time, not yeast, to do the heavy lifting.
- Salt (1 ¾ tsp): The flavor-bringer. Don’t you dare forget it.
- Warm Water (1 ½ cups): Not hot, not cold. Think “baby’s bathwater” warm. If it’s too hot, you’ll murder the yeast and have a very expensive paperweight.
Step-by-Step Instructions
- The Dump and Stir. In a big bowl, whisk together the flour, yeast, and salt. Pour in the warm water and stir with a wooden spoon until there’s no dry flour left. You’ll have a shaggy, sticky, and frankly, kinda ugly dough. This is perfect. Cover the bowl with plastic wrap.
- The Neglect. Now, walk away. Seriously. Leave it alone on the counter for 12-18 hours. Go to work, sleep, watch an entire season of something. The dough will bubble, rise, and do all the work itself. You’re just the proud parent watching from the sidelines.
- The Pre-Heat. When your dough is dotted with bubbles, it’s go-time. Plop your Dutch oven (pot and lid) into your cold oven and preheat it to 450°F (230°C). This takes a good 30 minutes, so use the time to shape your dough.
- The Shape (Kind Of). Flour a surface and your hands generously. The dough is sticky, so don’t fight it. Gently coax it out of the bowl and fold it over onto itself a few times to form a loose ball.
- The Final Rest. Place the dough ball on a parchment paper sling. This is your magic carpet ride into the pot. Let it rest while the oven finishes heating.
- The Bake. Carefully remove the screaming hot Dutch oven. Lift your dough using the parchment paper sling and plop it right in. Put the lid on and bake for 30 minutes. This traps the steam, creating that epic crust.
- The Reveal. After 30 minutes, take the lid off. Behold! Your masterpiece is pale but promising. Bake for another 15-20 minutes uncovered until it’s deeply golden and glorious.
- The Hardest Part. Remove the loaf and let it cool completely on a wire rack. I know, the smell is torture. But cutting into it hot will give you a gummy interior. Be strong. You’ve waited this long.
Common Mistakes to Avoid
- Using Hot Water: You’re not making tea for the yeast. Hot water will kill it. Use warm water, and your yeast will live a happy, bubbly life.
- Skipping the Pre-Heat: Thinking you can just throw the Dutch oven in when the oven beeps? Rookie mistake. That pot needs to be nuclear hot to create the perfect oven spring and crust.
- Cutting It Warm: I see you, knife in hand, ready to saw into that warm loaf. Stop! The bread is still cooking inside as it cools. Slicing it early ruins the texture. Patience, young grasshopper.
Alternatives & Substitutions
- No Dutch Oven? No problem! Use any heavy, oven-safe pot with a tight-fitting lid. A deep casserole dish with foil tightly crimped over the top works in a pinch.
- All-Purpose Flour: You can use it, but your crumb might be a tad less chewy and open. It will still be delicious, just a slightly different texture.
- Add-Ins: Feel fancy? When you’re stirring the dough, add a handful of chopped rosemary, olives, or shredded cheese. You’re an artist; the dough is your canvas.
FAQ
Can I use active dry yeast instead of instant?
Absolutely! Use the same amount. You can just mix it right in with the dry ingredients—no need to proof it in water first. This recipe is chill like that.
My dough didn’t rise much. What happened?
Your yeast might be old and tired (check the expiration date), your water was too hot and killed it, or your kitchen is just a bit too cold. Try placing the bowl in the (off) oven with the light on for a cozy, draft-free spot.
Why a Dutch oven?
It’s a magic trick! The heavy pot traps the steam released from the dough, which is what gives professional bakery bread its incredibly crisp, crackly crust. It’s our cheat code.
Can I halve this recipe?
You could, but why would you want less bread? If you must, it works perfectly. Just use a smaller pot.
How do I store it?
Once cool, keep it in a paper bag on the counter for a day to keep the crust crisp. For longer storage, a plastic bag will soften the crust but keep the interior moist. Honestly, it rarely lasts long enough to store.
This response is AI-generated, for reference only.
Related Recipes:
- Mango Sorbet Recipe That’ll Blow Your Mind
- Pineapple Upside Down Cake Recipe
- Pineapple Coconut Cream Tart Recipe: Delicious & Crazy Easy
Final Thoughts:
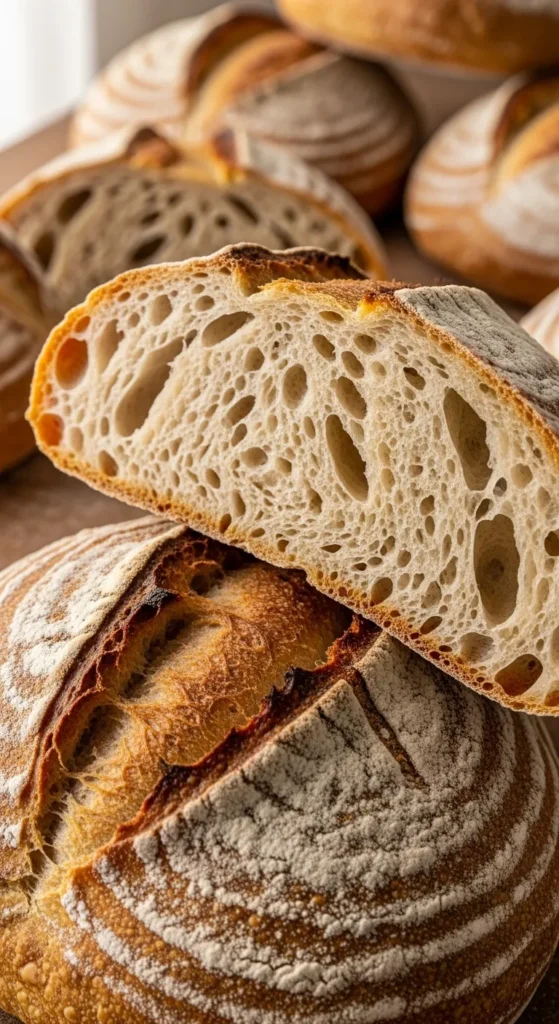
Crusty artisan bread is one of those recipes that makes you feel like a true baker—without the fuss. With its crisp crust and tender crumb, it’s perfect for sandwiches, soups, or just enjoying warm with butter. Simple ingredients, a little patience, and you’ll have bread that looks and tastes like it came straight from the bakery.
Would you like me to also draft SEO-friendly FAQs (like “What makes bread artisan?” or “How do I get a crisp crust at home?”) to strengthen your post?
Printable Recipe Card
Want just the essential recipe details without scrolling through the article? Get our printable recipe card with just the ingredients and instructions.

