So, you’ve decided to embark on the noble quest for gluten-free bread that doesn’t taste like a dried-out sponge? Welcome, friend. You’re in the right place. This isn’t a recipe that requires a PhD in Food Science or the patience of a saint. It’s for those of us who want a delicious, hearty slice of bread without the gluten, and without the drama.
Why This Recipe is Awesome
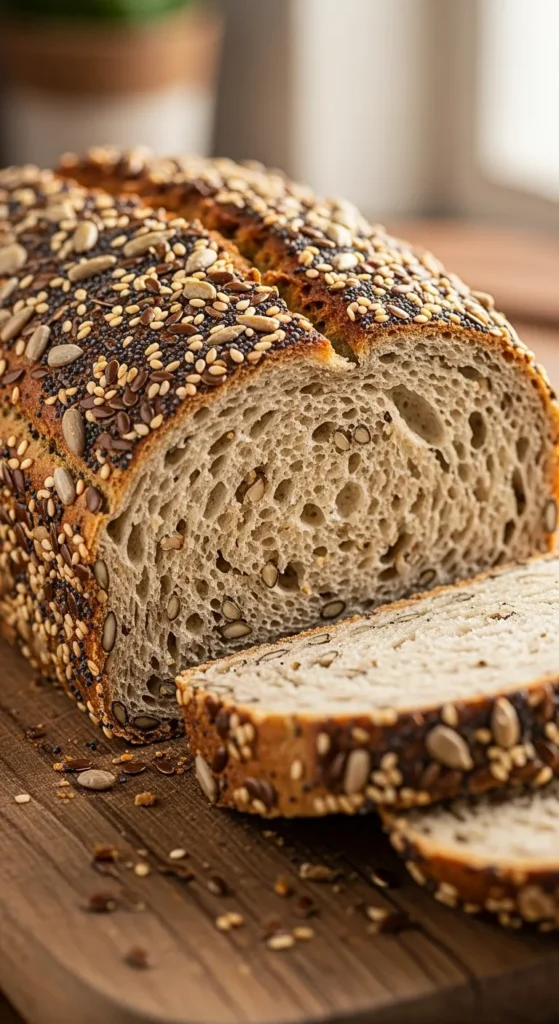
Let’s cut to the chase. Most gluten-free bread recipes are liars. They promise loft and crumb but deliver a brick-like disappointment that could double as a doorstop. This one is different. It’s stupidly simple, requires zero kneading (seriously, your biceps can relax), and is so packed with seeds you’ll feel virtuous with every single bite. It’s moist, it’s nutty, and it holds together when you slap some avocado on it. A miracle? Maybe. Delicious? Absolutely.
Ingredients You’ll Need
Gather your squad. This isn’t a complicated list, but each player has a important job.
- Gluten-Free All-Purpose Flour Blend (350g): NOT a single flour like almond or coconut. You need a blend that already has xanthan gum in it. This is your bread’s foundation, so don’t try to get creative here.
- Mixed Seeds (100g): This is where the personality comes in. I use a combo of sunflower seeds, pumpkin seeds, and flax seeds. Poppy seeds, sesame seeds—go nuts. This is your bread’s confetti.
- Psyllium Husk Powder (30g): This is the magic glue that holds everything together and gives it that wonderful, chewy bread texture. Do not skip this. It is non-negotiable.
- Active Dry Yeast (7g): One little packet. This gives our bread its rise and that lovely, yeasty aroma that says “I am real bread.”
- Warm Water (450ml): Not hot, not cold. Think baby-bottle warm. Too hot and you’ll murder the yeast; too cold and it’ll just take a nap.
- Honey (1 tbsp): A little snack for the yeast to get the party started. Maple syrup works too.
- Apple Cider Vinegar (1 tbsp): A secret weapon that adds a little tang and helps with the rise.
- Olive Oil (2 tbsp): For moisture and a happy crumb.
- Salt (1 tsp): Because bland bread is a crime.
Step-by-Step Instructions
- Wake Up the Yeast: In a small bowl or measuring cup, whisk your warm water, honey, and yeast together. Let it sit for about 5-10 minutes until it gets all foamy and excited. If it doesn’t foam, your yeast is dead and you need to start over. No judgment, it happens.
- Mix the Dry Crew: In a large mixing bowl, whisk together your gluten-free flour, psyllium husk powder, salt, and about 3/4 of your mixed seeds (save some for the top!).
- Make the Dough: Pour the foamy yeast mixture, olive oil, and apple cider vinegar into the dry ingredients. Stir with a sturdy spoon until everything is combined. It will look more like a thick, sticky batter than a traditional dough. This is correct. Do not panic.
- Let it Rest (The Hard Part): Scrape down the sides of the bowl, cover it with a clean tea towel, and walk away. Let it rest in a warm spot for 30-45 minutes. The psyllium will absorb the liquid and you’ll come back to a MUCH thicker, dough-like consistency. See? Magic.
- Preheat and Prep: While the dough is resting, preheat your oven to 375°F (190°C). Grease a standard 9×5 inch loaf pan. Seriously, preheat it. Don’t be that person.
- Shape the Loaf: Plop your now-gorgeous dough into the prepared loaf pan. Wet your hands (this prevents sticking) and smooth out the top. Sprinkle the remaining seeds over the top and press them in gently.
- Bake to Perfection: Pop that pan into the oven and bake for 50-60 minutes. It’s done when the top is golden brown and it sounds hollow when you tap it.
- COOL. IT. DOWN.: This is the most important step. I know you want to tear into it. DON’T. Remove the loaf from the pan and let it cool completely on a wire rack. Slicing into warm gluten-free bread is a one-way ticket to Gummy Town. Let it cool. Trust me.
Common Mistakes to Avoid
- Skipping the Psyllium Husk: I see you thinking about it. Don’t. It’s the MVP of this recipe. Your bread will crumble into a sad pile without it.
- Using a Single Flour: Almond flour alone will make a dense, oily brick. Coconut flour will suck up all the moisture and create a desert in your mouth. Use a pre-mixed BLEND.
- Cutting It Warm: I’m not joking about this. The bread is still cooking internally as it cools. If you cut it warm, you’ll unleash a steam-filled avalanche of regret. Just wait.
Alternatives & Substitutions
- No Honey? Maple syrup or agave nectar work perfectly.
- Seed Allergies? Just leave them out! The bread will be a little less texturally exciting, but still totally delicious. You could add some chopped, soft nuts instead, but be cautious as nut flours behave differently.
- Vegan? The honey is the only non-vegan ingredient here, so just swap it for maple syrup and you’re golden.
- Different Seeds? Go for it! Chia seeds, hemp hearts—whatever you have in the pantry is fair game.
FAQ
Can I make this without yeast?
Technically, you could try using baking powder as a leavener, but the texture and flavor will be completely different. It’ll be more like a quick bread than a yeast bread. I wouldn’t recommend it.
Why is my bread so dense?
You probably killed your yeast with water that was too hot, or you didn’t let it proof long enough. Or (and I can’t stress this enough) you cut it while it was still warm. Let it cool!
How do I store this masterpiece?
Once completely cool, wrap it tightly in beeswax wrap or plastic wrap and keep it on the counter for 2-3 days. For longer storage, slice it, freeze the slices, and pop them straight into the toaster when a craving hits.
My dough was too wet/too dry!
Gluten-free flours vary a lot by brand. If it seems way too wet after the rest time, add a tablespoon more flour. If it’s crumbly and dry, add a tablespoon of water. You want a moldable, slightly sticky dough.
Can I use whole eggs or egg whites?
This recipe is intentionally egg-free! But if you want to experiment, an egg white could add some extra structure. I haven’t tested it, so venture forth at your own risk, brave baker
Related Recipes:
- Pineapple Coconut Cream Tart Recipe: Delicious & Crazy Easy
- Refreshing Pineapple Sorbet Recipe – Cool & Tropical
- Pineapple Cheesecake Parfaits Recipe You’ll Crave
- Chicken Rice Casserole Recipe You’ll Crave
Final Thoughts:
Gluten-free seeded bread proves that healthy eating doesn’t mean sacrificing flavor. Loaded with seeds for crunch and nutrition, this bread is hearty, satisfying, and versatile. Whether you enjoy it fresh out of the oven, toasted with butter, or as the base for your favorite sandwich, it’s a recipe that brings both health and comfort to the table.
Would you like me to also create FAQs (like “What seeds are best for gluten-free bread?” or “How do I store gluten-free bread?”) to give your post more SEO strength?
Printable Recipe Card
Want just the essential recipe details without scrolling through the article? Get our printable recipe card with just the ingredients and instructions.

