So, you’re staring into the fridge hoping a slice of cake magically appears, huh? We’ve all been there. You want something gloriously sweet, soul-warmingly good, but the thought of following a novel-length recipe with 20 separate steps makes you want to just eat a spoonful of brown sugar and call it a day. I feel you. That’s why this isn’t just any recipe—it’s the recipe. My Grandma’s famous dessert. It’s the kind of thing that stops family arguments and makes neighbors suddenly remember your birthday. It’s legendary, simple, and you’re about to become a hero.
Why This Recipe is Absolutely Awesome
Let’s cut to the chase. This dessert is the culinary equivalent of a warm hug. It’s ridiculously easy, requiring zero fancy chef skills. If you can stir things in a bowl without injuring yourself, you’re already qualified. It’s also incredibly forgiving. Did you slightly over-measure the sugar? Who cares. Under-measure the flour a tiny bit? It’ll probably be even better. This recipe has survived decades of family potlucks, clumsy beginners, and distracted cooking (we’ve all burned water), and it still comes out perfect every single time. It’s basically idiot-proof.
Ingredients You’ll Need
Gather your troops! Here’s the lineup for this masterpiece. Don’t stress about perfection.
- All-Purpose Flour: The trusty foundation. Don’t pack it in, just scoop and level.
- Granulated Sugar: For that essential sweetness. Not the place for your fancy coconut sugar, just the regular stuff.
- Unsalted Butter: Softened. Not melted into a puddle, not rock-hard from the fridge. Think “almost squishy.”
- Eggs: The glorious binders that hold our joy together. Room temp is best, but we’re not sending them back to the store if they’re cold.
- Vanilla Extract: The real stuff, please. It makes a difference. This is the flavor fairy.
- Baking Powder & Salt: The unsung heroes that make it rise and balance the sweetness. Don’t you dare skip the salt.
- Milk: Whole milk is grandma’s choice, but any you have will work in a pinch.
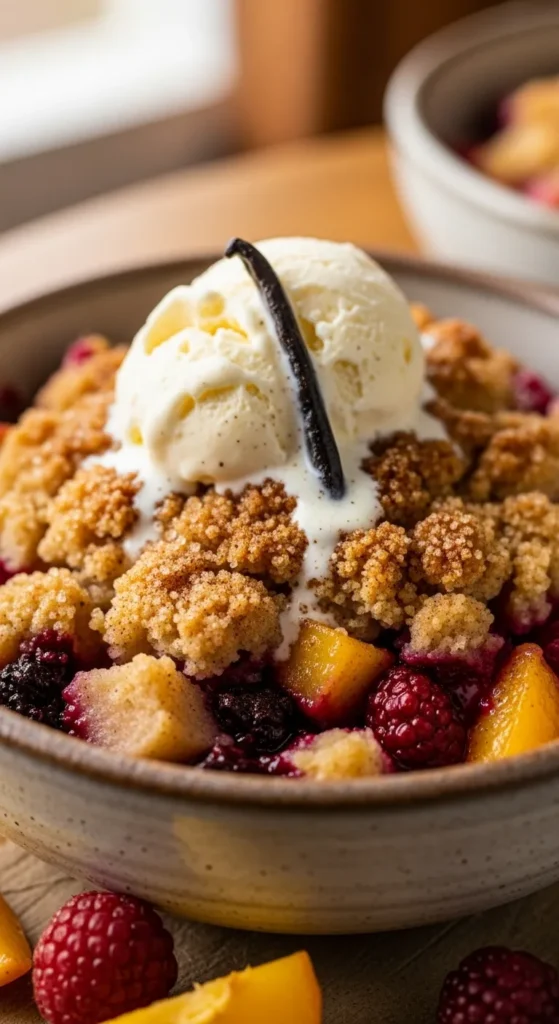
- Your Favorite Fruit (like apples, berries, or peaches) or Chocolate Chips: The star of the show! This is where you make it your own.
Step-by-Step Instructions
Let’s do this! Preheat your oven to 350°F (175°C). Grease a 9×9 inch baking pan. Or an 8×8. We’re not measuring our lives in millimeters here.
- Cream the Butter and Sugar. In a big bowl, beat the softened butter and sugar together until it’s light and fluffy. This is your arm workout for the day. If you have a mixer, use it and feel superior. If not, a wooden spoon and determination work just fine.
- Welcome the Eggs and Vanilla. Crack in the eggs one at a time, mixing well after each one. Then splash in that beautiful vanilla. Mix until it’s all one happy, slightly yellow family.
- Combine the Dry Stuff. In a separate, smaller bowl, whisk together the flour, baking powder, and salt. This just ensures there are no bitter baking powder pockets. Nobody wants that surprise.
- Bring It All Together. Gradually add the dry ingredients to the wet ingredients, alternating with splashes of milk. Mix until just combined. I repeat, DO NOT OVERMIX. A few lumps are totally fine; they’re just character.
- Fold in the Goodies. Gently stir in your chosen fruit or chocolate chips. This is the fun part.
- Bake to Perfection. Pour the batter into your prepared pan and spread it out evenly. Pop it in the oven for 40-45 minutes. You’ll know it’s done when the top is golden brown and a toothpick poked in the center comes out clean (unless you hit a melted chocolate chip, then try again).
- The Hardest Part: Wait. Let it cool in the pan for at least 15 minutes before you even think about cutting it. I know, the smell is torture. But it’s worth it, I promise.
Common Mistakes to Avoid
Let’s learn from the mistakes of others so you don’t have to live them.
- Using Melting-Hot Butter: If your butter is liquid, it’s going to make the texture all weird. Softened, people!
- Overmixing the Batter: This is the #1 way to make a tough, dense dessert. Mix until things are combined and then walk away. You’ve done enough.
- Not Preheating the Oven: Seriously? The oven needs time to get to the right temperature. Putting the batter in a cold oven is a one-way ticket to Dense Town.
- Skipping the Cooling Time: Cutting into it immediately will cause a crumbly mess. It’s still cooking inside from residual heat! Be patient. Have a cup of tea.
Alternatives & Substitutions
Got dietary needs or just missing an ingredient? No worries.
- Gluten-Free? Swap the all-purpose flour for a 1:1 gluten-free baking blend. Easy.
- Dairy-Free? Use your favorite plant-based butter and milk (oat or almond work great).
- Out of Eggs? A flax egg (1 tbsp ground flaxseed + 3 tbsp water per egg, let sit for 5 mins) works in a pinch.
- Fruit Options: The world is your oyster! Use whatever is in season or languishing in your fridge. Sliced apples with cinnamon, pears, berries, cherries, you name it. If using frozen fruit, don’t thaw it first—just toss it in frozen to prevent it from making the batter too soggy.
FAQ
Can I make this recipe into muffins instead?
Absolutely! This batter is versatile. Just grease a muffin tin or use liners, fill each cup about 2/3 full, and bake for 18-22 minutes. Boom, portable grandma goodness.
Can I use margarine instead of butter?
Technically, yes. But why would you want to? Butter gives it that rich, classic flavor that margarine just can’t match. Let’s not hurt our souls today.
How do I store the leftovers?
Leftovers? That’s adorable. Cover the pan with foil or transfer pieces to an airtight container. It’ll be perfect at room temp for 2 days, or in the fridge for up to 5.
Can I freeze this?
You bet! Wrap individual slices tightly in plastic wrap and then foil, and freeze for up to 3 months. Then, on a bad day, you can have a slice of happiness in minutes.
My dessert is super crumbly! What did I do wrong?
You probably either overmeasured your flour (scoop and level, don’t pack!) or you didn’t let it cool enough before slicing. Patience, young grasshopper.
Is it really okay to use frozen fruit?
Yes! It’s a fantastic way to make this year-round. Just toss it in straight from the freezer—no need to thaw.
Related Recipes:
- Pineapple Upside Down Cake Recipe
- Pineapple Coconut Cream Tart Recipe: Delicious & Crazy Easy
- Refreshing Pineapple Sorbet Recipe – Cool & Tropical
- Pineapple Cheesecake Parfaits Recipe You’ll Crave
Final Thoughts:
Grandma’s dessert recipes carry more than just flavor—they hold memories, traditions, and the warmth of home. Whether you’re recreating a childhood favorite or sharing a sweet bite with loved ones, these timeless treats remind us that the best desserts are the ones made with love and passed down through generations.
Would you like me to also make a list of popular grandma-style desserts (like apple pie, bread pudding, chocolate fudge, etc.) to strengthen your SEO?
Printable Recipe Card
Want just the essential recipe details without scrolling through the article? Get our printable recipe card with just the ingredients and instructions.

