So, you’ve decided you want your house to smell like a heavenly bakery and your soul to feel like it’s wrapped in a warm hug, huh? Welcome. You’ve come to the right place. Forget store-bought loaves that taste like disappointment and preservatives. Today, we’re making magic. We’re making Honey Oat Bread. And don’t you dare panic—I promise it’s easier than assembling IKEA furniture.
Why This Recipe is Absolutely Awesome
Let’s cut to the chase. This isn’t just bread; it’s a personality trait. It’s the kind of thing you casually mention at a party to instantly become the most interesting person in the room. “Oh, this? I just whipped it up.” Cue the awe.
But beyond the bragging rights, this recipe is legitimately foolproof. It’s designed for real humans who might occasionally measure flour with their hearts instead of a proper cup. It’s forgiving, it’s flexible, and it results in a loaf that’s subtly sweet, wonderfully soft, and has a chewy, oat-y crust that will ruin all other bread for you. You’ve been warned.
Ingredients You’ll Need to Raid Your Pantry For
Gather ’round, folks. Here’s the cast of characters for our delicious drama. Pro tip: using room-temperature ingredients (especially milk and eggs) is not just a suggestion from boring bakers; it’s the secret handshake to a better loaf.
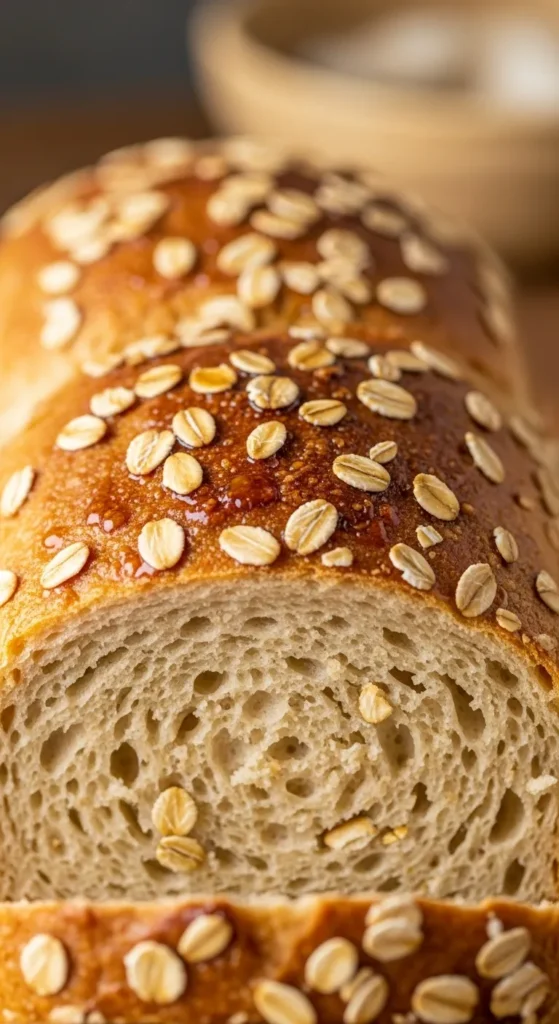
- Rolled Oats (1 cup): The star of the show. Not instant, not steel-cut. Just good old-fashioned rolled oats.
- Boiling Water (1 cup): For giving our oats a nice, cozy spa bath.
- Whole Milk (½ cup): For richness. Because we’re not monsters.
- Honey (⅓ cup): Nature’s liquid gold. This is for sweetness and keeping the bread moist.
- Unsalted Butter (2 tbsp, melted): Because butter makes everything better. Fact.
- Active Dry Yeast (2 ¼ tsp): Or one of those little packets. This is the tiny organism that does all the heavy lifting. Be nice to it.
- Bread Flour (3 – 3 ½ cups): Higher protein = better gluten = chewier, awesome-r bread. All-purpose will work in a pinch, but bread flour is the MVP here.
- Salt (1 tsp): The flavor enhancer. Don’t you dare skip it.
Step-by-Step Instructions: Your Path to Glory
- Soak the Oats: In a big bowl, pour that cup of boiling water over your rolled oats. Give it a stir and walk away for about 10 minutes. Let them get all mushy and happy. This is called the “oat soaker.” Fancy.
- Wake Up the Yeast: Once your oat mixture is just warm (not hot—you don’t want to murder the yeast), stir in the milk, honey, and melted butter. Sprinkle the yeast over the top, give it one gentle stir, and let it sit for 5-7 minutes. It should get all foamy and excited. If it doesn’t, your yeast might be dead. Start over. No tears, just science.
- Get Kneading: Add 2 cups of the bread flour and the salt to the wet mixture. Stir until it’s a shaggy, sticky mess. Now, gradually add more flour, about ¼ cup at a time, until the dough pulls away from the sides of the bowl and isn’t super sticky to the touch. You might not need all the flour!
- The Arm Workout: Dump the dough onto a floured surface and knead for 5-7 minutes. Put on a good song and get into a rhythm. You’re looking for a smooth, elastic dough that springs back slowly when you poke it.
- First Rise: Plop your beautiful dough ball into a lightly oiled bowl, turn it over to coat, and cover it with a clean kitchen towel or plastic wrap. Stick it in a warm, draft-free spot to rise until doubled in size. This takes about 1-1.5 hours. Go watch an episode of your favorite show.
- Shape the Loaf: Punch that dough down! Get all your frustrations out. Then, shape it into a loaf and place it in a greased 9×5 inch loaf pan. Pat some extra oats on top if you’re feeling fancy.
- Second Rise: Cover the loaf pan and let it rise again until it’s peeking over the top of the pan, about 30-45 minutes. Meanwhile, preheat your oven to 350°F (175°C). No cheating.
- Bake to Perfection: Bake that beautiful beige lump for 40-50 minutes. It’s done when it’s golden brown on top and sounds hollow when you tap the bottom. If you have a thermometer, it should read 190°F internally.
- The Hardest Part: Let it cool in the pan for 10 minutes, then turn it out onto a wire rack. I KNOW you want to cut into it immediately. Resist! If you slice it while it’s hot, it’ll turn into a gummy mess. Let it cool almost completely. I believe in your willpower.
Common Mistakes to Avoid (Don’t Be That Person)
- Killing the Yeast with Hot Liquid: Too hot, and you murder your tiny fungal friends. Too cold, and they won’t wake up. Aim for “warm bath” temperature.
- Adding Too Much Flour: The dough should be slightly tacky, but not stick to your hands like a desperate ex. Adding cup after cup of flour will give you a dense, brick-like loaf. Stop when the dough is soft and elastic.
- Skipping the Cool Down: I said it once, I’ll say it again: DO NOT slice the bread hot. You’ve worked too hard for gummy bread. Be cool.
Alternatives & Substitutions: Play With Your Food
- Vegan? No problem! Swap the milk for your favorite plant-based milk (oat milk would be poetic). Use maple syrup instead of honey, and a flax egg (1 tbsp ground flax + 3 tbsp water) if you feel it needs more binding power.
- No Bread Flour? All-purpose flour will work. Your bread might be a tad less chewy, but it will still be delicious.
- Want More Crunch? Toss in some sunflower seeds or chopped walnuts when you’re kneading.
- Out of Honey? Maple syrup or even brown sugar can stand in. The flavor will be slightly different, but still great.
FAQ: Your Burning Questions, Answered
Can I make this in a stand mixer?
Absolutely! Use the dough hook attachment for kneading. It’s a great arm-saver. Just keep an eye on it so you don’t over-mix.
Why is my dough not rising?
Your yeast is probably dead, or your kitchen is too cold. Yeast needs a warm, cozy environment. If your kitchen is chilly, try placing the bowl in your oven with the light on.
How do I store this masterpiece?
Keep it in an airtight bag or container at room temperature for 3-4 days. For longer storage, slice it and freeze it! Then just pop a frozen slice straight into the toaster.
Can I use quick oats?
You can, but the texture will be less pronounced. Rolled oats give you that wonderful, hearty oatiness.
Is this bread secretly healthy?
Well, it’s got oats and honey! That’s basically a health food. Let’s go with that. It’s certainly healthier than most store-bought breads full of unpronounceable ingredients.
There you have it. Your ticket to carb-filled nirvana. Now go forth, bake, and accept the compliments you so rightly deserve.
ere’s a warm and wholesome Final Thoughts section for your Honey Oat Bread:
Related Recipes:
- Blueberry Muffins Recipe
- Strawberry Shortcake Recipe:
- Dreamy Vanilla Cupcakes Recipe
- Dreamy Peach Cobbler Recipe: Easy to Make at Home
🍯 Final Thoughts
Honey Oat Bread is everything you want in a homemade loaf—soft, hearty, and gently sweet with a tender crumb and golden crust. The oats add a rustic texture, while the honey brings a subtle warmth that makes each slice comforting and flavorful.
It’s perfect for toast, sandwiches, or just slathered with butter while still warm from the oven. This bread feels nourishing and nostalgic, like something made with care and meant to be shared.
Simple, satisfying, and just sweet enough—Honey Oat Bread is a timeless classic you’ll come back to again and again.
Tip: Store leftovers wrapped tightly at room temp for up to 3 days, or freeze slices for easy toasting anytime.
Printable Recipe Card
Want just the essential recipe details without scrolling through the article? Get our printable recipe card with just the ingredients and instructions.

