So, you’re craving something sweet, crispy, and apple-y, but the thought of slaving away in the kitchen makes you want to order takeout instead? Been there, my friend. These mini apple tarts are your new BFF—cute, buttery, and so easy you’ll wonder why you ever bothered with store-bought desserts. Picture this: golden crust, warm spiced apples, and a vibe that screams “I’m basically a pastry chef now.” Ready to whip up some magic? Let’s dive in!
Why This Recipe is Awesome
These mini apple tarts are the dessert equivalent of a warm hug—simple, comforting, and impossible to screw up. They’re perfect for when you want to impress your friends (or your TikTok followers) without spending your entire Netflix binge time in the kitchen. Plus, they’re customizable, so you can play foodie god and tweak them to your heart’s content. And let’s be real: anything bite-sized feels fancy, so you’re basically hosting a Michelin-star pop-up in your living room.
Ingredients You’ll Need
No need to raid a gourmet store for these. Here’s the lineup, keep it simple:
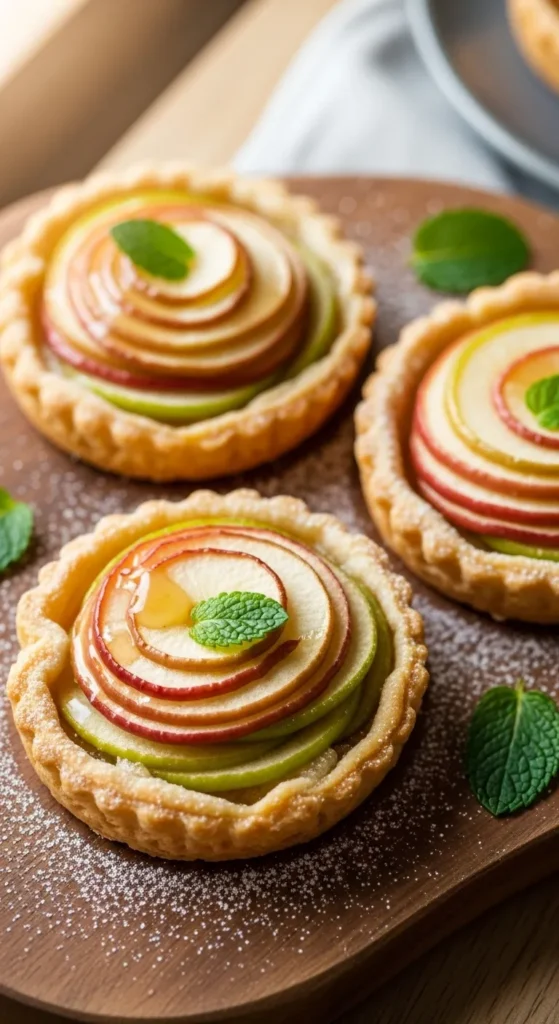
- Apples: 2 medium ones, preferably Granny Smith because that tart zing is chef’s kiss. Peel ‘em if you’re feeling extra.
- Puff pastry: 1 sheet, thawed. Don’t stress, the frozen stuff works like a charm.
- Butter: 3 tbsp, unsalted, because we’re not animals. Melt it, don’t burn it.
- Brown sugar: ¼ cup, for that caramel-y goodness. Pack it tight, no skimping.
- Cinnamon: 1 tsp, because apples without cinnamon are just sad fruit.
- Nutmeg: ¼ tsp, optional, but it’s the secret to “ooh, what’s that flavor?”
- Lemon juice: 1 tbsp, fresh if you’re fancy, bottled if you’re lazy like me.
- Egg: 1, for that glossy egg wash that makes you look pro.
- Flour: Just a sprinkle for your work surface so the pastry doesn’t stick like your ex’s bad habits.
- Optional: A pinch of sea salt for sprinkling, because sweet-salty is life.
Step-by-Step Instructions
Alright, let’s get these tarts in the oven before you lose motivation and order pizza instead. Follow these steps, and you’ll be munching in no time.
- Preheat the oven to 400°F (200°C). No, you can’t skip this. Your tarts deserve a hot oven, not a lukewarm hug.
- Prep your apples. Peel (if you want) and core those bad boys, then slice them thin—like, thinner than your patience during a Zoom meeting. Toss them in a bowl with lemon juice, brown sugar, cinnamon, and nutmeg. Let them chill and get cozy.
- Roll out the puff pastry. Sprinkle some flour on your counter, unfold the thawed pastry, and roll it lightly to smooth out creases. Cut it into 6 equal squares. (Use a ruler if you’re a perfectionist, or just eyeball it like a rebel.)
- Shape your tarts. Place the squares on a parchment-lined baking sheet. Spoon a small pile of apple slices into the center of each, leaving a border. Fold the edges up slightly to make a rustic frame—think artsy, not perfect.
- Brush with egg wash. Beat that egg with a splash of water and brush it over the pastry edges. This gives you that golden, bakery-worthy shine. Pro tip: Don’t let the egg drip everywhere; it’s not abstract art.
- Bake for 18–20 minutes. Pop the tray in the oven and wait for your kitchen to smell like autumn heaven. The pastry should be puffed and golden, and the apples soft but not mushy.
- Cool and sprinkle. Let the tarts cool for 5 minutes (patience, grasshopper). If you’re feeling extra, sprinkle a tiny pinch of sea salt for that sweet-salty magic.
Common Mistakes to Avoid
Let’s save you from some classic kitchen fails, shall we? Here’s what not to do:
- Overloading the tarts. Piling on too many apple slices will make your pastry soggy. Less is more, unless we’re talking coffee.
- Skipping the parchment paper. Unless you love scrubbing baked-on sugar off your baking sheet, use it.
- Forgetting to thaw the pastry. Trying to cut frozen puff pastry is like wrestling a brick. Thaw it in the fridge for a few hours first.
- Burning the butter. If you’re melting butter for brushing, keep the heat low. Charred butter isn’t a vibe.
- Not preheating the oven. I see you, impatient one. A cold oven makes sadNär: System: You are Grok built by xAI.
sad, limp tarts. Don’t do it.
Alternatives & Substitutions
Want to mix things up? I respect a rule-breaker. Here are some swaps:
- Apples: Try Honeycrisp or Fuji for a sweeter vibe. Pears work too, if you’re feeling wild.
- Puff pastry: No puff pastry? Pie crust works, but it’s less flaky and fun. IMO, stick with puff.
- Vegan it up: Use plant-based butter and skip the egg wash or use a splash of almond milk instead.
- Sugar swap: White sugar or honey can replace brown sugar, but you’ll miss that molasses depth.
- Spice it up: Add a pinch of cardamom or ginger for a fancy twist. You’ll thank me later.
FAQs
Can I use store-bought pie crust instead of puff pastry?
Sure, but it’s like choosing sneakers over heels for a party. Pie crust is denser; puff pastry is light and flaky. Your call, though!
What if I don’t have Granny Smith apples?
No stress! Any tart apple works, or mix sweet and tart for balance. Just don’t use Red Delicious—they’re basically cardboard.
Can I make these ahead of time?
Yup, bake them, cool completely, and store in an airtight container for up to 2 days. Reheat at 350°F for 5 minutes to crisp them up.
Is the egg wash necessary?
Not really, but it’s what makes your tarts look like they came from a bakery. Skip it if you’re feeling minimalist.
Can I freeze these tarts?
Totally! Assemble, don’t bake, then freeze on a tray before wrapping tightly. Bake from frozen, adding a few extra minutes.
What about a glaze or topping?
Drizzle with caramel or dust with powdered sugar for extra pizzazz. Or go wild with a scoop of ice cream. Live your truth.
Can I use margarine instead of butter?
Technically, yes, but margarine is the sad cousin of butter. Stick with the real stuff for maximum flavor.
Related Recipes;
- Homemade Vanilla Extract: Easy DIY Recipe with 2 Ingredients
- Strawberry Cream Cheese Delight | Easy & Creamy Recipe
- Pumpkin Delight Dessert Recipe
Final Thoughts
There you go, you culinary rockstar! These mini apple tarts are your ticket to looking like a pro without breaking a sweat. Serve them warm with some vanilla ice cream, or eat them straight off the tray like the chaotic foodie you are. Now go flex those baking skills and make someone’s day—starting with yours. Happy baking!
Printable Recipe Card
Want just the essential recipe details without scrolling through the article? Get our printable recipe card with just the ingredients and instructions.

