So, you’re staring at your oven like it’s a portal to another dimension that requires far too much energy to open. Same. You want something decadent, impressive, and delicious, but your motivation levels are currently set to “horizontal.” I feel you. What if I told you that the solution to all your problems involves zero baking, a handful of simple ingredients, and a final product that will make you feel like a dessert wizard who finally has their life together? Enter: No-Bake Blueberry Yum Yum. It’s not just a dessert; it’s a lifestyle choice for the gloriously lazy (and brilliant).
Why This Recipe is Awesome
Let’s cut to the chase. This recipe is the culinary equivalent of finding a $20 bill in a jacket you haven’t worn since 2019. It’s a pure, unadulterated win.
First, it’s idiot-proof. I made it while simultaneously binge-watching a true crime series and trying to figure out what my cat is so judgmental about. I didn’t mess it up, and neither will you.
Second, it’s a total crowd-pleaser. Bring this to a potluck and watch people’s eyes light up. They’ll think you slaved away for hours, and your secret of barely breaking a sweat is safe with us.
And finally, it’s no-bake! Which means you get to enjoy a creamy, dreamy, layered dessert without turning your kitchen into a sauna. It’s a cool, refreshing victory from crust to topping.
Ingredients You’ll Need
Gather your squad. This is the crew that’s going to make magic happen while you stand there and look pretty.
For the Crust:
- 2 cups graham cracker crumbs (About 15-16 full sheets. Pro tip: buy the crumbs to save your anger for more important things, like the last season of Game of Thrones.)
- 1/2 cup (1 stick) unsalted butter, melted (This is the glue. Savory, delicious glue.)
- 1/4 cup granulated sugar (Because life is sweet.)
For the Cream Cheese Layer:
- 8 oz cream cheese, softened to room temperature (Not rock-hard, not a puddle. Think “sunbathing” consistency.)
- 1 cup powdered sugar (Dust off the sifter, or don’t and just hope for the best. I believe in you.)
- 1 teaspoon vanilla extract (The good stuff. Don’t you dare use the imitation.)
- 1 (8 oz) tub of frozen whipped topping, thawed (Yes, Cool Whip. It’s a legend for a reason.)
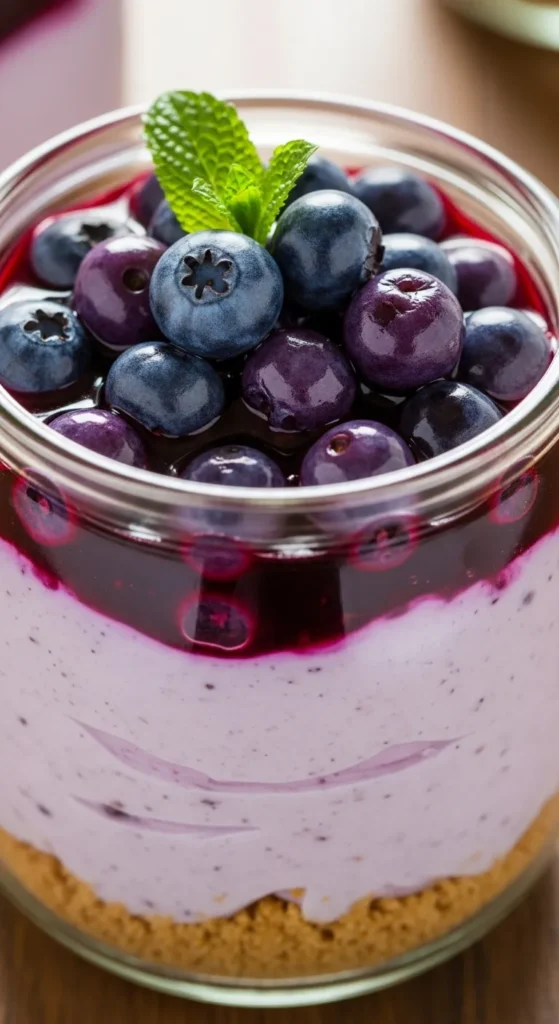
For the Blueberry Layer:
- 1 can (21 oz) blueberry pie filling (The cheat code that makes you look like a genius. Don’t fight it.)
For the Topping:
- 1 (8 oz) tub of frozen whipped topping, thawed (More fluff! More joy!)
- A handful of fresh blueberries for garnish (Optional, but makes it look like it came from a fancy bakery.)
Step-by-Step Instructions
- Conquer the Crust: Dump your graham cracker crumbs, melted butter, and sugar into a 9×13 inch baking dish. Mix it all together with a fork until it looks like wet sand. Press this mixture firmly and evenly into the bottom of the pan to form your crust. No wimpy pressing! A solid crust is the foundation of our lazy empire. Pop this in the fridge for 10 minutes to let it set.
- Whip Up the Creamy Dream: In a large bowl, beat the softened cream cheese with an electric mixer until it’s smooth and flawless. No lumps allowed! Add in the powdered sugar and vanilla extract and beat again until everything is combined and silky.
- Fold in the Fluff: Now, gently fold in the first 8 oz tub of thawed whipped topping. “Folding” is a fancy term for “be gentle so you don’t murder all the air bubbles.” Use a spatula and cut through the middle and turn it over until the mixture is one uniform, cloud-like color.
- Layer It On: Pull your crust out of the fridge. Spread the creamy cheese mixture evenly over the crust. Smooth the top like you’re zenning out.
- The Blueberry Bonanza: Open your can of blueberry pie filling. Dollop the entire glorious contents over the cream cheese layer and spread it gently into an even layer. Try not to eat all the blueberries straight from the can. I believe in your willpower (mostly).
- The Final Fluff: Carefully spread the second tub of whipped topping over the blueberry layer. This is the fluffy white blanket that tucks everything in.
- The Hardest Part: Cover the pan and refrigerate for at least 4-6 hours, but preferably overnight. I know, the waiting is torture. But it’s crucial for the layers to set and become sliceable perfection. Use this time to nap. You’ve earned it.
Common Mistakes to Avoid
- Using brick-hard cream cheese: If your cream cheese is cold, you will have lumpy sadness. LUMPS. No one wants a lumpy layer. Plan ahead and let it sit on the counter for an hour.
- Not pressing the crust firmly: A loosely packed crust will crumble into a million pieces when you try to serve it. Put some muscle into it! Pretend you’re pressing the “snooze” button.
- Skipping the chill time: Impatience leads to soup. Glorious, delicious soup, but not the layered masterpiece you were promised. Respect the chill.
- Overmixing the cream cheese layer: Once you add the whipped topping, switch from beating to folding. Overmixing will deflate your fluff and make the layer dense.
Alternatives & Substitutions
Allergies? Preferences? Got a random ingredient you need to use up? Let’s play.
- Crust Swap: Not a fan of graham? Use crushed vanilla wafers, Oreos (remove the filling for a chocolate crust!), or even pretzels for a sweet & salty twist.
- Cream Cheese: Feel free to use low-fat or Neufchâtel cheese. The texture will be slightly less rich but still totally delicious.
- Fruit Swap: Blueberries not your thing? The world is your oyster! Cherry pie filling is a classic. Lemon curd would be phenomenal. Or, mash up some fresh strawberries with a tablespoon of sugar and let them macerate for 30 minutes for a fresh twist.
- Whipped Topping: You can absolutely use an equal amount of homemade sweetened whipped cream here. Just know it might not hold its shape quite as long for leftovers (not that there will be any).
FAQ
Can I make this ahead of time?
Absolutely! This is the ultimate make-ahead dessert. It needs that long chill anyway, so making it the day before you need it is not just okay, it’s encouraged.
How long does it last in the fridge?
Covered tightly, your Blueberry Yum Yum will be perfect for about 3-4 days. The crust might start to get a tiny bit softer, but it will still taste incredible.
Can I use fresh blueberries instead of pie filling?
You could, but you’d need to cook them down with sugar and a thickener (like cornstarch) to get that syrupy, pie-filling consistency. The canned filling is the shortcut that guarantees perfect results with zero effort. Embrace the shortcut.
My cream cheese layer is lumpy! How do I fix it?
First, a moment of silence for your smooth dreams. If you have a few tiny lumps, the next layers might hide them. For major lumps, you could try pressing the mixture through a fine-mesh sieve, but that’s a lot of work. Honestly? Just call it “texture” and tell everyone it’s a feature, not a bug. It will still taste amazing.
Is it freezer friendly?
You can freeze it, but the texture of the whipped layers can change a bit upon thawing, becoming slightly icier. It’s best enjoyed fresh from the fridge. But if you’re desperate, freeze it for up to a month and thaw in the fridge overnight.
Can I use a different size pan?
A 9×13 is ideal. You could use a square 9×9 pan for a thicker, more decadent version—just know you might have a little extra filling. (Or just eat it with a spoon. No judgment here.)
Now, go forth and create your no-bake masterpiece. Your taste buds (and your lazy soul) will thank you
Related Recipes:
- Pineapple Upside Down Cake Recipe
- Pineapple Coconut Cream Tart Recipe: Delicious & Crazy Easy
- Refreshing Pineapple Sorbet Recipe – Cool & Tropical
- Pineapple Cheesecake Parfaits Recipe You’ll Crave
Final Thoughts:
No-bake blueberry desserts are a sweet way to enjoy fruity flavor without ever turning on the oven. With their luscious layers, refreshing taste, and easy prep, they’re perfect for summer gatherings, holidays, or anytime you want a dessert that’s as beautiful as it is delicious.
Printable Recipe Card
Want just the essential recipe details without scrolling through the article? Get our printable recipe card with just the ingredients and instructions.

