So, you’re staring into the fridge, craving something decadent but your brain is already in weekend mode, screaming “NO OVENS!” I feel you. Turning on the oven feels like a commitment we’re just not ready for. What if I told you that creamy, dreamy cheesecake is not only possible but laughably easy to make? Enter your new best friend: No-Bake Cheesecake Cups. They’re the superhero of desserts, minus the cape and the complicated origin story.
Why This Recipe is Awesome
Let’s cut to the chase. This recipe is the culinary equivalent of finding a $20 bill in your pocket. It’s a total win. First, it’s idiot-proof. I’ve made these while simultaneously explaining to my cat why he can’t eat my houseplants, and they still turned out perfectly. Zero baking means zero stress about over-baking, under-baking, or that weird oven hot spot that burns everything. You get individual portions of joy, which means no fighting over who got the bigger slice. Plus, they set in the fridge, giving you plenty of time to binge your favorite show while they magically transform into heaven.
Ingredients You’ll Need
Gather your squad. This is the easiest party you’ll ever host in your kitchen.
For the Crust:
- Graham Cracker Crumbs (1 cup): The classic. The GOAT. If you’re feeling fancy, digestives or vanilla wafers work too.
- Melted Butter (4 tablespoons): The glue that holds our crunchy dreams together. Salted is best for that sweet-salty vibe.
- A Pinch of Sugar (1 tbsp): Because a little extra sweetness never hurt anybody.
For the Filling:
- Cream Cheese (8 oz, full-fat please): This is the star. Bring it to room temperature unless you enjoy wrestling with lumpy batter. I don’t judge, but your whisk will.
- Powdered Sugar (½ cup): Dissolves like a dream and keeps things silky smooth.
- Heavy Cream or Cool Whip (1 cup): Heavy cream makes it extra rich and fluffy. Cool Whip is a fantastic shortcut for maximum fluffiness with minimal effort.
- Vanilla Extract (1 tsp): The essence of happiness.
- A Squeeze of Lemon Juice (½ tsp): The secret weapon to cut through the richness and make the flavors pop.
For the Topping:
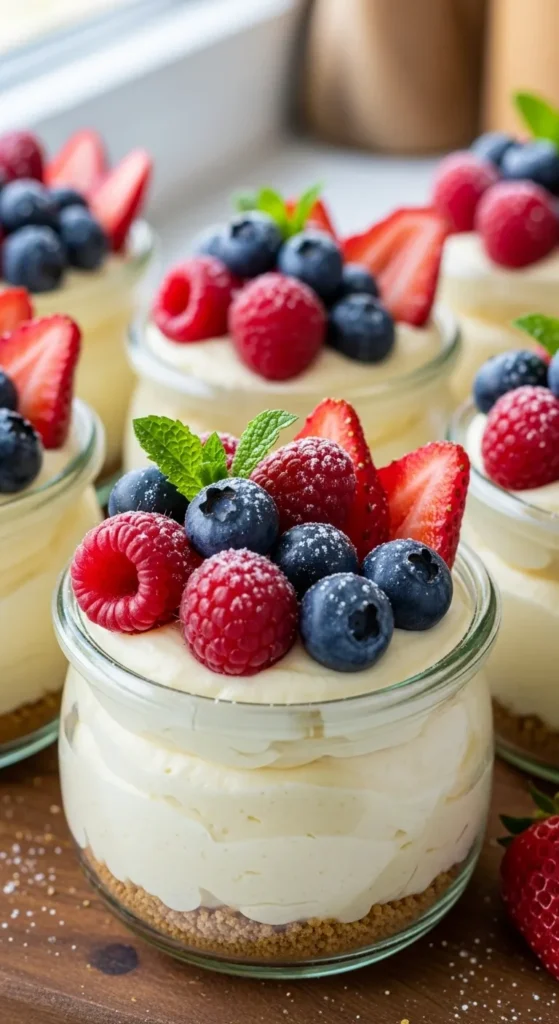
- Your Favorite Toppings: This is where you shine. Canned pie filling, fresh berries, chocolate sauce, caramel, crushed Oreos—the world is your cheesecake oyster.
Step-by-Step Instructions
- Make the Crust: In a medium bowl, mix your graham cracker crumbs, melted butter, and that pinch of sugar. You’re aiming for a texture that holds together when you pinch it. If it seems too dry, add a teensy bit more butter. Divide this glorious, butty sand equally among 4-6 cups or small jars. Press it down firmly with the back of a spoon. This is your foundation—make it strong! Pop them in the fridge to chill while you make the filling.
- Whip the Cream: If you’re using heavy cream, pour it into a chilled bowl and whip it with a hand mixer or a whisk (if you need an arm workout) until you get stiff, beautiful peaks. You should be able to turn the bowl upside down without it falling on your head. If you’re using Cool Whip, just give it a quick fluff with a spatula. Set this aside.
- Create the Filling Base: In another bowl, beat the room-temperature cream cheese until it’s completely smooth and lump-free. This is the most important step! No one wants chunky cheesecake. Add the powdered sugar, vanilla extract, and lemon juice. Beat it again until everything is combined and deliciously smooth.
- Fold it All Together: Time to be gentle. Add about a third of your whipped cream (or Cool Whip) to the cream cheese mixture and fold it in with a spatula. This lightens the thick base. Now, gently fold in the rest of the whipped cream until no white streaks remain. You want a cloud of cheesecake fluff.
- Assemble and Chill: Pull your cups from the fridge. Spoon or pipe the filling on top of the crusts. Smooth the tops. Now, for the hardest part: waiting. Cover them and refrigerate for at least 4 hours, but ideally overnight. This sets the filling and makes the flavors best friends.
- Top and Devour: Right before serving, go crazy with your toppings. Then, dig in and accept the compliments you will undoubtedly receive.
Common Mistakes to Avoid
- Using Cold Cream Cheese: This is the #1 rookie mistake. Cold cream cheese will never, ever become smooth. It will laugh at your whisk and leave you with a lumpy mess. Plan ahead and let it sit on the counter for an hour.
- Over-whipping the Cream: If you whip the heavy cream too long, you’ll end up with butter. Stop when you have firm peaks that hold their shape.
- Not Chilling Long Enough: Impatience is the enemy of no-bake desserts. They need time to set! If you skip this, you’ll have cheesecake soup. Tasty, but not the textural win we’re going for.
- Packing the Crust Too Tight or Too Loose: You want a firm base, but you’re not trying to create cement. A good, firm press is all you need.
Alternatives & Substitutions
- Dairy-Free? No problem! Use your favorite plant-based cream cheese and whipped topping. The recipe works like a charm.
- Gluten-Free? Just grab gluten-free graham crackers or cookies for the crust. Easy peasy.
- Not a Graham Cracker Fan? Get creative! Use crushed Oreos, Biscoff cookies, or even pretzels for a salty-sweet situation.
- Want More Flavor? Add a tablespoon of lemon zest to the filling for a zing, or mix in some cocoa powder for a chocolate version. The base recipe is your blank canvas.
FAQ
Can I make this one big cheesecake instead of cups?
Absolutely! Just press the crust into a 7-inch or 8-inch springform pan and spread the filling on top. The chilling time will be the same. You’ll just have to share a bigger pie.
How long do these last in the fridge?
They’re best friends within 2-3 days. The crust might start to get a tiny bit softer after that, but they’ll still be delicious. Keep them covered.
My filling is runny! What did I do wrong?
Did you chill it long enough? If you did, the culprit is likely under-whipped cream or (say it with me) cold cream cheese that made the filling too thin. You can try to pop it in the freezer for a bit to salvage it!
Can I use low-fat cream cheese?
You can, but the texture and flavor won’t be as rich and luxuriously creamy. This is dessert. Live a little.
Is there a way to make this without a mixer?
For the whipped cream? You can use a whisk and some serious elbow grease. For the cream cheese, if it’s truly room temperature, you can probably beat it smooth by hand with a little determination. But I’d highly recommend recruiting a mixer for backup.
Related Recipes;
- Pineapple Upside Down Cake Recipe
- Pineapple Coconut Cream Tart Recipe: Delicious & Crazy Easy
- Refreshing Pineapple Sorbet Recipe – Cool & Tropical
- Pineapple Cheesecake Parfaits Recipe You’ll Crave
Final Thoughts:
No-bake cheesecake cups are the ultimate fuss-free dessert—smooth, creamy, and perfectly portioned. With their crunchy crust and rich filling, they’re ideal for parties, holidays, or whenever you want something sweet without turning on the oven. Elegant yet easy, these little cups prove that simple desserts can still feel special.
Printable Recipe Card
Want just the essential recipe details without scrolling through the article? Get our printable recipe card with just the ingredients and instructions.

