So you’re craving something ridiculously tasty but the thought of turning on the oven makes you want to take a nap? Same. You’ve come to the right place. Forget complicated recipes and hot kitchens; we’re about to dive into the glorious, lazy-person’s paradise of no-bake peanut butter delights.
Why This Recipe is Awesome
Let’s be real. This isn’t just *a* recipe; it’s your new secret weapon. It’s idiot-proof; even I didn’t mess it up. Seriously. You get all the satisfaction of a decadent, homemade dessert with precisely zero of the baking-related stress. No scorching your fingertips, no worrying about over-mixing, and absolutely no oven light staring contest to see if your cake has risen. It’s quick, it’s easy, and it requires minimal cleanup. What’s not to love?
Ingredients You’ll Need for No-Bake Peanut Butter Dessert
Gather your squad. This is the dream team that’s about to make magic happen.
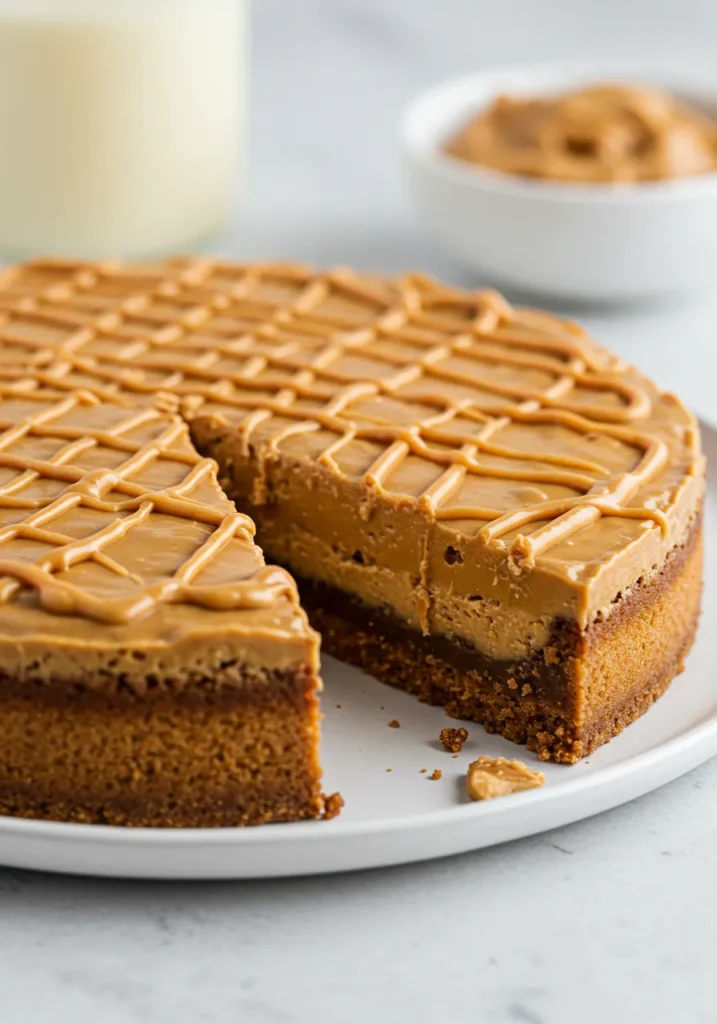
- Creamy Peanut Butter: The star of the show. Don’t use the natural, oily kind that separates—we need the classic, stir-free stuff for the right texture.
- Butter: Unsalted, please. We’re in control of the salt levels here. Let it soften on the counter so it’s ready to get friendly with the other ingredients.
- Powdered Sugar: Also known as confectioner’s sugar. This is what gives our dessert its smooth, melt-in-your-mouth texture, not a gritty one.
- Graham Cracker Crumbs: For that perfect crusty base. You can buy them pre-crumbled or crush your own in a zip-top bag with a rolling pin (highly therapeutic).
- Vanilla Extract: The supporting actor that makes the peanut butter taste more like peanut butter. Don’t you dare skip it.
- A Pinch of Salt: To balance all that sweetness and make the flavors pop.
- Chocolate Chips (optional but highly recommended): For melting and drizzling on top. Because chocolate and peanut butter is a match made in heaven.
Step-by-Step Instructions
Let’s get down to business. This is so easy, you could probably do it with your eyes closed (but maybe don’t, for safety’s sake).
- Prep Your Pan. Grab an 8×8 inch square pan. Line it with parchment paper, leaving some overhang on the sides. This is your future self thanking you for easy dessert removal. Pro tip: A little butter on the pan first makes the parchment stick in place.
- Make the Crust. In a medium bowl, mix together the graham cracker crumbs and a little melted butter until it looks like wet sand. Press this mixture firmly and evenly into the bottom of your prepared pan. Pop it in the fridge to chill while you make the good stuff.
- Whip Up the Filling. Using a hand mixer or a stand mixer, beat the softened butter and peanut butter together until they’re completely combined and smooth. It should look creamy and dreamy.
- Incorporate the Sweetness. Gradually beat in the powdered sugar. It might try to poof out of the bowl like a sugar cloud, so start slow! Keep mixing until it’s all incorporated and the mixture is super thick and slightly stiff.
- Add the Flavor. Mix in the vanilla extract and that pinch of salt. Taste it. Go on, you’ve earned it. Is it amazing? Yes, it is.
- Assemble and Chill. Spread the peanut butter filling evenly over your chilled crust. If you’re going for the chocolate drizzle, melt your chocolate chips and use a spoon or fork to artfully drizzle it all over the top. Refrigerate for at least 2-3 hours, or until firm. This is the hardest part: waiting.
- Slice and Conquer. Use the parchment paper to lift the whole block out of the pan. Slice it into squares and try not to eat them all at once.
Common Mistakes to Avoid
Even the easiest recipes have pitfalls. Let’s avoid them, shall we?
- Using the Wrong Peanut Butter: This is the big one. That all-natural, health-food-store peanut butter will make your filling oily and prevent it from setting properly. Stick with the classic Skippy or Jif-style for guaranteed success.
- Not Chilling Long Enough: Impatience is the enemy here. If you try to cut into these before they’re properly set, you’ll have a gooey, delicious mess. A delicious mess, but a mess nonetheless. Set a timer and walk away.
- Not Pressing the Crust Firmly: If you just loosely sprinkle the crust into the pan, it will fall apart when you try to eat it. Press it down hard with the bottom of a glass or measuring cup to compact it.
Alternatives & Substitutions
Don’t have exactly what’s on the list? No panic. We can work with this.
- Graham Cracker Sub: No graham crackers? Digestive biscuits or even crushed-up vanilla wafers work beautifully.
- Need a Gluten-Free Version? Simply use certified gluten-free graham crackers or gluten-free oat flour as your base.
- Chocolate Lovers: Feel free to add a layer of melted chocolate between the crust and the peanut butter layer. Or mix mini chocolate chips right into the filling. IMO, you can never have too much chocolate.
- Feeling Fancy? Swap the vanilla extract for almond extract for a different flavor profile. Or stir in some chopped-up pretzels for a salty-sweet crunch!
FAQS about No-Bake Peanut Butter Dessert
Can I use margarine instead of butter?
Well, technically yes, but why hurt your soul like that? Butter provides a far superior flavor and texture. I strongly recommend the real deal.
How long will these keep?
In an airtight container in the fridge, they’ll be perfect for up to a week. If you need to keep them longer, they freeze amazingly well for up to 3 months.
My mixture is too crumbly! Help!
This means it’s a bit dry. Just add a tiny splash of milk (like a teaspoon at a time) and mix until it comes together smoothly.
My mixture is too gooey! What now?
This usually means your peanut butter was a bit too oily or your butter was too soft. No worries! Just add a little more powdered sugar until it reaches a thicker, fudge-like consistency.
Can I make these into balls instead of bars?
Absolutely! Instead of pressing into a pan, just roll the mixture into tablespoon-sized balls. You can even roll them in extra crushed graham crackers or cocoa powder. FYI, this is a great way to portion control (or not).
Related Recipes
Final Thoughts about No-Bake Peanut Butter Dessert
And there you have it. You are now the proud creator of a dessert that requires more willpower to stop eating than it did effort to make. These no-bake peanut butter squares are your ticket to impressing friends, satisfying a midnight craving, or just proving to yourself that you are, in fact, a kitchen genius. Now go enjoy your well-earned treat. You’ve absolutely earned it
Printable Recipe Card
Want just the essential recipe details without scrolling through the article? Get our printable recipe card with just the ingredients and instructions.

