So, you’re staring into the abyss of your pantry, craving something decadent but your motivation to actually bake is sitting at a solid zero? Same. What if I told you that the most legendary, crowd-pleasing dessert of your life requires exactly three ingredients, zero baking, and the culinary skill of a slightly coordinated goldfish? Welcome to the magical, mind-bogglingly simple world of Oreo truffles. Let’s get this no-bake party started.
Why This Recipe is Awesome
Let’s cut to the chase. This recipe is the culinary equivalent of finding a $20 bill in your old jeans—pure, unadulterated joy with minimal effort. It’s idiot-proof, even I didn’t mess it up, and that’s saying something. These truffles look like you fussed for hours, whispering sweet nothings to a double boiler. But in reality? You’ll be smashing cookies like you’re venting about a bad day. They’re the ultimate potluck hero, the perfect last-minute gift, and the best excuse to eat dessert for breakfast (what? They have dairy!). They are rich, creamy, chocolatey, and require absolutely no heat, unless you count the microwave for 60 seconds.
Ingredients You’ll Need
Gather your tiny army of three. That’s it. No, seriously.
- 1 package (14.3 oz) Oreos: The classic. Don’t get fancy here. The standard “Original” is your workhorse. We’re using the whole cookie—filling and all. This is a no-judgment zone.
- 1 package (8 oz) brick-style cream cheese, softened: Brick-style. Not the spreadable stuff in a tub. This is non-negotiable for the right texture. And softened is key unless you enjoy arm day and want to murder your mixer.
- 1 package (12 oz) semi-sweet or dark chocolate melting wafers: This is your secret weapon. You can use almond bark or chocolate chips, but wafers are designed to melt smoothly and set with a perfect snap. They’re the VIP pass to Truffle Town. Also, grab a teaspoon of coconut oil to make the chocolate even smoother, if you’re feeling fancy.
Step-by-Step Instructions
- Pulverize the Oreos. Dump the entire package of Oreos into a food processor and let ‘er rip. Pulse it until you have fine, dark crumbs. No food processor? No problem. This is a fantastic stress-reliever. Seal the cookies in a heavy-duty zip-top bag and go to town with a rolling pin, wine bottle, or whatever blunt object is handy. You want it to look like edible dirt.
- Meet Your New Best Friend: Cream Cheese. In a large mixing bowl, combine your beautiful black crumbs with the entire block of softened cream cheese. Use a hand mixer (or some serious elbow grease and a wooden spoon) to mix until it’s completely combined and looks like a uniform, sticky, black cookie dough. You shouldn’t see any white streaks.
- Form the Truffle Balls. Line a baking sheet with parchment paper. Now, scoop out the mixture. A tablespoon or a small cookie scoop is perfect for getting even-sized balls. Roll them between your palms to make them nice and round. Pro Tip: If the mixture is too sticky, pop the whole bowl in the fridge for 20-30 minutes. It’ll be much easier to handle.
- Chill Out. Once all your balls are rolled (heh), place the entire baking sheet into the freezer for at least 15-20 minutes. DO NOT SKIP THIS. This is the step that prevents a melty, chocolatey disaster later. You want them firm and cold.
- Melt Your Chocolate. While the balls are chilling, melt your chocolate wafers according to the package directions. This usually means microwaving in 30-second bursts, stirring in between, until smooth. If you’re using a teaspoon of coconut oil, add it now.
- The Chocolate Dip. Remove your truffle balls from the freezer. Using a fork or a dipping tool, dunk one ball into the melted chocolate. Swirl it around to coat it completely, then lift it out, gently tapping the fork on the edge of the bowl to shake off any excess chocolate.
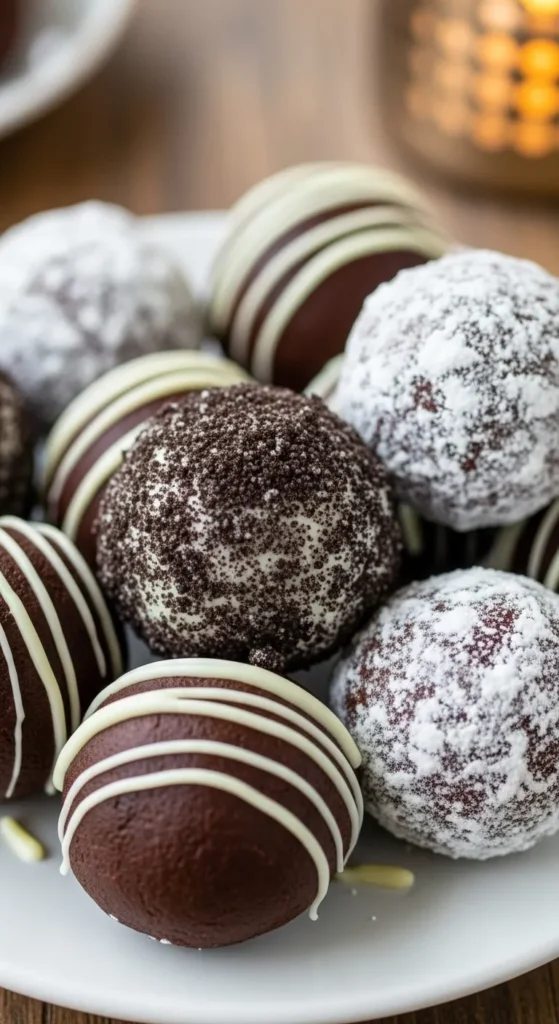
- Decorate and Set. Place the chocolate-coated truffle back onto the parchment-lined sheet. If you’re going to add sprinkles or extra cookie crumbs, do it immediately after dipping, before the chocolate sets. Repeat until all your truffles are beautifully dressed in their chocolate tuxedos.
- The Final Wait. Let the chocolate set completely. You can leave them at room temperature if it’s not too warm, or pop the tray back in the fridge for 10-15 minutes to speed things up. Then, try not to eat them all in one sitting. I believe in you.
Common Mistakes to Avoid
- Using Cold Cream Cheese: If your cream cheese is cold, it will not incorporate smoothly. You’ll be left with white chunks, and you’ll have to overmix, which can make the mixture greasy. Softened. Is. Key.
- Skipping the Freeze: Trying to dip a room-temperature truffle ball is a one-way ticket to a crumbly, melted mess in your chocolate. The frozen center is what keeps everything together. Don’t be impatient.
- Using Chocolate Chips Without Tempering: Melting wafers are foolproof. Chocolate chips often contain stabilizers that make them seize up or not set properly without a specific tempering process. Save yourself the heartache and use the wafers.
Alternatives & Substitutions
- Gluten-Free? Use your favorite gluten-free chocolate sandwich cookies. The recipe works exactly the same.
- Dairy-Free? Use dairy-free cream cheese and check your Oreo labels (some are dairy-free!) or use another brand of vegan chocolate sandwich cookies. Use dairy-free chocolate wafers for coating.
- Flavor Twists: Use Mint Oreos, Peanut Butter Oreos, or Golden Oreos for a different flavor profile! The world is your oyster. Or your truffle.
- Coating Options: Not a dark chocolate fan? Use white chocolate or pink candy melts! You can also simply roll the finished balls in cocoa powder, powdered sugar, or crushed nuts for a less fussy, but still delicious, version.
- Add-Ins: Feel like a overachiever? Mix a 1/2 cup of mini chocolate chips or finely chopped nuts into the Oreo/cream cheese mixture for extra texture.
FAQ
Can I make these ahead of time?
Absolutely! These are the ultimate make-ahead dessert. Store them in an airtight container in the fridge for up to a week, or you can even freeze them for up to 3 months. Just thaw in the fridge before serving.
Why is my mixture so sticky?
It means your cream cheese was probably a bit too warm, or you’re a powerful roller! Just chill the mixture in the bowl for a bit before attempting to roll again. Easy fix.
My chocolate coating is thick and clumpy. Help!
You likely overheated the chocolate. If it seizes (gets thick and grainy), it’s sadly very difficult to come back from. This is another reason why melting wafers are superior—they’re more forgiving. Always melt slowly and on low power.
Can I use reduced-fat cream cheese?
Technically, yes. But IMO, you’re making candy. This is not the time to cut corners. Full-fat cream cheese provides the best flavor and texture and won’t make the mixture too watery.
What’s the best way to store these?
In the fridge, in a sealed container, always. The cream cheese means they need to stay chilled. They’ll be good for about a week… if they last that long.
Related Recipes:
- Almond Flour Zucchini Bread Recipe That’ll Make You Love Veggies
- Strawberry Tiramisu Recipe That Steals Hearts
- Strawberry Swiss Roll Cake Recipe: Perfect Summer Dessert
Final Thoughts
And there you have it. The easiest, most impressive dessert that will ever cross your counter. You’ve just unlocked a superpower: the ability to create pure magic with three simple ingredients. Now go forth and impress your friends, your family, or just your wonderful self. You’ve earned every single delicious, chocolatey bite.
This response is AI-generated, for reference only.
Printable Recipe Card
Want just the essential recipe details without scrolling through the article? Get our printable recipe card with just the ingredients and instructions.

