So, you’ve got a pile of peaches on your counter that are so ripe they’re basically screaming, “EAT ME NOW OR I’LL TURN INTO A MUSHY MESS.” We’ve all been there. Instead of just shoving your face into them (tempting, I know), let’s channel that fruity urgency into something legendary. Let’s make a peach pie so good, it’ll make your taste buds do a happy dance and earn you bragging rights for at least a week. Don’t worry, it’s way easier than it looks. I promise.
Why This Recipe is Awesome
Look, not all heroes wear capes. Some wield a rolling pin. This recipe is your superhero origin story. It’s idiot-proof, even I didn’t mess it up, and that’s saying something. We’re talking about a pie with a flaky, buttery crust that shatters perfectly, giving way to a sweet, juicy, and just-thick-enough peach filling that’s not gloppy or overly sweet. It’s the kind of pie that makes people think you slaved away for hours, when in reality, you were probably binge-watching your favorite show while the oven did most of the work. It’s the perfect balance of humble and show-stopping.
Ingredients You’ll Need
Gather your squad. This is the fun part. Pro tip: set everything out before you start. It makes you look organized and prevents a mid-recipe panic.
For the All-Butter Crust (The Star of the Show):
- 2 ½ cups all-purpose flour (spooned and leveled, don’t just dunk the measuring cup in!)
- 1 cup (2 sticks) unsalted butter, chilled and cubed (This is non-negotiable. Cold butter = flaky layers.)
- 1 teaspoon salt (It enhances all the flavors, trust me.)
- 1 tablespoon granulated sugar (A little secret for a golden, slightly sweet crust.)
- 6-8 tablespoons ice water (The “ice” part is crucial. We’re not making soup.)
For the Peach Filling (The Heart of the Operation):
- 6-7 cups peeled and sliced fresh peaches (About 6-8 large peaches. See? Math.)
- ¾ cup granulated sugar (Adjust based on how sweet your peaches are.)
- ¼ cup light brown sugar (For that deep, caramel-y vibe.)
- ¼ cup cornstarch (This is our thickening agent. No soupy pies here!)
- 1 tablespoon lemon juice (Brightens everything up and prevents the peaches from browning.)
- 1 teaspoon vanilla extract (The flavor booster.)
- ½ teaspoon ground cinnamon (A warm, cozy hug.)
- A pinch of nutmeg (The secret weapon.)
- 1 tablespoon cold butter, for dotting (Because more butter is always the answer.)
For the Glaze:
- 1 egg, beaten (For that gorgeous golden-brown shine.)
- Coarse sugar, for sprinkling (For a delightful crunch.)
Step-by-Step Instructions
Let’s get down to business. Preheat your oven to 425°F (220°C). Yes, preheat. Do not skip this. Put a baking sheet on the lower rack to catch any bubbly drips. You’ll thank me later.
- Make the Dough. In a large bowl, whisk together the flour, salt, and that one tablespoon of sugar. Add your chilled, cubed butter. Using a pastry cutter, two forks, or your fingertips, work the butter into the flour until the mixture looks like coarse crumbs with some pea-sized butter pieces still visible. This is what creates flakiness!
- Bring It Together. Drizzle in the ice water, one tablespoon at a time, and gently mix with a fork until the dough just begins to clump together. You should be able to squeeze a handful and have it hold its shape. Don’t overmix! Divide the dough in half, shape each into a disk, wrap in plastic, and chill in the fridge for at least 30 minutes.
- Prep the Peaches. While the dough chills, get your peaches ready. The easiest way to peel them? Score a small “X” on the bottom and blanch them in boiling water for 30-60 seconds, then plunge them into an ice bath. The skins will slip right off! Slice them up and toss them in a large bowl with the lemon juice and vanilla.
- Mix the Filling. In a small bowl, whisk together the granulated sugar, brown sugar, cornstarch, cinnamon, and nutmeg. Pour this over your peaches and give it all a very gentle toss until the peaches are evenly coated. Set this aside while you roll out the crust.
- Roll Out the Crust. Take one disk of dough from the fridge. On a floured surface, roll it out into a 12-inch circle. Carefully drape it into your 9-inch pie dish. Gently press it in and trim the edges, leaving about a ½-inch overhang. Spoon your peach filling into the crust and dot the top with that last tablespoon of cold butter.
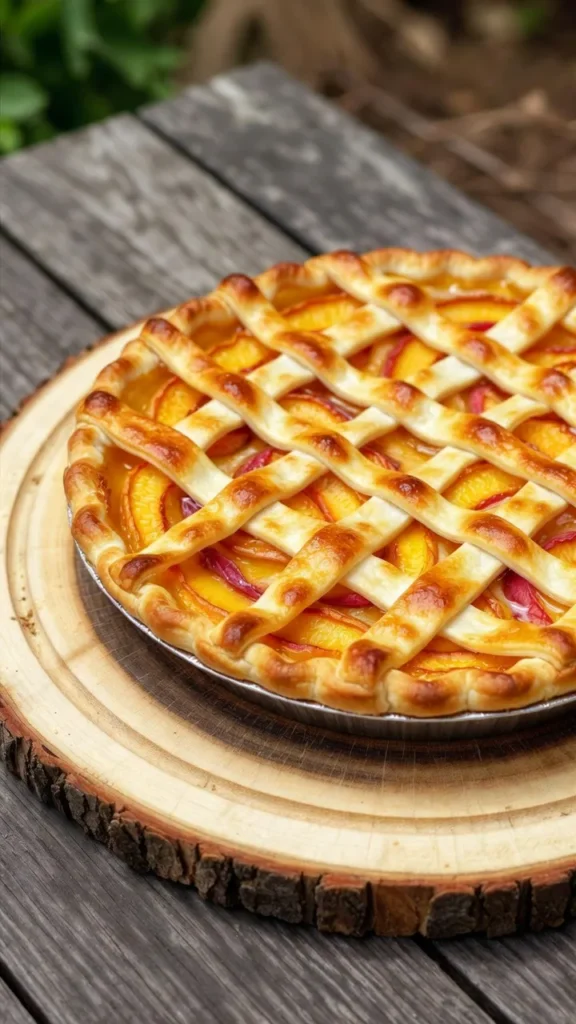
- Top It Off. Roll out the second disk of dough. You can do a full top crust with slits, or get fancy with a lattice. Place it over the filling, trim the excess, and crimp the edges to seal. Brush the top with the beaten egg and sprinkle generously with coarse sugar.
- Bake to Perfection. Place your beautiful pie on the preheated baking sheet. Bake at 425°F for 20 minutes, then reduce the oven temperature to 375°F (190°C) and continue baking for another 35-45 minutes, until the crust is deeply golden brown and the filling is bubbling through the vents.
- The Hardest Part: Wait. Let the pie cool on a wire rack for at least 3-4 hours. I know, it’s torture. But this allows the filling to set properly. Cutting into a hot pie is a one-way ticket to Soupsville.
Common Mistakes to Avoid
- Using Warm Butter. This is the #1 pie crust sin. Warm butter melts too fast and creates a greasy, tough crust. Keep everything cold!
- Overworking the Dough. You’re not kneading bread. Handle the dough as little as possible for a tender, flaky result.
- Skipping the Thickener. Cornstarch is your friend. Without it, you’ll have a peach soup inside a pastry bowl. Not ideal.
- Cutting In Too Soon. I get it, it smells amazing. But if you slice into that pie while it’s still hot, the filling will run everywhere. Be strong. Let it set.
Alternatives & Substitutions
No stress! Baking is about improvisation.
- Crust: Short on time? A store-bought crust is a totally acceptable cheat. I won’t tell.
- Peaches: Can’t find good fresh peaches? Frozen peaches work great! Just thaw and drain them really well to avoid extra liquid. Canned peaches are a last resort—get them in juice, not syrup, and drain well.
- Cornstarch: You can use an equal amount of tapioca starch (which gives a clearer, glossier filling) or arrowroot powder.
- Spices: Not a cinnamon fan? Try a pinch of cardamom or ginger for a different kind of warmth.
- Vegan? Use a vegan butter substitute and a flax egg (1 tbsp ground flax + 3 tbsp water) for the glaze.
FAQs
Can I make this pie ahead of time?
Absolutely! You can make the dough disks and keep them in the fridge for up to 2 days, or freeze them for 3 months. The assembled, unbaked pie can also be frozen—just wrap it tightly and bake from frozen, adding about 20 minutes to the baking time.
My crust is browning too fast! Help!
This is common. If the edges or top are getting too dark before the baking time is up, gently tent the pie with aluminum foil. This will shield it and allow the filling to finish cooking without burning the pastry.
Why is my filling runny?
The most likely culprit is not letting the pie cool completely. The cornstarch needs time to cool down to set up properly. If you waited and it’s still runny, you might have needed a bit more cornstarch or to drain your peaches better.
Can I use margarine instead of butter?
Well, technically yes, but why hurt your soul like that? IMO, butter provides a far superior flavor and flakiness for the crust. It’s a pie, not a diet food. Live a little.
Do I really have to peel the peaches?
Okay, fine, you rebel. You can leave the skins on if you don’t mind a slightly more textured filling and bits of peel. For a super smooth experience, peeling is best. FYI, the blanching method makes it a breeze.
Final Thoughts
And there you have it! You’re now armed with the knowledge to create a truly irresistible peach pie. It’s not just dessert; it’s a memory maker. It’s the thing you bring to a summer BBQ that disappears in five minutes. It’s the perfect excuse to have friends over.
So go forth, bake with confidence, and get ready to accept all the compliments headed your way. You’ve totally earned a giant slice. Now go impress someone—or yourself!
Printable Recipe Card
Want just the essential recipe details without scrolling through the article? Get our printable recipe card with just the ingredients and instructions.

