So you’re craving something tasty but too lazy to spend forever in the kitchen, huh? Same. That’s exactly why these Peanut Butter Cornflake Bars are basically my new best friend. Crispy, peanut buttery, and sweetly satisfying, they’re the perfect snack to make when you want something homemade but zero hassle. Plus, they don’t ask for fancy skills—just a hungry belly.
Why This Recipe is Awesome
Let’s get real. This recipe is downright genius. It’s idiot-proof—even I didn’t mess it up, and if I can do it, so can you. It’s a total crowd-pleaser that takes like 15 minutes and zero fancy equipment (no fancy baking pans or tempering chocolate nonsense here). Seriously, if you think you can’t make desserts, this recipe will prove you wrong. Plus, these bars pack that satisfying crunch with a gooey peanut butter twist that’ll have you coming back for more (and maybe hiding some from everyone else).
Ingredients You’ll Need
Here’s the simple squad you need to summon for these bars:
- 1 cup (250g) peanut butter — smooth or chunky, live your truth
- 1/2 cup (115g) unsalted butter — because life’s better with butter
- 1 cup (200g) brown sugar — skillet sweet talk
- 1/3 cup (100g) honey or golden syrup — sticky magic
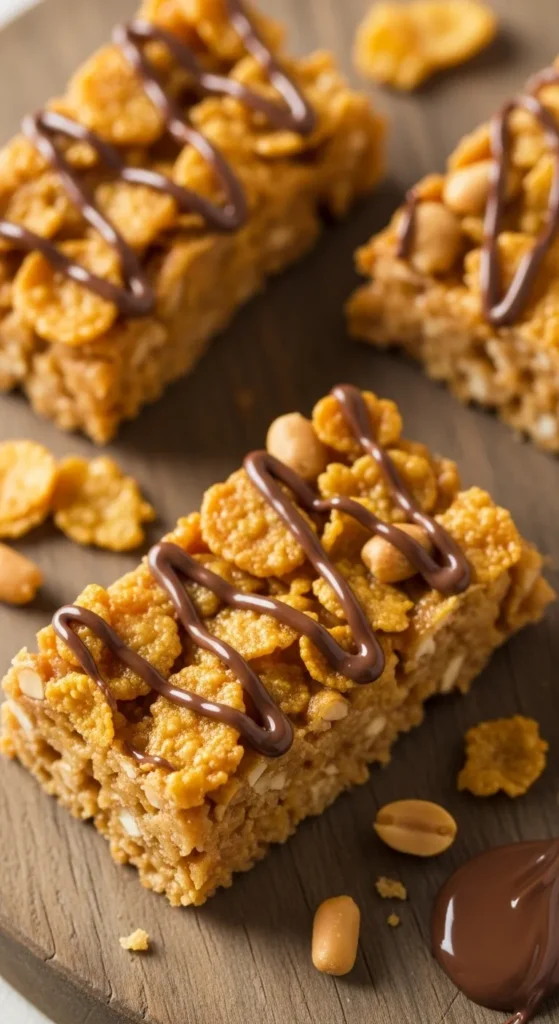
- 4 cups (about 120g) cornflakes — the crispy crunch heroes
- 1 teaspoon vanilla extract — make it fancy-ish
Optional but recommended:
- A pinch of salt — trust me, it’s love in tiny doses
- 1/2 cup chocolate chips on top — because chocolate makes everything better
Step-by-Step Instructions
- Melt the magic: In a medium saucepan, melt the peanut butter, butter, brown sugar, and honey together over medium heat. Stir like your snack life depends on it until it’s all smooth and glorious.
- Vanilla vibe: Remove from heat and add the vanilla extract (and a pinch of salt if you’re using it). Stir it in like a pro.
- Crisp time: Pour the cornflakes into a big mixing bowl. Slowly drizzle your warm peanut butter mixture over the cornflakes. Gently fold—the goal is to coat most flakes but keep that crunch, not soggy cereal soup.
- Press it down: Grease a 9×9-inch baking dish or line it with parchment paper. Transfer the mixture and press it down firmly. Channel your inner Hulk for maximum compactness.
- Optional chocolate love: Sprinkle those chocolate chips on top and press lightly so they stick. If you’re feeling fancy, melt some chocolate and drizzle it over instead.
- Chill time: Pop the whole pan in the fridge for at least 2 hours. This is the hardest part—waiting!
- Slice and snack: Once firm, cut into bars (or whatever shape you fancy). Devour immediately or stash for later.
Common Mistakes to Avoid
- Skipping the chilling: Yeah, if you eat these straight off the pan, you’re going to regret it because they’ll fall apart faster than your excuses to skip cardio.
- Over-mixing the cornflakes: Be gentle! Crushed cornflakes aren’t the goal—keep the crunch.
- Using crunchy peanut butter with big chunks: Unless you like your bars resembling a gravel driveway, go smooth or lightly chunky at best.
- Ignoring the salt: Just a pinch makes the sweetness sing. No salt? It’s like a joke with no punchline.
- Pressing too lightly: You want these babies packed tight, or they’ll crumble like your last breakup.
Alternatives & Substitutions
- Butter Substitute? Swap unsalted butter for coconut oil if you’re feeling tropical or dairy-free. It changes the vibe but stays delish.
- Sweetener Swap? If honey or golden syrup isn’t your jam, use maple syrup or agave nectar. Your bars will still sweetly sing.
- Nut Butter Swap? Crazy about almond or cashew butter? Go for it! Texture might differ, but hey, adventure is tasty.
- Cornflake Swap? No cornflakes? Rice cereal or crushed crispy oats can tag in for a fun twist.
- Chocolate? If you hate chocolate (weird flex, but OK), sprinkle some toasted coconut or nuts on top instead.
FAQ
Can I make these gluten-free?
Absolutely! Most cornflakes are gluten-free, but double-check your brand to avoid any sneaky gluten. Rice cereal is a great gluten-free backup too.
Can I use margarine instead of butter?
Well, technically yes, but why hurt your soul like that? Butter gives taste and texture these bars basically need to thrive.
How long do these bars keep?
If you can resist eating them all at once, they last up to a week in the fridge. Just keep ‘em covered or airtight, so they don’t pick up fridge smells (unless you want peanut butter bars that taste like last week’s leftovers, no judgment).
Is this recipe kid-friendly?
So much yes! Kids love squishing the bars down in the pan—and eating them is fun for all ages.
Can I double or triple this recipe?
Go for it! Just use a bigger pan or divide the mix into multiple pans. More bars = happier snackers.
Can I add extras like raisins or nuts?
Sure thing, but keep in mind this might affect the “crispy + gooey” magic balance. A handful here and there is fine, but don’t go wild.
What’s the best way to store these bars?
Refrigerate in an airtight container. If you want them chewy softer, let them sit at room temp—but fridge chilling helps keep them together.
There! The ultimate guide to making peanut butter cornflake bars that will crush those snack cravings with that perfect crunch and gooey peanut butter hug. Ready to get your hands sticky? Let’s do this!
Related Recipes:
- Mango Sorbet Recipe That’ll Blow Your Mind
- Pineapple Upside Down Cake Recipe
- Pineapple Coconut Cream Tart Recipe: Delicious & Crazy Easy
Final Thoughts:
Peanut butter cornflake bars are the perfect mix of chewy, crunchy, and sweet—plus they come together in minutes with no oven required. Whether you’re whipping up a lunchbox treat, party snack, or late-night bite, these bars prove that simple recipes often turn out to be the most irresistible
Printable Recipe Card
Want just the essential recipe details without scrolling through the article? Get our printable recipe card with just the ingredients and instructions.

