Let me guess — you’re here because you’ve heard whispers about spumoni bars, or you saw a picture of them and thought: What kind of magical dessert is this rainbow square of goodness? Well, buckle up, my friend, because I’m about to walk you through everything you need to know about making these delightful, chewy, nutty, fruity bars. And yes, you can absolutely impress everyone at your next gathering with them (and act like it was no big deal 😉).
I’ve been baking spumoni bars for years — partially because people beg me for them, but mostly because I like eating half the pan before anyone notices. So, let’s talk about what makes these babies special, how to make them, and a few tips to avoid the rookie mistakes I’ve made (so you don’t end up with rainbow-colored regrets).
What Are Spumoni Bars Anyway?
Good question! Ever wondered what would happen if you took spumoni ice cream — you know, that Italian trifecta of pistachio, cherry, and chocolate — and turned it into a soft, chewy, layered cookie bar? That’s basically what these are.
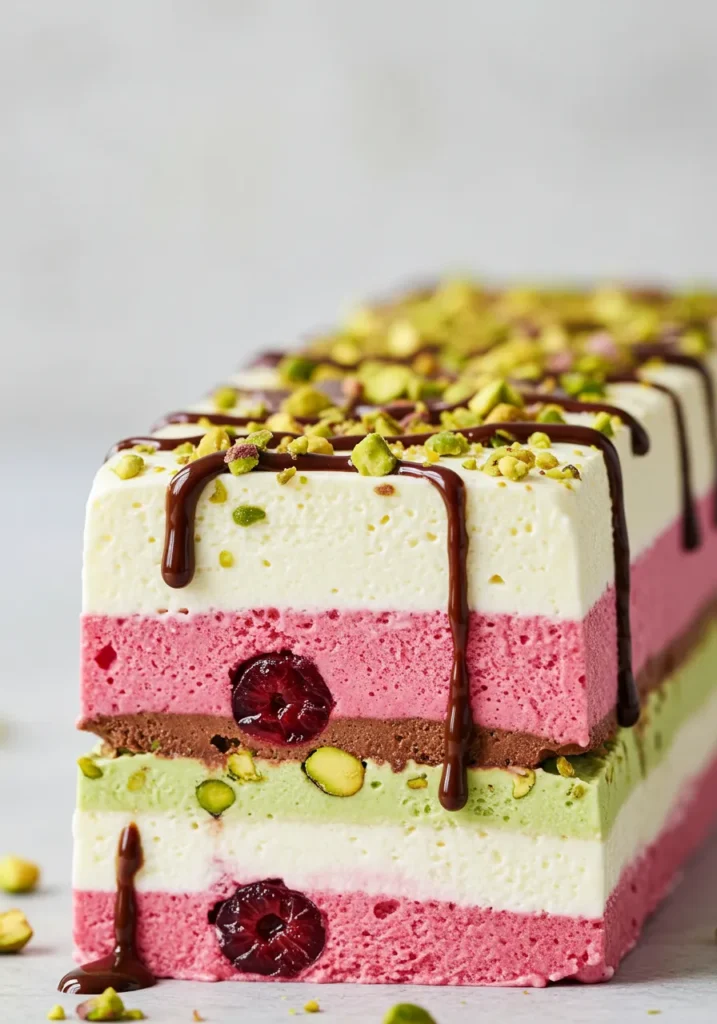
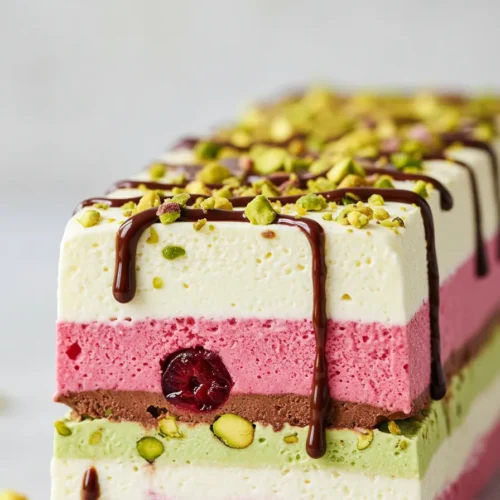
Spumoni bars are three layers of colorful almond-flavored dough with a thin jam layer sandwiched between them. They’re chewy, slightly nutty, sweet-but-not-too-sweet, and honestly? They look way fancier than they are to make.
FYI, people will assume you’re a professional baker when you show up with these. Whether or not you correct them is totally up to you.
Why You’ll Love Making Spumoni Bars
So why bother making these instead of, say, chocolate chip cookies? Let me give you a few solid reasons:
- They’re drop-dead gorgeous. Those three pastel layers? Instagram gold.
- They taste like nostalgia. If you’ve ever had spumoni ice cream, these will hit you right in the feels.
- They’re versatile. You can swap jams, tweak colors, and make them your own.
- They freeze like a dream. Bake ahead of time, stash ‘em in the freezer, and look like you have your life together.
Seriously, who doesn’t want to bake something that looks fancy, tastes amazing, and gives you bonus points for planning ahead?
Ingredients You’ll Need
Alright, let’s talk shopping list. Don’t worry — nothing too exotic here. (No trips to the Arctic required. You’re welcome.)
For the bars:
- 1 cup unsalted butter, softened
- 1 cup granulated sugar
- 4 large eggs, separated
- 1 teaspoon almond extract (yes, almond — trust me on this)
- 2 cups all-purpose flour
- ¼ teaspoon salt
- Red and green food coloring
- ½ cup seedless raspberry jam (or apricot if you prefer)
For the topping:
- 6 oz semi-sweet chocolate, melted
- 2 tablespoons unsalted butter
Not too scary, right? Chances are you already have most of this lurking in your pantry.
Step-by-Step: How to Make Spumoni Bars
You ready? Let’s do this.
Step 1: Preheat and Prep
Set your oven to 350°F (175°C). Line a 9×13-inch baking pan with parchment paper and lightly grease it. You don’t want your beautiful bars stuck in the pan.
Step 2: Make the Dough
- Beat the butter and sugar together until light and fluffy.
- Add the egg yolks one at a time, mixing well.
- Stir in the almond extract.
- In a separate bowl, whisk together the flour and salt, then gradually add it to your butter mixture.
Step 3: Whip Those Whites
- In a clean bowl, beat the egg whites until stiff peaks form. (You’re basically making a mini arm workout here. Go you.)
- Gently fold the egg whites into your dough to keep it light and airy.
Step 4: Divide and Color
Here’s where it gets fun. Divide the dough evenly into three bowls:
- Leave one plain.
- Tint one pink (red food coloring, obviously).
- Tint the other green.
Step 5: Bake the Layers
- Press the green dough evenly into the pan. Bake for about 10 minutes, then remove and let it cool slightly.
- Spread half the jam on top of the green layer.
- Gently press the plain dough over the jam layer, then bake another 10 minutes.
- Cool slightly again, then spread the remaining jam and press the pink dough on top. Bake a final 10-12 minutes.
Step 6: Chocolate Topping
- Melt the chocolate and butter together and spread it over the cooled bars.
- Chill in the fridge until set, then cut into bars or squares.
And just like that, you’re officially a spumoni bar master.
Tips & Tricks for Perfect Spumoni Bars
Even the best of us have made spumoni mistakes (yes, I’m speaking from experience). Let me save you from the heartbreak of soggy or bland bars:
- Use parchment paper. Non-negotiable if you want to actually get them out of the pan in one piece.
- Don’t overbake. These are supposed to be soft and chewy, not crispy bricks.
- Chill before cutting. If you try to cut while warm, the layers will smoosh all over the place.
- Use good-quality jam. Cheap jam can be too runny and make the layers slide.
Basically — follow the directions, take your time, and don’t rush the cooling process. Trust me, patience = pretty bars.
Fun Variations to Try
Feeling adventurous? Or maybe you’re just a rebel who can’t leave well enough alone? Either way, here are a few ways to switch things up:
- Use apricot jam instead of raspberry for a slightly tart edge.
- Swap the semi-sweet chocolate for white chocolate if you’re feeling fancy.
- Add a few chopped pistachios on top of the chocolate for extra crunch.
- Try food coloring gels for brighter, more vibrant layers.
Ever wondered what a purple spumoni bar would look like? Only one way to find out.
Why These Bars Always Impress
Here’s the thing: people eat with their eyes first. Spumoni bars look like they belong in a bakery window — colorful layers, shiny chocolate top, neat little squares. They scream “effort,” even though (between you and me) they’re really not that hard.
They’re also great for holidays (hello, Christmas colors), bake sales, parties, or just eating in your pajamas at 2 a.m. while watching Netflix. Not that I’ve ever done that… 😉
FAQS About Spumoni Bars
Are spumoni bars hard to make?
Not at all. They look complicated, but if you can follow a recipe and have a little patience, you’re golden.
Can I make these ahead of time?
Absolutely. They even taste better the next day when the flavors have had a chance to mingle. Plus, you can freeze them for up to a month.
Do I have to use almond extract?
Technically no, but IMO it’s what gives these bars that authentic spumoni flavor. You could use vanilla, but it won’t be quite the same.
Why You Need Spumoni Bars in Your Life
Let’s be real — the world has enough boring desserts. These bars are colorful, flavorful, and just the right amount of fancy. Whether you’re making them for a party or just to treat yourself (because you deserve it, obviously), they deliver every single time.
Plus, you get bragging rights when everyone asks, “Wow, did you really make these yourself?” and you casually shrug and say, “Oh, it was nothing.” (Meanwhile, inside you’re high-fiving yourself like crazy. 🙂)
Related Recipes
- Almond Wedding Cake Cupcakes Recipe
- Honey Lavender Ice Cream Recipe
- Coconut Cheesecake Bread Pudding Recipe
Final Thoughts About Spumoni Bars
So there you have it — your ultimate guide to making spumoni bars. They’re beautiful, they’re tasty, and they’re surprisingly easy once you know the steps. You’ll wow your friends, satisfy your sweet tooth, and maybe even start a new baking tradition.
Go on — grab your butter, sugar, and food coloring, and give it a shot. And when your kitchen smells like almond heaven and you’re eating the first chewy square straight out of the pan? Don’t forget to thank me later.
Now go bake something colorful and fabulous. You’ve got this.
Spumoni Bars Recipe
Ingredients
- 1 cup unsalted butter softened
- 1 cup granulated sugar
- 2 large eggs
- 2 cups all-purpose flour
- 1 tsp baking powder
- ½ tsp salt
- ½ cup chocolate chips melted
- ½ cup maraschino cherries chopped
- ½ cup shelled pistachios chopped
- 1 tsp almond extract
- Food coloring green & pink, optional
Instructions
- Preheat oven to 350°F (175°C) and grease a 9x13-inch baking pan.
- Cream butter and sugar until fluffy, then beat in eggs and almond extract.
- Mix in flour, baking powder, and salt until combined.
- Divide batter into three equal parts.
- Mix melted chocolate into one portion; spread evenly in the pan.
- Mix cherries and pink coloring into the second portion; spread over chocolate layer.
- Mix pistachios and green coloring into the last portion; spread on top.
- Bake for 25–30 minutes or until a toothpick comes out clean.
- Cool completely before cutting into bars.
Notes
- For a richer taste, use dark chocolate instead of milk chocolate.
- You can skip food coloring if you prefer a natural look.
- Store in an airtight container for up to 5 days.
DID YOU MAKE THIS EASY RECIPE?
If you have, then share it with us by sending a photo. We’re excited to see what you’ve made 🙂Printable Recipe Card
Want just the essential recipe details without scrolling through the article? Get our printable recipe card with just the ingredients and instructions.

