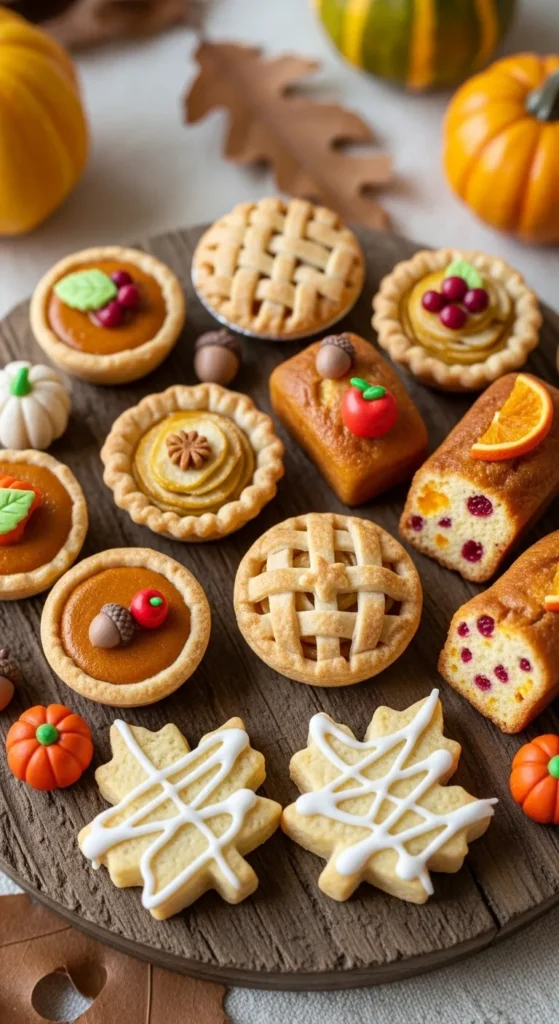
So you want something autumn-y, cozy, and cute enough to impress Instagram—but also not something that will chain you to the kitchen for six hours, right? Enter the tiny harvest-themed bake: all the vibes of fall wrapped into bite-sized treats that scream “I’m festive but also practical.” Think pumpkins, apples, warm spices, and that smug feeling you get when people ask, “Did you really make these yourself?” and you just casually nod.
Why This Recipe is Awesome?
- It’s basically fall in edible form—but smaller, cuter, and much easier to snack on.
- Perfect for when you want to pretend you’re a homesteader with baskets of apples but actually just bought everything at the grocery store.
- Zero advanced skills required. If you can stir, roll, and not burn your house down, you’re qualified.
- Works for friends, kids, family, neighbors, or—let’s be real—just you and your couch.
Ingredients You’ll Need
Alright, let’s keep this simple. Here’s what you’ll want for your tiny harvest masterpieces:
- 1 package refrigerated pie crust (because we’re not about to make dough from scratch—who has the time?)
- 1 medium apple, chopped into small bits (bonus points if it’s tart)
- ½ cup canned pumpkin puree (not pumpkin pie filling—don’t get scammed)
- ¼ cup brown sugar (sweet, but not dentist-appointment sweet)
- 1 tsp cinnamon (fall in a spice jar)
- ½ tsp nutmeg (optional, but your kitchen will smell like a holiday candle)
- 1 egg, lightly beaten (for that shiny, professional bakery look)
- A handful of chopped pecans or walnuts (if you’re feeling fancy)
- Powdered sugar (to dust dramatically like you’re in a cooking show)
Step-by-Step Instructions
- Preheat the oven to 375°F (190°C). Don’t skip this. Cold ovens = sad, pale bakes.
- Roll out your pie crust. Use a cookie cutter (leaf, pumpkin, or whatever shape screams “fall vibes”) to cut out little pieces.
- Make the filling. Mix apple bits, pumpkin puree, brown sugar, cinnamon, and nutmeg in a bowl. Try not to eat it all before baking.
- Assemble the cuties. Spoon a small amount of filling onto half the cut-outs. Sprinkle some nuts if you’re feeling extra.
- Seal them. Top with another cut-out and press edges with a fork like you’re sealing tiny edible envelopes.
- Egg wash time. Brush tops with the beaten egg for that glossy finish.
- Bake for 15–18 minutes. They should be golden brown and smell like happiness.
- Cool (a little). Dust with powdered sugar like a show-off.
- Eat. Preferably warm, with coffee, cider, or while judging other people’s less adorable snacks.
Common Mistakes to Avoid
- Overfilling. Yes, I know you want more filling, but then you’ll end up with pumpkin goo volcanoes in your oven.
- Forgetting the egg wash. Don’t cheat yourself out of that Instagram-worthy golden shine.
- Not sealing the edges properly. Unless you like cleaning burnt filling off your baking tray for eternity.
- Thinking powdered sugar is optional. It’s not. It’s edible magic.
Alternatives & Substitutions
- No pumpkin puree? Swap in mashed sweet potato. Nobody will complain.
- No nuts? Leave them out, or add chocolate chips if you want dessert-y vibes.
- Gluten-free friends? Use a GF pie crust. You’ll still look like a hero.
- Wanna be extra? Drizzle with caramel sauce. It’s like a tiny harvest bake went to private school.
FAQ
Can I make these ahead of time?
Yes, but they’re best fresh. Store them in an airtight container and reheat for a few minutes. Or just eat them cold at midnight.
Do I have to use cookie cutters?
Not at all. Circles with a glass work fine. They just won’t look as Pinterest-y.
Can I freeze them?
Totally. Freeze before baking, then bake straight from frozen. Just tack on a few extra minutes.
Can I skip the egg wash?
Sure, but your bakes will look like they’ve had a rough week.
What if I don’t like pumpkin?
First of all, who hurt you? Second, swap in apple pie filling or even pear.
Can I make them savory?
Yes! Try cheese + herbs inside instead of pumpkin. Tiny harvest appetizer edition.
How many does this recipe make?
Depends on the size of your cutters, but usually about 12–15 mini bakes. Perfect for sharing (or hoarding).
Related Recipes:
- Earthy Mushroom and White Bean Stew Recipe |
- Baked Potato Soup Recipe Worth Craving
- Potato and Bean Soup: Easy, Hearty Recipe
Final Thoughts
And there you go—tiny harvest-themed bakes that look way fancier than the actual effort required. They’re fun, festive, and dangerously easy to eat by the dozen. Honestly, the hardest part is waiting for them to cool.
Now go grab that pie crust, throw on a cozy sweater (even if it’s 80 degrees outside), and whip these up. Trust me, once you taste them, you’ll feel like you’ve got autumn completely under control.
Printable Recipe Card
Want just the essential recipe details without scrolling through the article? Get our printable recipe card with just the ingredients and instructions.

