So, you’re staring into the fridge, hoping a magical dessert fairy has left something new and exciting behind the pickles. No? Just me? Well, my friend, your luck is about to change. Forget slaving over a hot oven for hours. These Whipped Chocolate Mousse Cups are your ticket to dessert heaven, and they require exactly zero baking skills. You’re basically a wizard now.
Why This Recipe is Awesome
Let’s cut to the chase. This recipe is the culinary equivalent of finding a twenty-dollar bill in an old pair of jeans. It’s stupidly easy, requires minimal effort, and the payoff is massive. You get this impossibly light, airy, and decadent chocolate mousse that looks like it came from a fancy patisserie. The secret is in the whipping—literally. It’s so foolproof that even if you’ve previously set toast on fire, you can nail this. IMO, it’s the perfect “I want to feel fancy but I also want to be on my couch in 20 minutes” dessert.
Ingredients You’ll Need
Gather your squad. This list is short, sweet, and to the point. FYI, using good-quality chocolate is non-negotiable here—it’s the main event!
- Heavy Cream (1 ½ cups): This is what we’re whipping into glorious, fluffy peaks. Make sure it’s cold. Not cool, cold. Think of it as giving your cream a pep talk before the big game.
- Semi-Sweet Chocolate (4 oz): Chop it up if it’s a bar, or just use good-quality chocolate chips. This is where the flavor lives. Don’t you dare use that sad, dusty baking chocolate from 2017.
- Powdered Sugar (¼ cup): For a touch of sweetness without the grit. It dissolves like a dream.
- Vanilla Extract (1 tsp): The trusty sidekick that makes everything taste better.
- A Pinch of Salt: To make all the chocolate flavors pop. Seriously, don’t skip it.
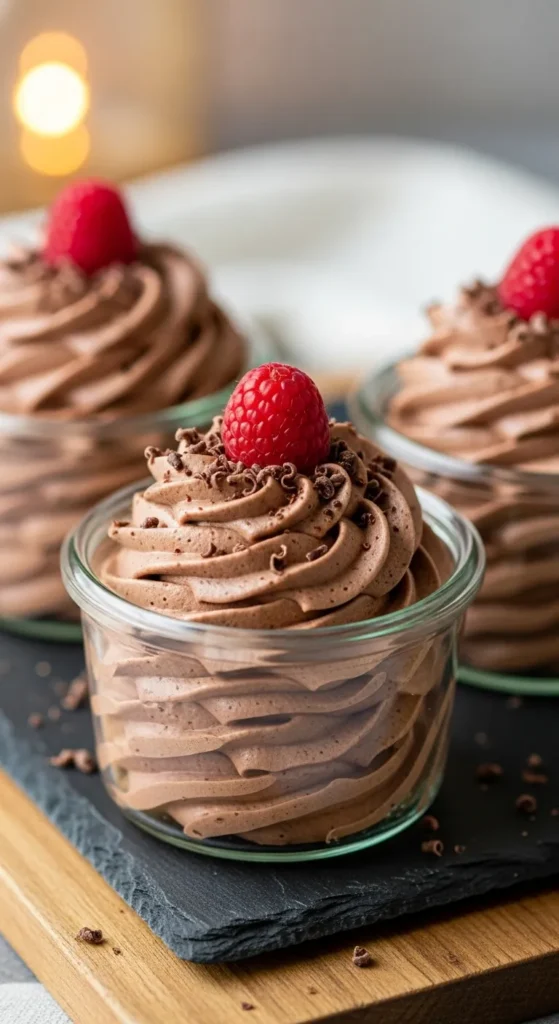
- Toppings of Your Choice: Berries, shaved chocolate, crushed cookies, a sprinkle of sea salt—go nuts. Or go berries. You do you.
Step-by-Step Instructions
- Melt the Chocolate. Break your chocolate into a heatproof bowl. Melt it gently over a pot of simmering water (a double boiler, if we’re being fancy) or in 20-second bursts in the microwave, stirring each time. The goal is smooth, not scorched. Let it cool for a few minutes so it’s not nuclear hot.
- Start Whipping. Pour your ice-cold heavy cream into a large, clean bowl. Using a hand mixer or a stand mixer with the whisk attachment, whip on medium-high speed until it just starts to thicken and get soft peaks. This takes about 2-3 minutes.
- Add the Good Stuff. Now, add the powdered sugar, vanilla extract, and that all-important pinch of salt. Keep whipping! Whip until you have firm peaks. This means when you lift the whisk out, the peak stands straight up and doesn’t flop over. Don’t go too far, or you’ll make butter (which, while also delicious, is not our goal today).
- Fold in the Chocolate. Here’s the magic part. Take your slightly cooled, melted chocolate and gently drizzle it over the whipped cream. Then, using a spatula, fold it in. Don’t stir aggressively! You want to keep all that lovely air you just whipped in. Fold until no white streaks remain.
- Chill Out. Spoon or pipe the mousse into little cups, glasses, or even espresso mugs. Pop them in the fridge for at least an hour to set. This is the hardest part: waiting.
- Top and Serve. Once they’re chilled and set, add your toppings. Then, try to act humble when everyone thinks you’re a gourmet chef.
Common Mistakes to Avoid
- Using Warm Cream or a Warm Bowl: Your cream will simply refuse to whip up properly. Cold is key. I sometimes even pop my bowl and whisk in the freezer for 10 minutes before starting. It’s extra, but it works.
- Over-whipping the Cream: We’re going for firm peaks, not a lumpy, grainy mess that’s about to separate. Keep a close eye on it!
- Adding Scorching Hot Chocolate: If your melted chocolate is too hot, it will melt the whipped cream on contact and deflate your beautiful mousse. Let it cool to just warm, not hot.
- Stirring Instead of Folding: Be gentle! You’ve worked hard to incorporate all that air. Treat it with respect.
Alternatives & Substitutions
Don’t have exactly these things? No panic.
- Dairy-Free? Use a full-fat, chilled coconut cream (just the solid part from the can) and dairy-free chocolate. It works like a charm.
- Want it Less Sweet? You can reduce the powdered sugar a little or use a darker chocolate. Just know that darker chocolate can sometimes seize up when melting, so be extra gentle.
- No Powdered Sugar? You can blitz regular granulated sugar in a blender until it’s a fine powder. It’s a hack, but it works in a pinch.
- Feeling Fancy? Add a tablespoon of orange liqueur, a pinch of espresso powder to the melting chocolate, or a swirl of peanut butter. The world is your chocolatey oyster.
FAQs
Can I make this ahead of time?
Uh, absolutely. In fact, I encourage it. These mousse cups are perfect for making a few hours—or even a full day—ahead. Just keep them covered in the fridge. Add any crunchy toppings right before serving so they don’t get soggy.
Do I really need a mixer?
Technically, no. You can whisk this by hand. But unless you’re trying to set a new personal record for arm day, I highly recommend using an electric mixer. Your biceps will thank you.
My mousse is runny. What did I do wrong?
This usually happens for one of two reasons: 1) Your cream wasn’t cold enough, or 2) You under-whipped it. Make sure you’re hitting those firm peaks! If it’s already too late, you can try whipping it a bit more, but it’s a fine line before it turns to butter.
How long will it last in the fridge?
They’re best enjoyed within 2-3 days. After that, they might start to weep a little (get watery), but they’ll still taste amazing.
Can I freeze this mousse?
You can! It freezes surprisingly well. Thaw it in the fridge for a few hours before you want to eat it. The texture might be a tiny bit different, but it’s still a fantastic frozen treat.
Related Recipes:
- Homemade Vanilla Extract: Easy DIY Recipe with 2 Ingredients
- Strawberry Cream Cheese Delight | Easy & Creamy Recipe
- Pumpkin Delight Dessert Recipe
Final Thoughts
And there you have it. You’ve just created a dessert that is guaranteed to impress, whether it’s for a date night, a party, or just a Tuesday where you deserve something special. You didn’t break a sweat, and you probably have minimal dishes to clean. That’s what I call a win-win.
Now go forth and enjoy your delicious, cloud-like creations. You’ve totally earned it. And if anyone asks for your secret, you can just smile mysteriously and say, “Oh, it’s an old family recipe.”
Printable Recipe Card
Want just the essential recipe details without scrolling through the article? Get our printable recipe card with just the ingredients and instructions.

