Yeah, same. We’ve all had that moment of desperation where the snack drawer is empty, your willpower is nonexistent, and you’re ready to eat peanut butter straight from the jar with a spoon (no judgment here). Enter: 3-Ingredient Oreo Balls. They’re ridiculously easy, borderline dangerous because of how good they are, and honestly, you’ll feel like a kitchen genius with zero effort.
Why This Recipe is Awesome
Let me just put it out there: this recipe is idiot-proof. Like, I managed to make them while binge-watching Netflix and scrolling TikTok—without setting the kitchen on fire. If I can do it, trust me, so can you.
- Three ingredients. That’s it. Not three plus some “optional” extras. Literally just three.
- No baking. Yep, your oven can keep collecting dust.
- They look way fancier than they are. People will think you slaved over them, but joke’s on them—you did basically nothing.
- Perfect for every occasion. Parties, holidays, late-night cravings, breakups, Tuesdays… you name it.
Basically, if you want dessert with minimal effort and maximum reward, this recipe is your new BFF.
Ingredients You’ll Need for 3-Ingredient Oreo Balls
Here’s your very exclusive grocery list (prepare yourself—it’s intense):
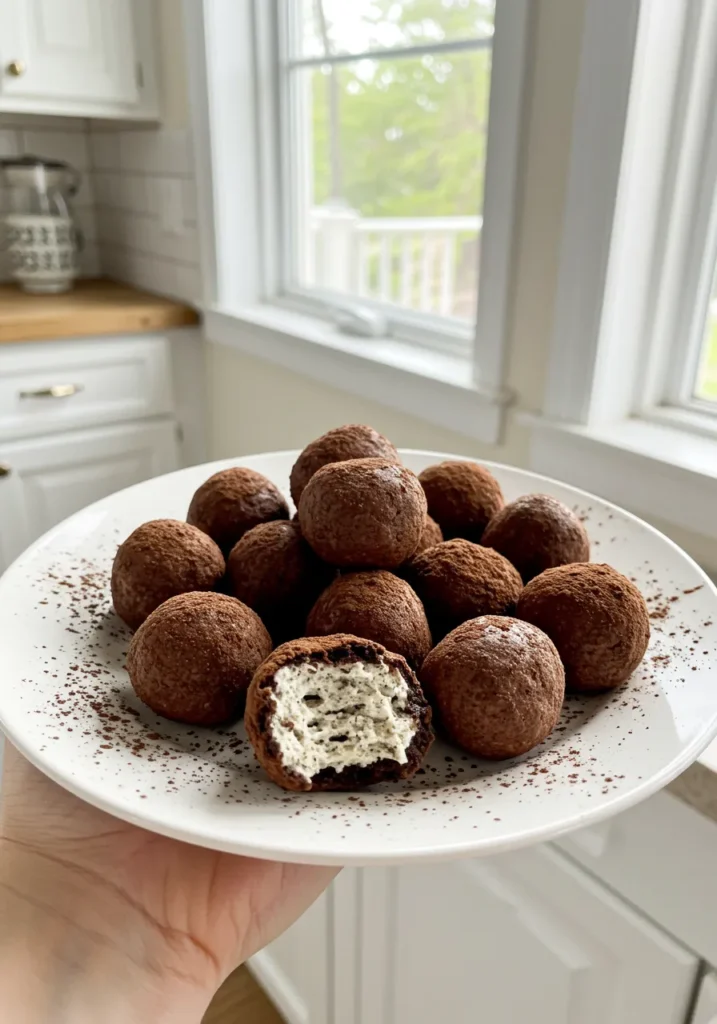
- 1 package of Oreos – The classic black-and-white legend. Don’t overthink it.
- 1 block of cream cheese (8 oz) – Because creamy + chocolate = heaven.
- Chocolate for coating – Milk, dark, or white—dealer’s choice. Pro tip: all three if you’re feeling chaotic.
And that’s it. Told you it was easy
Step-by-Step Instructions
Okay, roll up your sleeves (or don’t, it’s that easy):
- Crush those Oreos. Toss them in a food processor and let it do the work. No processor? No problem. Throw them in a zip-top bag and smash with a rolling pin, wine bottle, or even your bare fists if you’ve had a stressful day. Just get them crumbly.
- Mix with cream cheese. Dump the Oreo crumbs into a bowl, add softened cream cheese, and mash everything together until it looks like edible dirt (trust me, it’ll taste amazing).
- Roll into balls. Scoop out tablespoon-sized amounts, roll them into little balls, and place on a parchment-lined tray. Pop them in the freezer for about 15–20 minutes so they don’t fall apart later.
- Dip in chocolate. Melt your chosen chocolate in the microwave (short bursts, stir in between so you don’t end up with sad, burnt goo). Dip the Oreo balls until they’re fully coated. Use a fork for easier dipping—your fingers will thank you.
- Decorate (optional). Drizzle with contrasting chocolate, sprinkle with crushed Oreos, or just leave them plain and mysterious.
- Chill & devour. Stick them back in the fridge until set. Then… eat. All of them. Immediately.
Common Mistakes to Avoid
Let’s make sure your Oreo balls don’t end up as Oreo disasters:
- Skipping the chill time. If you don’t freeze the balls before dipping, you’ll end up with lumpy, gloopy messes. Not cute.
- Overheating chocolate. Burnt chocolate smells like sadness and broken dreams. Keep an eye on it.
- Using low-fat cream cheese. Just… don’t. This is dessert, not diet food. Don’t rob yourself of joy.
- Rolling gigantic balls. If they’re too big, dipping them is a nightmare, and you’ll basically be eating a hockey puck. Stick to bite-sized.
Alternatives & Substitutions
Feeling a little adventurous? Or maybe you forgot to buy something (relatable). Here’s how you can switch things up:
- Oreos: Any flavor works. Golden, mint, peanut butter, birthday cake… Oreo is basically the Beyoncé of cookies—every version is a hit.
- Cream cheese: Don’t have it? Try mascarpone or even peanut butter for a twist. (But cream cheese really is the GOAT.)
- Chocolate coating: White chocolate looks bougie, dark chocolate feels fancy, and milk chocolate screams classic. You do you.
- Toppings: Crushed candy canes, sprinkles, nuts, sea salt—basically anything you can sprinkle counts as “fancy.”
FAQS about 3-Ingredient Oreo Balls
Q1: Do I really need a food processor?
Nah. Channel your inner Hulk with a zip-top bag and a rolling pin. Bonus stress relief.
Q2: Can I make these ahead of time?
Yes! They keep in the fridge for up to 2 weeks (if you have that kind of self-control, which I do not). You can also freeze them for up to 2 months.
Q3: Do I have to use cream cheese?
Technically, no. But if you don’t, they won’t be as creamy and magical. It’s like watching a movie without popcorn—it works, but why would you?
Q4: How do I stop the chocolate from clumping when I dip?
Make sure your Oreo balls are cold and your chocolate is smooth. If it thickens, add a tiny bit of coconut oil to loosen it up.
Q5: Can kids help with this recipe?
Absolutely. They’ll love rolling the balls, and you’ll love having them occupied. Win-win.
Q6: Are these gluten-free?
Not with regular Oreos. But guess what? They make gluten-free Oreos now, so yes—you can totally adapt.
Q7: Can I make these without a chocolate coating?
You can, but… why? That’s like ordering pizza without cheese. Just… no.
Related Recipes
Final Thoughts about 3-Ingredient Oreo Balls
There you go—3-Ingredient Oreo Balls in all their glory. Minimal effort, maximum flavor, and enough “wow factor” to trick people into thinking you’re a culinary genius. Seriously, make these once and they’ll become your go-to dessert hack.
So next time your sweet tooth is screaming at you, skip the complicated recipes and whip up a batch of these little chocolate bombs. You’ve officially unlocked the cheat code to dessert happiness.
Now go impress someone—or just yourself. Honestly, treating yourself is always the best audience. 😉
Printable Recipe Card
Want just the essential recipe details without scrolling through the article? Get our printable recipe card with just the ingredients and instructions.

