So you’re staring into the fridge, then the pantry, then back to the fridge, hoping something delicious will magically appear. You want a dessert that’s a little fancy but requires approximately zero Michelin-star chef skills. You want something that says, “I’m a baking genius,” but secretly only requires you to press some dough into a pan. My friend, your craving has been answered. These Berry Crumble Bars are here to solve all your problems (or at least the ones related to your sweet tooth).
Why This Recipe is Awesome
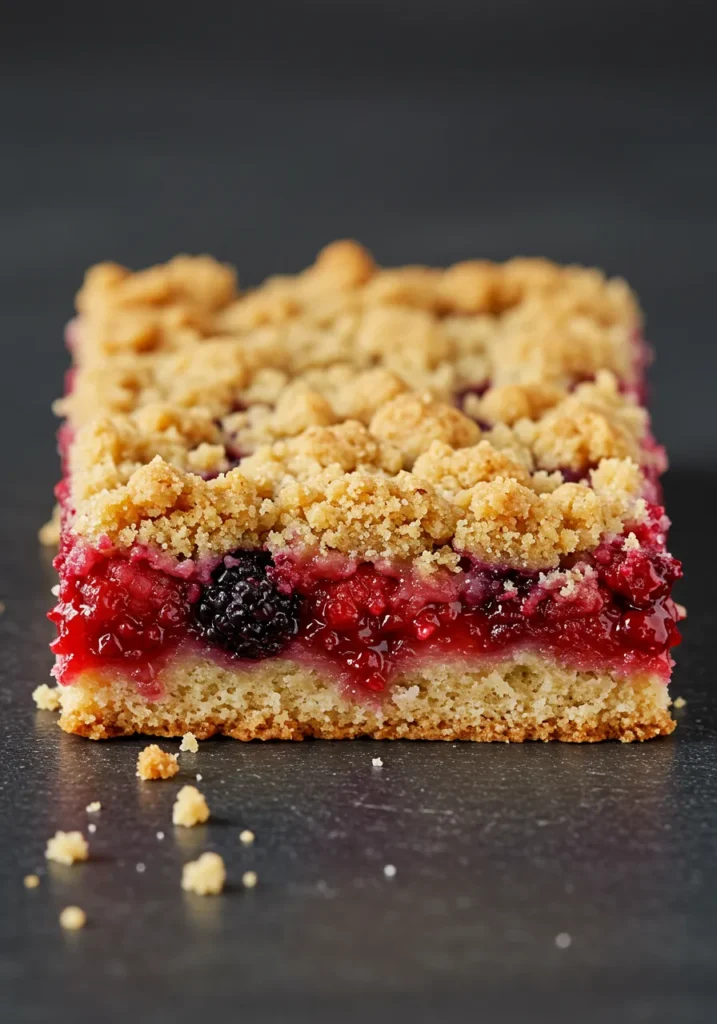
Let’s cut to the chase. This recipe is the culinary equivalent of your favorite cozy sweater. It’s ridiculously easy, incredibly forgiving, and so dang good. The best part? The same mixture is used for the crust and the crumble topping. That’s right—less measuring, less mess, less chance for you to get confused and accidentally create a science experiment instead of dessert. It’s practically idiot-proof. I’ve made these while simultaneously explaining TikTok to my mom, and they still turned out perfectly. If that’s not a ringing endorsement, I don’t know what is.
Ingredients You’ll Need for Berry Crumble Bars
Gather your squad. Here’s what you need to lure them into your kitchen with the promise of baked goods.
For the Crust & Crumble:
- All-Purpose Flour (2 cups): The trusty foundation of our operation.
- Old-Fashioned Rolled Oats (1 cup): For that wholesome, chewy texture. Don’t use instant oats; they’ll turn to mush and we’re not making porridge here.
- Granulated Sugar (3/4 cup): Sweetness. The good stuff.
- Brown Sugar (1/2 cup, packed): For a hint of molasses-y depth. Packing it is non-negotiable.
- Unsalted Butter (1 cup, melted): The glue that holds our dreams together. Melted means no waiting for it to soften! Hooray for laziness!
- Baking Powder (1 tsp): A little lift never hurt anybody.
- Salt (1/2 tsp): The secret weapon that makes all the flavors pop. Don’t you dare skip it.
For the Berry Filling:
- Mixed Berries (3 cups): Fresh or frozen! I used a mix of raspberries, blueberries, and blackberries because that’s what my freezer coughed up. No judgment.
- Lemon Juice (1 tbsp): Brightens up the whole party. Use the real stuff, not the weird plastic lemon.
- Cornstarch (2 tbsp): This is what turns your juicy berries into a glorious, gloppy filling instead of a soupy mess. This is crucial.
- Granulated Sugar (1/3 cup): Because berries can be a little tart and we’re not savages.
Step-by-Step Instructions
- Heat Things Up. Preheat your oven to 350°F (175°C). Line an 8×8 or 9×9 inch baking pan with parchment paper, leaving some overhang on the sides. This is your future self thanking you for easy cleanup and easy removal.
- Make the Magic Mix. In a large bowl, whisk together the flour, oats, both sugars, baking powder, and salt. Pour in the melted butter and stir until everything is combined and clumpy. It should feel like wet sand that holds together when you pinch it.
- Press Play on the Crust. Take about two-thirds of this mixture and dump it into your prepared pan. Press it down firmly and evenly into the bottom. Use a flat-bottomed cup or your fingers—get it nice and compacted. This is your base.
- Concoct the Filling. In a separate bowl, toss your berries with the lemon juice, sugar, and cornstarch. Keep tossing until the berries are evenly coated. No need to thaw frozen berries! They’re perfect straight from the bag.
- Assemble the Masterpiece. Spread the berry mixture evenly over your pressed crust. Sprinkle the remaining third of the crumble mixture over the top. Don’t press it down! We want those beautiful, rustic crumbs.
- Bake to Perfection. Pop the pan into the oven and bake for 45-55 minutes, or until the top is a gorgeous golden brown and the berry filling is bubbly around the edges. Your kitchen will smell like a fairy tale.
- The Hardest Part: Wait. I know, I know. But you MUST let these cool completely before you slice them. I’m talking at least an hour, preferably two. This allows the filling to set up so you get clean bars, not berry soup squares. Go watch an episode of your favorite show. Distract yourself.
Common Mistakes to Avoid
- Skipping the Cornstarch: Thinking you can wing it without the thickener? Enjoy your berry lava flow. It’s a dessert, not a volcano.
- Not Letting it Cool: Impatience is the enemy of beauty here. Cutting into these bars while they’re hot is a one-way ticket to Soggy Town. Let. Them. Cool.
- Using a Different Fat: Margarine or oil will work in a pinch, but they won’t give you the same rich, buttery flavor and delightful crispness. Just use the butter, your soul will thank you.
- Pressing the Top Layer: The top is supposed to be a crumble, not a second crust. Just sprinkle it loosely for maximum texture.
Alternatives & Substitutions
Play with your food! This recipe is your canvas.
- Gluten-Free? Swap the all-purpose flour for a 1:1 gluten-free baking blend. GF oats are a must, too.
- Dairy-Free? Vegan butter works like a charm in this recipe.
- Fruit Options: Not a berry person? Use sliced peaches, apples (toss them with a bit of cinnamon), cherries, or apricots. The world is your oyster… or, more accurately, your fruit bar.
- Add-Ins: Feel like getting fancy? Stir 1/2 cup of white chocolate chips, chopped nuts, or shredded coconut into the crumble mixture.
FAQs about Berry Crumble Bars
Can I use frozen berries?
Absolutely! It’s one of the best things about this recipe. No need to thaw them first, just toss them in the cornstarch mixture and carry on. They might need an extra 5 minutes in the oven.
Why did my filling turn out runny?
You probably didn’t let the bars cool completely. Cornstarch needs time to set up as it cools. Or, you might have been a little shy with the cornstarch. Measure accurately!
How should I store these?
Keep them in an airtight container at room temperature for 2 days, or in the fridge for up to 5 days. They also freeze beautifully for up to 3 months.
Can I double this recipe?
You bet! Double all the ingredients and press it into a 9×13 inch pan. You might need to add a few extra minutes to the baking time—just keep an eye on that golden-brown top.
Can I use quick oats?
IMO, it’s not ideal. Quick oats are cut smaller and absorb more liquid, which can make the texture a bit mushy. Rolled oats give you that perfect chewy-crunchy contrast.
Related Recipes
Final Thoughts about Berry Crumble Bars
And there you have it. A dessert that requires minimal effort but delivers maximum “oohs” and “aahs.” These bars are perfect for potlucks, picnics, or just eating straight out of the pan while hiding from your responsibilities in the pantry (no one’s judging).
Now go forth and bake. You’ve got this. And then you’ve got dessert.
Printable Recipe Card
Want just the essential recipe details without scrolling through the article? Get our printable recipe card with just the ingredients and instructions.

