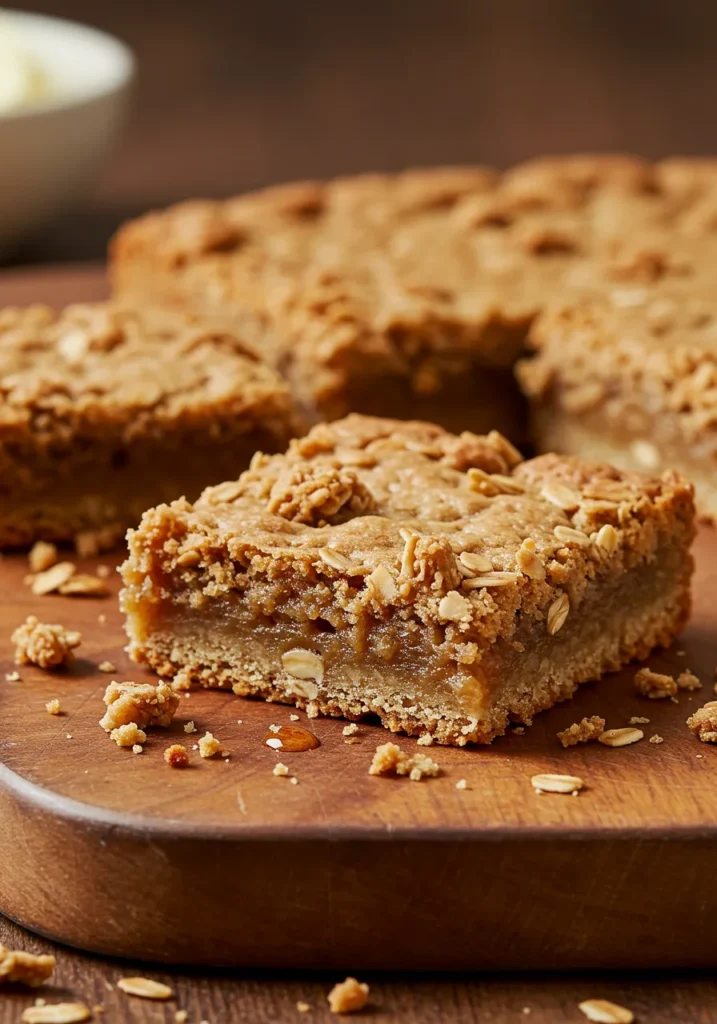
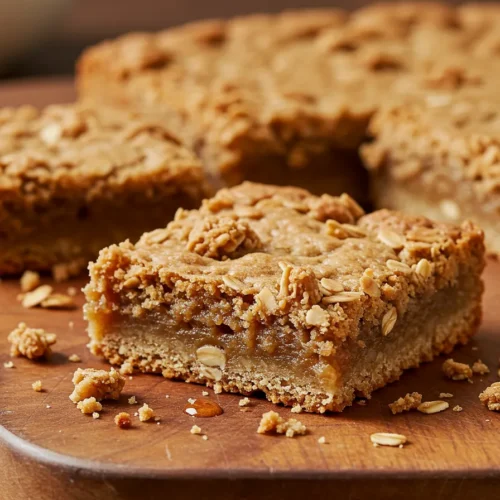
Alright, let me guess — you’re craving something sweet, chewy, crunchy, and ridiculously easy to whip up, right? Oh, and let’s not forget: something that might pass for breakfast (because hey, oats = health… kind of?). Well, buckle up, because these Chocolate Chip Peanut Butter Granola Cookie Bars check all those boxes — and then some.
I’ve made these bars more times than I care to admit, and every time, someone asks: “Where did you buy these?” 😂 Nope. Made ‘em right here, in my cozy little kitchen. So, want the secret? Thought so.
Let’s get to it.
Why You’ll Fall in Love With These Bars
First off, let me set the stage.
These bars are:
- Chewy and gooey in the center but with that perfect crispy edge.
- Packed with protein and fiber, thanks to peanut butter and oats — so you can totally pretend they’re good for you.
- Sweet, salty, and just a little nutty (kind of like me, IMO).
- Stupidly easy to make. Like, you-don’t-even-need-a-mixer easy.
Ever wondered why peanut butter and chocolate are basically soulmates? Yeah, these bars are proof of that magical union.
So if you’re tired of store-bought granola bars that taste like sawdust (you know it’s true), you need this recipe in your life.
Ingredients You’ll Need for Peanut Butter Granola Cookie Bars
Here’s your shopping list — and don’t worry, you probably already have most of this stuff sitting in your pantry.
Dry Ingredients
- 2 cups old-fashioned oats (none of that quick-oats nonsense, okay?)
- 1 cup all-purpose flour
- ½ teaspoon baking soda
- ¼ teaspoon salt
- ½ cup brown sugar (light or dark — your call)
Wet Ingredients
- ½ cup unsalted butter, melted
- ½ cup creamy peanut butter (don’t even think about using the natural kind here — you want the good, sticky stuff)
- ¼ cup honey (or maple syrup if you’re feeling fancy)
- 1 large egg
- 2 teaspoons vanilla extract
Mix-Ins
- 1 cup chocolate chips (I use semi-sweet, but you do you)
- Optional: ½ cup chopped nuts or shredded coconut if you’re into that kind of thing
FYI: If you’re feeling rebellious, you can even throw in some dried cranberries or pretzel bits. Not traditional, but hey — live a little.
Step-By-Step Instructions
Ready to rock? Here’s the game plan.
Step 1: Preheat & Prep
Preheat your oven to 350°F (175°C). Line an 8×8-inch baking pan with parchment paper and lightly spray it with cooking spray. Why parchment? Because scraping cookie bars out of the pan like some sort of caveman is NOT the vibe.
Step 2: Dry Ingredients Party
In a medium bowl, whisk together the oats, flour, baking soda, salt, and brown sugar. Looks boring now, but trust me — this is where the magic starts.
Step 3: Wet Ingredients Party
In another bowl, stir together the melted butter, peanut butter, honey, egg, and vanilla until it’s smooth and creamy. Don’t taste it yet — or do, but then you might “accidentally” eat half of it before it hits the pan.
Step 4: Combine & Conquer
Dump the wet ingredients into the dry ingredients and mix until just combined. No need to overthink it. Fold in those glorious chocolate chips and any optional add-ins here.
Step 5: Bake it Up
Press the dough evenly into your prepared pan. Bake for about 20–25 minutes, or until the edges are golden and the center looks just set.
Pro tip: Don’t wait for it to look fully baked in the center — it’ll firm up as it cools. Unless, of course, you enjoy eating cookie gravel.
Step 6: Cool & Slice
Let the bars cool completely in the pan before lifting them out and slicing. Or, if you have zero patience (same), at least wait 10 minutes so you don’t burn your mouth.
Tips & Tricks for the Best Bars
Ever made bars that fell apart like a bad relationship? Been there. Here are a few tips to keep yours intact (both the bars and the relationship — no promises on the latter).
- Use old-fashioned oats — they give that hearty texture. Quick oats = mush.
- Don’t overbake. Seriously. Take them out when they still look a little underdone in the center.
- Let them cool. I know it’s hard, but warm bars are super soft and fall apart.
- Line your pan. Unless you enjoy chiseling them out like a DIY archaeologist.
Why Make These Instead of Buying Store-Bought?
Oh, you mean besides the fact that homemade tastes like happiness while store-bought tastes like cardboard? 😏
Here’s the rundown:
- Freshness — No preservatives here, just gooey, chewy goodness.
- Customizable — You control what goes in. Hate coconut? Skip it. Love extra chocolate? Add it.
- Cheaper — Have you seen the price of “artisan” cookie bars lately? LOL.
- Bragging Rights — “Oh, these? Yeah, I made them.” Enough said.
Fun Variations to Try
Feeling adventurous? Here are a few ways to remix your bars.
Swap the Nut Butter
- Almond butter for a milder flavor.
- Cashew butter for ultra-creamy vibes.
Change the Chocolate
- White chocolate chips (if you’re feeling fancy)
- Dark chocolate chunks (for that sophisticated look)
Go Fruit & Nut
- Add dried cranberries, raisins, or chopped dates.
- Toss in chopped pecans, walnuts, or pistachios.
Basically, if it sounds good to you, throw it in there. Worst case? You’ve got a weird but still edible experiment.
Storage & Freezing Tips
So you didn’t eat the entire pan in one sitting? Impressive. Here’s how to keep your bars fresh:
- Room Temp: Store in an airtight container for up to 4 days.
- Fridge: Keep them chilled for up to a week if you like a firmer texture.
- Freezer: Wrap tightly and freeze for up to 3 months. Just thaw at room temp before eating.
Personal Anecdote: Why These Are My Go-To
Confession: I made these bars for the first time when I forgot my friend’s birthday. (Don’t judge — life happens.) I needed something quick but impressive, and these saved my butt.
When she took a bite, she legit said: “You should sell these.” Um, no thanks, but I will make another batch for myself.
Now, they’re my go-to for potlucks, late-night cravings, and, occasionally, breakfast — because oats, remember?
FAQS about Peanut Butter Granola Cookie Bars
Can I make these gluten-free?
Absolutely. Just swap the flour for a 1:1 gluten-free blend and make sure your oats are certified gluten-free.
Can I use natural peanut butter?
You can, but the texture won’t be as chewy since natural PB is oilier and less stable. If you must, stir it really well before using.
Do they need to be refrigerated?
Not unless you want them firmer or plan to keep them for more than a few days.
Related Recipes
Final Thoughts about Peanut Butter Granola Cookie Bars
So there you have it — my tried-and-true, crowd-pleasing Chocolate Chip Peanut Butter Granola Cookie Bars recipe. They’re chewy, chocolatey, peanut-buttery perfection — and way better than anything wrapped in plastic from the store.
Honestly, why wouldn’t you make these? They’re easy, customizable, and give you an excuse to eat dessert for breakfast. FYI: I won’t tell if you don’t. 😉
So, what are you waiting for? Grab your mixing bowl, crank up your favorite playlist, and make a batch today. Oh, and if someone asks where you bought them? Just smile mysteriously and say: “Oh, these? Just a little something I whipped up.”
You got this.
If you try the recipe, let me know how it turns out — or what wacky add-ins you came up with. Because let’s be honest: the only thing better than eating these bars… is humble-bragging about them.
Happy baking! 🍪
Peanut Butter Granola Cookie Bars Recipe
Ingredients
- 1 cup creamy peanut butter
- ½ cup honey or maple syrup
- ¼ cup brown sugar
- 2 cups old-fashioned oats
- 1 cup granola
- 1 tsp vanilla extract
- ½ tsp baking soda
- ¼ tsp salt
- ½ cup mini chocolate chips
Instructions
- Preheat oven to 350°F (175°C) and line a baking pan with parchment paper.
- In a bowl, mix peanut butter, honey, and brown sugar until smooth.
- Stir in vanilla, oats, granola, baking soda, and salt until combined.
- Fold in chocolate chips.
- Press mixture evenly into prepared pan.
- Bake for 18–20 minutes until golden around edges.
- Cool completely before slicing into bars.
Notes
- Use crunchy peanut butter for extra texture.
- Swap chocolate chips with dried fruit for a healthier twist.
- Store in an airtight container for up to 5 days.
DID YOU MAKE THIS EASY RECIPE?
If you have, then share it with us by sending a photo. We’re excited to see what you’ve made 🙂Printable Recipe Card
Want just the essential recipe details without scrolling through the article? Get our printable recipe card with just the ingredients and instructions.