So, you’re staring into the abyss of your pantry, craving something decadent but your inner couch potato is screaming, “NO BAKING!” I feel you. Deeply. The thought of preheating an oven feels like a monumental task fit for a superhero, and honestly, my cape is at the dry cleaner’s. What if I told you that the most epic, crowd-pleasing, soul-soothing dessert of your life involves exactly zero baking and about 15 minutes of effort? Stop rolling your eyes; I’m serious. Let’s make some magic happen.
Why This Recipe is Absolutely Awesome
Let’s cut to the chase. This recipe is the culinary equivalent of finding a $20 bill in your jeans pocket—pure, unadulterated joy with zero effort. It’s idiot-proof. I once tried to mess it up by accidentally using the cat’s spatula (don’t ask), and it still turned out phenomenal. These bars are the ultimate fusion of crunchy, creamy, chocolatey, and peanut-buttery perfection. They require no heat, no fancy equipment, and absolutely no patience (well, except for the chilling part, but we’ll power through that together). They’re the dessert you’ll proudly bring to a party and secretly pretend you slaved over for hours.
Ingredients You’ll Need
Gather your squad. This is the easiest grocery list of your life. Most of this stuff is probably already lurking in your kitchen, just waiting for a purpose.
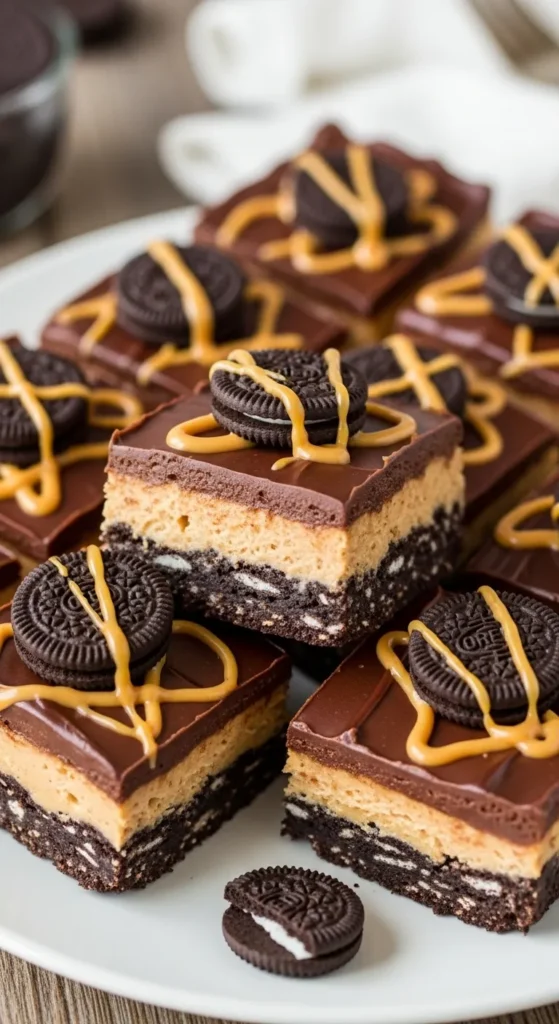
- Oreos: One standard package. Don’t you dare remove the cream filling. That’s the good stuff.
- Cream Cheese: 8 ounces, softened. Full-fat, please. This is not the time for austerity measures. Let it sit on the counter for a bit so it doesn’t put up a fight when you try to mix it.
- Creamy Peanut Butter: 1 cup. I’m a Jif or Skippy gal for this—the kind that’s already sweetened and smooth. Natural peanut butter can sometimes be a diva and not set as well.
- Powdered Sugar: 1 cup. Also known as confectioner’s sugar or “10x sugar” if you want to sound fancy. It’s for the filling, so no gritty sugar textures here.
- Unsalted Butter: ½ cup (1 stick), melted. This is the glue that holds our Oreo crust together.
- Semi-Sweet Chocolate Chips: 1 ½ cups. For that glorious, shiny layer on top.
- A splash of vanilla extract: Because why not? It makes everything better.
Step-by-Step Instructions
- Pulverize the Oreos. Dump the entire package of Oreos (yes, all of them!) into a food processor and blast them into fine, black-and-white-sprinkled crumbs. No food processor? No problem! Throw them in a heavy-duty zip-top bag and channel your inner Hulk. A rolling pin, wine bottle, or even a can of beans works great for crushing. Get out any lingering frustrations. It’s therapeutic.
- Create the Crust. Dump your beautiful Oreo crumbs into a bowl. Pour the melted butter over them and mix until it looks like wet sand and every crumb is coated. Press this mixture firmly into the bottom of a 9×9 inch pan lined with parchment paper (this is your getaway car for clean slices later). Use the bottom of a measuring cup to really pack it down. Get it tight!
- Whip Up the Filling. In another bowl, beat the softened cream cheese and peanut butter together until it’s smooth and no longer looks like a weird science experiment. Add the powdered sugar and vanilla extract and mix until it’s all combined and gloriously creamy. Taste it. You know you want to.
- Assemble the Layers. Plop the entire peanut butter mixture onto your Oreo crust and spread it out into a smooth, even layer. An offset spatula is magic here, but a butter knife or the back of a spoon works just fine.
- Make the Magic Shell. Now, melt your chocolate chips. You can do this in a microwave in 30-second bursts, stirring in between, or use a double boiler if you’re feeling fancy. Once it’s melted and smooth, pour it over the peanut butter layer and spread it gently to cover every last inch.
- The Hardest Part: Wait. I know, I know. But you HAVE to pop this pan into the refrigerator for at least 4 hours, or ideally, overnight. This is non-negotiable. It’s what transforms this gooey mess into firm, sliceable bars of heaven.
- Slice and Devour. Once it’s completely set, use the parchment paper to lift the whole slab out of the pan. Slice it into squares with a sharp knife (wiping it clean between cuts for pretty edges). Prepare for the compliments to roll in.
Common Mistakes to Avoid
- Not Crushing the Oreos Enough: Big chunks = a crumbly crust that falls apart. You want fine, even crumbs for a solid base.
- Using Cold Cream Cheese: If your cream cheese is straight from the fridge, you’re in for a lumpy, frustrating battle. Let it get soft. Trust me.
- Skipping the Chill Time: Impatience leads to soup. You’ll try to cut it, it’ll be a gooey mess, and you’ll have to eat it with a spoon (which, honestly, isn’t the worst fate, but bars are neater).
- Not Lining the Pan: You think you can just spray the pan and it’ll pop right out? Oh, you sweet summer child. Use parchment paper. Thank me later.
Alternatives & Substitutions
Allergic to peanuts or just not a fan? No worries!
- Peanut Butter: Swap it out for any other nut or seed butter. Almond butter, cashew butter, or even sunflower seed butter would be delicious.
- Oreos: Use gluten-free chocolate sandwich cookies to make this GF-friendly.
- Chocolate Topping: Use milk chocolate or dark chocolate chips based on your preference. You could even add a teaspoon of coconut oil to the chocolate as it melts to make it extra shiny and easy to spread.
- Add-Ins: Feel free to get wild! Mix some crushed pretzels into the crust for salty crunch, or sprinkle some sea salt on top of the chocolate layer before it sets.
FAQ
Can I use natural peanut butter?
You can, but it might be a bit oilier and not set quite as firmly. The stabilizers in conventional peanut butter really help the filling layer hold its shape. If you use natural, make sure it’s well-stirred!
How long do these bars last?
In an airtight container in the fridge, they are perfect for up to a week. If they last that long. They also freeze amazingly well for up to 3 months. Just thaw in the fridge overnight.
My chocolate layer cracked when I cut it. What did I do wrong?
You probably let the chocolate get too cold and hard. Let the whole pan sit on the counter for 5-10 minutes before slicing. And use a sharp, warm knife (run it under hot water and dry it off).
Can I use margarine instead of butter?
Well, technically yes, but why hurt your soul like that? Butter provides a far superior flavor and setting quality for the crust.
I don’t have a 9×9 pan. What can I use?
A 9×13 pan will work, but your bars will be thinner! You might want to reduce the chill time by an hour or so.
Related Recipes:
Final Thoughts
No-Bake Peanut Butter Oreo Bars are sinfully easy and ridiculously delicious—the kind of treat that hits all the right notes: sweet, salty, crunchy, and creamy. With layers of crushed Oreos, smooth peanut butter, and a decadent chocolate topping, they’re a no-bake dream come true.
Perfect for parties, potlucks, or whenever you need a quick dessert fix without turning on the oven, these bars are guaranteed crowd-pleasers.
Minimal effort, maximum flavor—these bars are dangerously addictive and impossible to resist.
Tip: Chill thoroughly before slicing for clean layers, and store in the fridge for the perfect fudgy texture.
Printable Recipe Card
Want just the essential recipe details without scrolling through the article? Get our printable recipe card with just the ingredients and instructions.

