So you’re craving cheesecake but also way too lazy to deal with water baths, oven timers, or that one friend who insists, “real cheesecake has to bake.” Nope. Not today. We’re skipping the oven, saving our sanity, and making no-bake mini cheesecakes—the cuter, faster, and honestly smarter cousin of the traditional cheesecake.
Think creamy filling, buttery crust, and endless topping options… all without turning your kitchen into a sauna. These little guys are perfect for parties, midnight snacking, or when you just want dessert that looks like you tried way harder than you actually did.
Why This Recipe is Awesome
- Zero oven drama. Seriously, no cracks, no water baths, no stress.
- Mini size = automatic portion control. (Unless you eat six… in which case, portion control failed, but happiness achieved.)
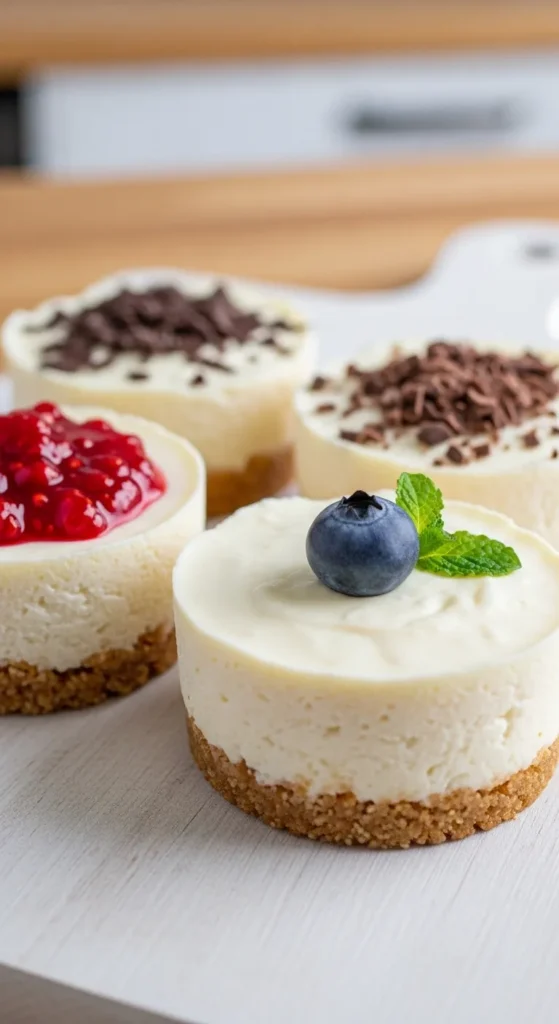
- They’re customizable. Top with fruit, chocolate, caramel, or go rogue with crushed Oreos.
- Perfect for beginners. It’s basically just mix, scoop, chill, and eat. If you can stir, you can nail this recipe.
- They look fancy. Put them in cute little liners and suddenly you’re a dessert influencer.
Ingredients You’ll Need
For the crust:
- 1 ½ cups graham cracker crumbs (or digestive biscuits if you’re feeling classy)
- 6 tablespoons unsalted butter, melted (aka the glue that holds it all together)
- 2 tablespoons sugar (because even the crust deserves a little sweetness)
For the filling:
- 16 oz cream cheese, softened (don’t even think about using low-fat—it won’t be the same)
- ½ cup powdered sugar (smooth, no grainy vibes here)
- 1 teaspoon vanilla extract (the secret to making things taste “bakery-made”)
- 1 cup heavy whipping cream, whipped to soft peaks (yes, you need the good stuff)
Optional toppings:
- Fresh berries (strawberries, blueberries, raspberries—pick your vibe)
- Chocolate ganache (fancy word for melted chocolate + cream)
- Caramel drizzle (for the sweet tooths who don’t hold back)
- Cookie crumbs, nuts, or literally whatever makes you happy
Step-by-Step Instructions
- Make the crust. Mix graham cracker crumbs, melted butter, and sugar in a bowl until it looks like sandy wet beach vibes. Scoop about a tablespoon into each cupcake liner, then press it down firmly with the back of a spoon. Chill in the fridge while you work on the filling.
- Whip the cream. In a cold mixing bowl, whip the heavy cream until soft peaks form. Translation: it holds shape but still looks a little fluffy. Set aside.
- Mix the cream cheese base. In another bowl, beat the softened cream cheese, powdered sugar, and vanilla until smooth and dreamy. No lumps allowed.
- Fold it all together. Gently fold the whipped cream into the cream cheese mixture. Don’t stir like a maniac—fold like you’re being gentle with a sleeping baby. This is how you keep the filling light and fluffy.
- Fill the liners. Spoon or pipe the filling onto your chilled crusts. Smooth the tops with a spoon if you’re fancy, or leave them rustic if you’re lazy.
- Chill. Pop them in the fridge for at least 2 hours (overnight if you’re patient—unlike me).
- Top & serve. Add your toppings of choice right before serving, then watch people think you slaved over them for hours.
Common Mistakes to Avoid
- Skipping the chill time. I get it, you’re excited. But if you don’t chill them, you’ll just have cheesecake pudding cups. Not bad, but not the goal.
- Using cold cream cheese. Unless you enjoy lumps, let it soften first. Patience = smooth cheesecake.
- Overmixing the filling. Too much mixing = sad, deflated filling. Fold, don’t attack.
- Forgetting cupcake liners. Unless you like scraping cheesecake off the pan like an archaeologist, use liners.
Alternatives & Substitutions
- Crust swaps: Use Oreos, gingersnaps, or Biscoff cookies instead of graham crackers. Bonus points if you go Oreo-on-Oreo.
- Dairy-free version: Use vegan cream cheese and coconut whipped cream. Still delicious, still creamy.
- Flavored fillings: Mix in some lemon zest, melted chocolate, or peanut butter for extra flair.
- Sugar swaps: Use honey, maple syrup, or your fave sugar substitute if you’re avoiding refined sugar.
- Boozy upgrade: Add a splash of Bailey’s, Kahlua, or Grand Marnier. Grown-up cheesecake = next-level dessert.
FAQ (Frequently Asked Questions)
Q: Can I make these ahead of time?
A: Yes, and you should. They hold up beautifully for up to 3 days in the fridge. Just don’t add toppings until right before serving.
Q: Do I need a mixer?
A: It definitely helps, but you can whisk by hand if you’re feeling strong (and possibly masochistic).
Q: Can I freeze them?
A: Absolutely. Wrap them tightly, freeze, and thaw in the fridge before serving. Ice cream–cheesecake hybrid? Yes please.
Q: Do I have to use graham crackers?
A: Nope. Oreos, shortbread, or even pretzels (sweet-salty magic) all work.
Q: Why isn’t my filling setting?
A: Probably because you rushed the chill time or didn’t whip the cream enough. Remember: fridge time = firmness.
Q: Can I make these in one big pan instead of minis?
A: Yes, but it won’t be as cute. Just use an 8×8 pan, press the crust down, spread filling, and chill. Slice into bars.
Q: Can I skip the crust?
A: Technically yes, but then you’re just eating cheesecake fluff. Not a tragedy, but why cheat yourself out of buttery crust bliss?
Related Recipes:
- Classic Pumpkin Chocolate Chip Cookies Recipe
- Easy Blueberry Cheesecake Cookies Recipe
- Brown Butter Chocolate Chip Cookies Recipe
- 3-Ingredient Banana Brownies Recipe
Final Thoughts
And that’s it—no-bake mini cheesecakes that are as easy as they are impressive. Creamy, rich, customizable, and ready to make you look like you know what you’re doing in the kitchen (even if you don’t).
So grab your cream cheese, whip that filling, and chill your way to cheesecake glory. Share them at a party, serve them at dinner, or just hoard them in the fridge for solo snacking. No judgment here.
Now go impress someone—or yourself—with your new mini cheesecake skills. You’ve earned it.
Want me to also put together an SEO-friendly meta title and meta description for this cheesecake article so it’s blog-ready?
Printable Recipe Card
Want just the essential recipe details without scrolling through the article? Get our printable recipe card with just the ingredients and instructions.

