Okay, so you’re craving something decadently creamy, peanut-buttery, and so easy you could make it with one hand tied behind your back? Say hello to this No-Bake Peanut Butter Pie—your new obsession that requires zero oven time and maximum chill vibes. It’s like a peanut butter cup and a cloud had a delicious baby, and you’re about to be its proud parent. Ready to whip up a dessert that’ll have everyone begging for seconds? Let’s do this!
Why This Recipe is Awesome
This pie is the ultimate cheat code for impressing your friends, family, or just your own taste buds. It’s no-bake, which means you don’t have to wrestle with an oven or pray your crust doesn’t burn. The creamy peanut butter filling is so rich it feels illegal, and the whole thing comes together faster than you can binge an episode of your favorite show. Plus, it’s versatile—serve it at a party, sneak a slice at midnight, or eat it straight from the pan (no judgment here).
What makes this recipe a total rockstar? It’s idiot-proof—even if your kitchen skills are limited to microwaving popcorn, you’ve got this. The crust is a simple mix of crumbs and butter, the filling is a dreamy blend of peanut butter and cream, and you can top it with whatever makes your heart sing. It’s the kind of dessert that looks fancy but laughs at complicated recipes. And let’s be real: anything with peanut butter is basically a love letter to your soul.
Ingredients You’ll Need
Here’s the lineup for this peanut butter party. Nothing fancy, just pantry staples with a side of sass:
-
For the Crust:
- 1 ½ cups graham cracker crumbs: Because a good pie needs a crunchy foundation.
- ⅓ cup granulated sugar: Sweetens the deal without stealing the show.
- 6 tbsp unsalted butter (melted): The glue that holds your crust dreams together.
-
For the Filling:
- 1 cup creamy peanut butter: Go for the smooth stuff—crunchy’s great for toast, not pie.
- 8 oz cream cheese (softened): Makes it rich and velvety, like a dessert hug.
- 1 cup powdered sugar: For that perfect sweetness without grit.
- 1 tsp vanilla extract: Because vanilla makes everything secretly better.
- 1 ½ cups heavy whipping cream: The key to that cloud-like fluffiness.
-
For the Topping (Optional but Highly Recommended):
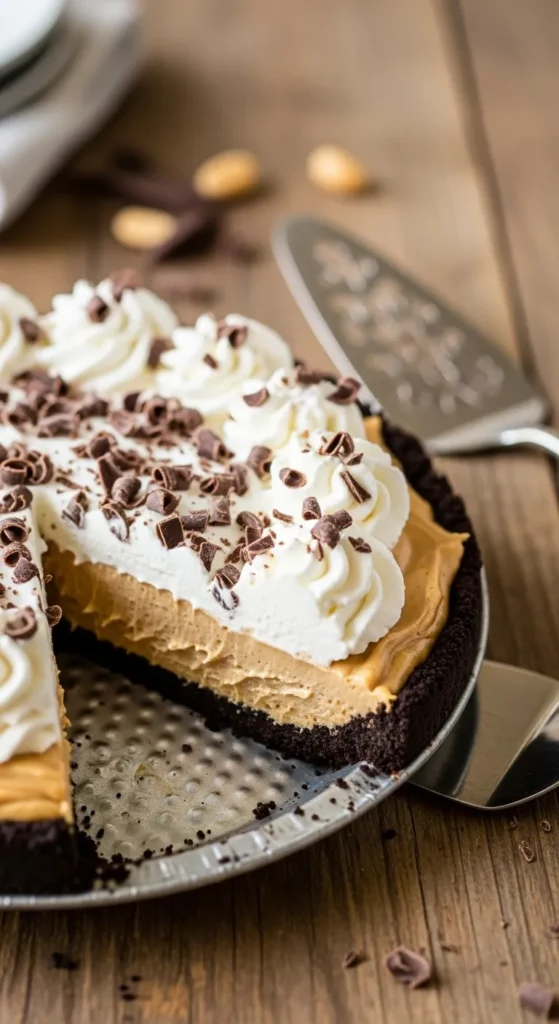
- ½ cup chocolate chips (melted): For drizzling, because chocolate and peanut butter are soulmates.
- ¼ cup chopped peanuts: For a little crunch and extra peanut swagger.
- Whipped cream: Store-bought or homemade, because more cream is always a yes.
- Mini peanut butter cups: For that “I’m extra” vibe.
Pro Tip: Use room-temperature cream cheese to avoid a lumpy filling. Nobody wants a bumpy pie.
Step-by-Step Instructions
Ready to make this masterpiece? Follow these steps, keep it chill, and trust the process. This pie’s so easy, you’ll be done before you know it.
- Make the crust. Mix graham cracker crumbs, sugar, and melted butter in a bowl until it looks like wet sand. Press it evenly into a 9-inch pie pan—bottom and sides. Pop it in the fridge to chill for 15 minutes while you work on the filling.
- Beat the peanut butter and cream cheese. In a large bowl, use a hand mixer to blend peanut butter and softened cream cheese until smooth. This takes about a minute—don’t rush it, let them get cozy.
- Add sugar and vanilla. Mix in powdered sugar and vanilla extract until everything’s silky. Scrape down the bowl to make sure no sugar hides in the corners.
- Whip the cream. In a separate bowl, whip the heavy cream until stiff peaks form. This is your arm workout for the day—think fluffy clouds, not liquid soup.
- Fold it together. Gently fold the whipped cream into the peanut butter mixture. Use a spatula and go slow to keep it airy. Spread this dreamy filling into your chilled crust, smoothing the top like you’re an artist.
- Chill the pie. Cover the pie and refrigerate for at least 4 hours, or overnight if you’ve got the patience. This lets the flavors meld and the pie set into sliceable perfection.
- Add toppings (optional). Melt chocolate chips and drizzle over the pie. Sprinkle with chopped peanuts or mini peanut butter cups. Add dollops of whipped cream if you’re feeling fancy.
- Slice and serve. Cut into wedges and serve cold. Watch everyone’s eyes light up as they take their first bite.
Key Tip: Don’t skip the chilling step—it’s what makes the pie hold together like a champ.
Common Mistakes to Avoid
This recipe is pretty forgiving, but let’s not tempt fate. Here are some goofs to steer clear of, with a side of snark:
- Using cold cream cheese: Lumpy filling is not a vibe. Let it sit out for 30 minutes before you start.
- Overmixing the whipped cream: Fold gently, or you’ll deflate your fluffy dreams into a dense mess.
- Skimping on chill time: Cutting into a warm pie is like trying to slice soup. Give it at least 4 hours in the fridge.
- Pressing the crust too loosely: Pack it down firmly, or it’ll crumble like your resolve at a buffet.
- Using natural peanut butter: The oily stuff doesn’t play nice here. Stick with the classic, processed kind (sorry, health nuts).
Alternatives & Substitutions
Ran out of something or want to switch it up? No stress—here’s how to keep the pie party going:
- No graham crackers? Use Oreos or vanilla wafers: Oreos make it extra indulgent, but crush ‘em well.
- Swap peanut butter for almond butter: It’s a nutty twist, but make sure it’s creamy. IMO, peanut butter still reigns supreme.
- Dairy-free? Use coconut cream instead of heavy cream: Chill a can, scoop the solid part, and whip it. Swap cream cheese for a vegan version.
- Gluten-free crust? Try gluten-free graham crackers: They work just as well, and no one will notice.
- No chocolate chips? Drizzle with caramel: It’s a whole new flavor adventure, and it’s divine.
- Low sugar? Cut the powdered sugar to ¾ cup: It’ll still be sweet enough to satisfy.
Pro Tip: If you’re using a cookie crust like Oreos, skip the extra sugar—it’s sweet enough already.
FAQ (Frequently Asked Questions)
Can I use crunchy peanut butter?
You could, but it’ll mess with the creamy texture. Stick to smooth for that melt-in-your-mouth magic. Save crunchy for your sandwiches.
How long does this pie last?
Keep it in the fridge, covered, for up to 5 days. But let’s be real—it’s not gonna last that long once you taste it.
Can I freeze this pie?
Yup! Wrap it tightly in plastic wrap and foil, then freeze for up to 2 months. Thaw in the fridge overnight before serving.
What if I don’t have a pie pan?
Use a springform pan or even a square baking dish. It’ll still taste like heaven, just with a different shape.
Can I skip the whipped cream step?
Sure, use store-bought whipped topping like Cool Whip. It’s a shortcut, but your pie will still be a star.
Is this pie kid-friendly?
Absolutely! Kids go nuts for peanut butter, and there’s nothing spicy or weird here. Just watch for allergies.
Can I make mini pies instead?
Totally! Press the crust into muffin tins, add filling, and chill. You’ll get cute little pies perfect for parties.
Related Recipes;
- No-Bake Mini Cheesecakes
- Easy Chocolate Mousse:
- No-Bake Chocolate Oatmeal Cookies
- Bakery Style Snickerdoodle Cookies
Final Thoughts
And there you have it—a No-Bake Peanut Butter Pie that’s basically dessert royalty with zero effort. Whether you’re treating yourself after a long day, wowing a crowd, or just sneaking a slice at 2 a.m. (we’ve all been there), this pie delivers big on flavor and chill vibes. So grab your ingredients, channel your inner dessert wizard, and make this creamy dream come true. You’re about to be everyone’s favorite baker—go you!
Printable Recipe Card
Want just the essential recipe details without scrolling through the article? Get our printable recipe card with just the ingredients and instructions.

