Okay, let’s just cut to the chase — you’re here because you want a strawberry cheesecake pie that’ll make everyone at the table say, “Wait… you made this?” 🙂 And guess what? You’re in the right place.
I’ve whipped up this recipe more times than I’d care to admit (because honestly, who needs that many slices of pie in a week?), and every time, it’s a total crowd-pleaser. If you’re nervous about cheesecake being “fussy” — relax. This isn’t your grandma’s marathon cheesecake ordeal. It’s a chill, easy, and ridiculously tasty pie version that even beginners can nail.
So, ready to bake (and humble-brag later)? Let’s go.
Why You’ll Fall in Love With This Strawberry Cheesecake Pie
Ever wondered why some desserts just hit differently? This is one of those.
Here’s what makes it so special:
- No water baths or scary cracks. Unlike traditional cheesecakes, this pie keeps things simple.
- A buttery graham cracker crust. If you don’t love this crust… you’re lying.
- Creamy, rich cheesecake filling. Velvety smooth but not heavy enough to send you into a food coma.
- Juicy, fresh strawberries on top. AKA the crown jewel of this masterpiece.
Basically, it looks fancy, but it’s actually low-maintenance — just how I like my desserts (and my friendships, FYI).
Ingredients You’ll Need for Strawberry Cheesecake Pie
Alright, let’s talk shopping list. If you’ve got cream cheese and strawberries already, you’re halfway there.
For the crust:
- 1 ½ cups graham cracker crumbs
- ¼ cup granulated sugar
- 6 tablespoons melted butter
For the filling:
- 16 oz cream cheese, softened
- ½ cup granulated sugar
- 1 teaspoon vanilla extract
- 2 large eggs
For the topping:
- About 2 cups fresh strawberries, halved
- ¼ cup apricot jam (or any red jam — I once used raspberry when I ran out and nobody noticed 😎)
- 1–2 teaspoons water (to thin the jam, if needed)
That’s it. No weird, fancy ingredients. No unicorn dust.
How to Make Strawberry Cheesecake Pie Like a Pro
If you can operate an oven and a mixer, you’ve already won half the battle.
Step 1: Prep That Crust
- Preheat your oven to 350°F (175°C).
- Mix the graham cracker crumbs, sugar, and melted butter in a bowl until it looks like damp sand.
- Press that crumbly goodness firmly into a 9-inch pie pan — sides too!
- Bake it for about 8–10 minutes, then let it cool.
Pro tip: Use the bottom of a glass to really press the crust down. Ever tried using your hands? Yeah, don’t. You’ll just end up eating half of it before it hits the oven.
Step 2: Whip Up the Filling
- In a bowl, beat the cream cheese until smooth. (No lumps allowed — seriously, nobody likes a lumpy pie.)
- Add sugar and vanilla; keep beating.
- Add eggs one at a time, mixing just until combined.
- Pour the mixture into the cooled crust.
Step 3: Bake It
- Bake at 350°F for about 35–40 minutes. You’re looking for set edges but a slightly jiggly center — kind of like Jell-O doing its thing.
- Let it cool completely on a wire rack, then chill it in the fridge for at least 3 hours. Overnight is even better if you can resist. (I never can, TBH.)
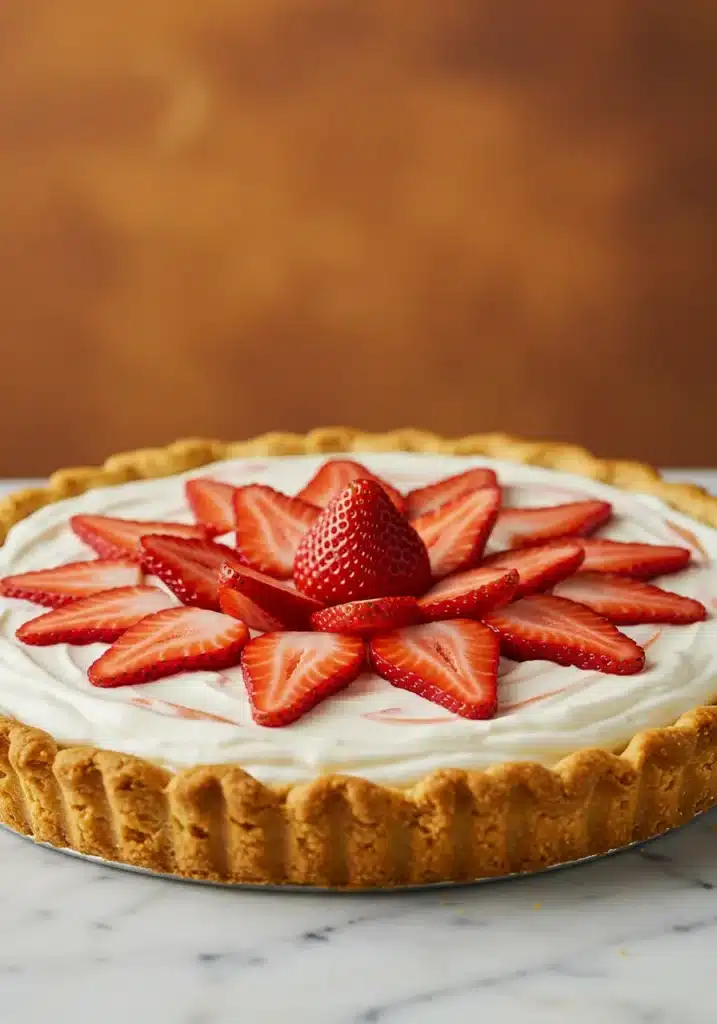
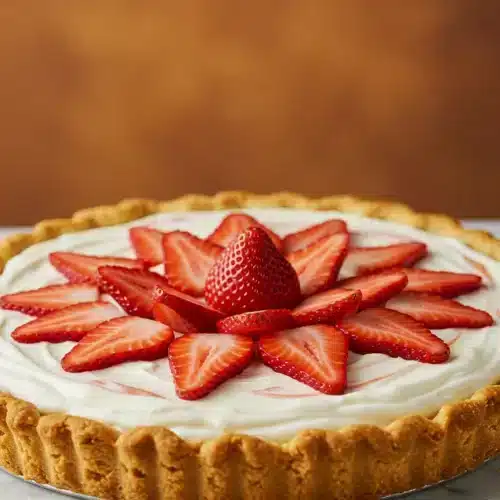
Step 4: Decorate Like a Boss
- Arrange your fresh strawberries on top. You can get artsy or just dump them on — no judgment here.
- Warm the jam with a little water and brush it over the berries for that gorgeous glossy finish.
Boom. Done. Stand back and admire your creation. Maybe even take a photo — because if it’s not on Instagram, did it even happen?
Tips, Tricks, and Little Secrets
Here’s where I spill some tea (and some wisdom) from my own kitchen disasters and triumphs.
Don’t Overmix
Overmixing the batter adds too much air, which can make it crack or puff weirdly. Just mix until smooth.
Room Temperature Ingredients Are Key
Cold cream cheese? Nightmare. Let your cream cheese and eggs sit out until they’re room temp for a smoother filling.
Make Ahead
This pie actually tastes better the next day. The flavors settle, the crust firms up, and you look like you’ve got your life together when you “magically” produce a perfect dessert after dinner. 😉
Can You Make It Without an Oven?
Ah, the million-dollar question. Technically, you can swap the baked filling for a no-bake cheesecake filling (cream cheese + whipped cream + sugar), then chill it. IMO, it’s good… but the baked version has more depth of flavor. Why settle for “good” when you can have “I-need-another-slice-right-now” good?
FAQs About Strawberry Cheesecake Pie
Can I use frozen strawberries?
You can, but fresh strawberries hold their shape and look prettier. If frozen is all you’ve got — go for it. Just thaw and drain them well first.
What if I don’t have graham crackers?
Use digestive biscuits, vanilla wafers, or even crushed Oreos. Honestly, nobody’s gonna complain.
How long does it last?
In the fridge? About 4–5 days, though good luck keeping it around that long. Freezer? Up to 2 months.
Can I make it in advance?
Yep — and you should. This pie is at its best after chilling overnight.
Why This Recipe Wins Every Time
Look, I’ve tried plenty of strawberry cheesecake pies. Some were meh. Some were basically sugar bricks. But this recipe? Always a winner.
Why?
- It’s easy enough for beginners but impressive enough for a dinner party.
- The balance of sweet, tangy, creamy, and fruity is chef’s kiss.
- It’s foolproof. Unless you forget it in the oven. Please don’t do that.
Ever had a dessert that made people fight over the last piece? Yeah, this is that dessert.
How to Serve and Impress (Even More)
Want to level up even further? Here are a few ideas:
- Add a dollop of whipped cream on each slice.
- Sprinkle some crushed pistachios or toasted coconut for extra flair.
- Drizzle with dark chocolate if you’re feeling fancy.
- Pair with a glass of rosé or iced coffee for peak summer vibes.
Pro move: Casually mention it’s “just something you threw together” while secretly basking in the compliments.
Related Recipes
- Cookies and Cream Cheesecake Bites Recipe
- Blackberry Mini Cheesecakes Recipe
- Cherry Cheesecake Brownies Recipe
Final Thoughts about Strawberry Cheesecake Pie
So there you have it — my foolproof strawberry cheesecake pie recipe, complete with tips, tricks, and just enough sass to keep it interesting.
You don’t need to be a pro baker to pull this off. Heck, you don’t even need to own a springform pan or know what “blind baking” means. If you can follow these simple steps, you’re golden.
One last thing — when someone asks you for the recipe (and trust me, they will), feel free to send them this link and tell them you got it from “a friend who knows her desserts.” 😉
Now go grab those strawberries and get baking. You’re about to make something so good, people will still be talking about it next week. And if they don’t? Well… more pie for you.
Happy baking! 🍓
Strawberry Cheesecake Pie Recipe
Ingredients
- 1 pre-made graham cracker crust
- 8 oz cream cheese softened
- 1 cup powdered sugar
- 1 tsp vanilla extract
- 1 cup heavy whipping cream
- 2 cups fresh strawberries sliced
- ½ cup strawberry glaze
Instructions
- Beat cream cheese, powdered sugar, and vanilla until smooth.
- Whip heavy cream until stiff peaks form; fold into cream cheese mixture.
- Spread filling evenly into crust.
- Arrange sliced strawberries on top.
- Drizzle with strawberry glaze.
- Chill for at least 2 hours before serving.
Notes
• Use fresh strawberries for best taste and texture.
• Can be made a day ahead for parties. • For extra flavor, add lemon zest to the filling.
• Use fresh strawberries for best taste and texture.
• Can be made a day ahead for parties.
Printable Recipe Card
Want just the essential recipe details without scrolling through the article? Get our printable recipe card with just the ingredients and instructions.

